
Enforce Okta Device Trust for Exchange ActiveSync on OMM-managed iOS devices
This is an Early Access feature. To enable it, please contact Okta Support.
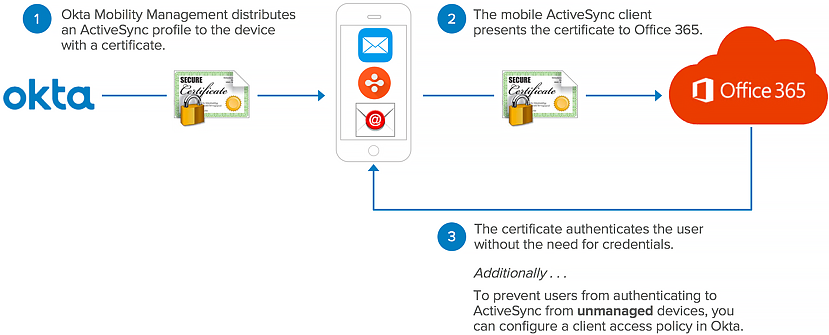
This Okta Device Trust solution for Microsoft Office 365 EAS on OMM managed iOS devices allows you to do the following:
- Configure the iOS mail app to use certificates instead of passwords to allow OMM-enrolled users to authenticate to Microsoft Office 365 Exchange ActiveSync.
- Configure iOS mail app client access policy to prevent users with unmanaged devices from accessing Microsoft Office 365 Exchange ActiveSync.
This Device Trust solution provides these key benefits:
- Allows end users to seamlessly SSO in to their native iOS mail app (EAS) from OMM-enrolled iOS devices
- Enhances Office 365 Exchange ActiveSync security through enforcement of certificate-based authentication instead of password authentication
-
Prevents users with unmanaged iOS devices from accessing Office365
- Helps prevent users from becoming locked-out of their account due to Active Directory (AD) password resets
Prerequisites
- An Office 365 tenant federated to an Okta org with at least one license for Exchange Online
- A Windows computer to run PowerShell commands
- Azure PowerShell 5.0 (64-bit)
- An iOS 9 (or higher) device
Procedures
This procedure has four main steps:
Step 1. Enable Exchange ActiveSync certificate-based authentication in Okta
- Do not click Save at the end of Step 1. You will save changes in Step 3: Distribute certificates for EAS to OMM-enrolled devices.
- If you have set up multiple Office 365 app instances in your org, note that Okta generates a different Okta CA certificate for each Office 365 app instance/domain. This means that you must upload a separate root certificate for each Office 365 app instance/domain that you want to configure with certificate based authentication.
- In the Admin Console, go to .
- Click the Office 365 app.
- Click the Mobile tab.
- Scroll down to Exchange ActiveSync Settings, and then click Edit.

- Select Enable Exchange ActiveSync.
- Enter a Profile name.
- Select Enable certificate-based authentication for iOS.
- Click Download root certificate.
- For use later in this procedure, copy and paste the Certificate Revocation List URL and the Delta Certificate Revocation List URL into a text editor.

Do not click Save yet. You'll save these settings in Step 3: Distribute certificates for EAS to OMM-enrolled devices after you complete the PowerShell actions detailed in Step 2: Enable Exchange ActiveSync certificate-based authentication in Office 365. If you save now and then encounter a problem when enabling Exchange ActiveSync Cert Based Authentication in Office 365, your users may not be able to access their mail app.


Tell your end users how the above configuration may affect their device and mail account. See Known issues.
Step 2. Enable Exchange ActiveSync certificate-based authentication in Office 365
From a Windows command line, do the following:
- Launch Azure PowerShell 5.0 (64-bit) as an Administrator.
An error message appears if you try to use the x86 (32-bit) version of PowerShell.
-
Issue the following command to install the AzureAD module for PowerShell:
Install-Module -Name AzureAD –RequiredVersion 2.0.0.33
- If the message "NuGet provider is required to continue" appears, click Yes to install and import NuGet provider.
- If the message "Untrusted repository" appears, click Yes to All to install the required modules.
- In PowerShell, issue the following command to connect to your Azure AD tenant and authenticate to Office 365:
Connect-AzureAD
-
Enter your Office 365 credentials in the Azure Active Directory sign-in screen.
- To create the necessary PowerShell variables, issue the following commands in PowerShell:
$cert=Get-Content -Encoding byte "LOCATION OF YOUR CER FILE\filename.cer"
Make sure to replace LOCATION OF YOUR CER FILE\filename.cer with the path and filename of your *.cer file.
$new_ca=New-Object -TypeName Microsoft.Open.AzureAD.Model.CertificateAuthorityInformation
$new_ca.AuthorityType=0
$new_ca.TrustedCertificate=$cert
- To enable certificate revocation in Office 365, issue the following commands, making sure to paste the revocation URLs that you saved earlier:
$new_ca.crlDistributionPoint = "CERTIFICATE REVOCATION LIST URL"
Replace CERTIFICATE REVOCATION LIST URL with the Certificate Revocation list URL that you saved earlier.
$new_ca.deltaCrlDistributionPoint = "DELTA CERTIFICATE REVOCATION LIST URL"
Replace DELTA CERTIFICATE REVOCATION LIST URL with the Delta Certificate Revocation list URL that you saved earlier.
- To add the appropriate certificate authority in Office 365, issue the following command:
New-AzureADTrustedCertificateAuthority -CertificateAuthorityInformation $new_ca
- To confirm that the certificate authority was added to Office 365, issue the following command:
Get-AzureADTrustedCertificateAuthority

- Optional. Issue the following commands to help troubleshoot your configuration, if necessary:
If you want to add the existing Certificate Authorities to a variable:
$c=Get-AzureADTrustedCertificateAuthority
If you want to remove a Certificate Authority, issue the following command and choose the correct certificate. Numbering begins at 0 (zero). For example, to remove the first certificate, enter 0 as shown below:
Remove-AzureADTrustedCertificateAuthority -CertificateAuthorityInformation $c[0]

Tell your end users how the above configuration may affect their device and mail account. See Known issues.
Step 3. Distribute certificates for EAS to OMM-enrolled devices
- Make sure to advise your end users to remove any manually-configured EAS profiles that may be installed on their device.
- In the Okta Admin Console, return to the Exchange ActiveSync Settings dialog box and click Save.
- Click Save in the Confirm Exchange ActiveSync changes message.
Step 4. Optional. Prevent unmanaged devices from accessing Office 365 email using the iOS Mail app (EAS)
Only configure Step 4 if your users have been notified to enroll in Okta Mobility Management.
- Configure the Office 365 client access policy:
- In the Admin Console, go to .
- Click the Office 365 app instance
- Click the Sign On tab, scroll down to the Sign On Policy, and click Add Rule.
- Enter a name for the rule and apply it to the appropriate group or users.
- In the Client section, select Mobile (Exchange ActiveSync) and iOS.
- In the Actions section, for When all the conditions above are met, sign on to this application is, select Denied.
- Click Save.
-
Using an OMM-enrolled iOS device, verify the Device Trust configuration:
- Ensure that the OMM-enrolled iOS device is covered by an appropriate Okta mobile policy.
- Launch the native iOS mail app and confirm that email works without the need to authenticate to Office 365.
- Manually create an EAS mail account on the native iOS mail app to confirm that Okta is blocking manually-configured email accounts.
Make sure the other options are not selected.

Known issues
- Continuous password prompt caused by duplicate EAS profiles — iOS 9.3 and iOS 10.2 device users who manually configure the native iOS mail app before enrolling in OMM will have duplicate EAS profiles on their device after OMM enrollment pushes a certificate-based profile to their device automatically. On iOS 9.3 devices, this duplication may cause confusion. On iOS 10.2 devices, in addition to the profile duplication issue, the manually-configured profile doesn't receive email and continuously prompts for a password. To address these issues, we recommend that you advise your users to delete the manually-configured profile from their device. Otherwise, the password prompt appears continuously.
- Currently, this feature supports only the native iOS mail app on iOS devices.
-
Users may be prompted for credentials — If you unassign and then reassign a CBA-configured Office 365 app instance to users or groups, users trying to access the EAS-enabled native iOS mail client are prompted to enter their credentials. Even after entering credentials, users still receive the message "Cannot Get Mail". Users may need to wait up to several hours before they can access email.
- Block access to Outlook for iOS or Android — If you don't want your end users to access Outlook for iOS or Android, you can block access as described in the Microsoft article Enabling Outlook for iOS and Android in Exchange Online. Scroll down to Blocking Outlook for iOS and Android.
-
CRL cache must refresh — When Okta revokes a certificate, or if the trusted root CA certificate is removed from Exchange Online/O365/Azure AD, CBA EAS-enabled devices using the certificate can still access email until the next time Office 365 invalidates the Certificate Revocation List (CRL) cache and refreshes the CRL. When the cache is refreshed, Microsoft denies the device access to email. Microsoft cache expires once every 24 hours, or whenever the device switches to a different Wi-Fi network.
- More than one OS type in the header when using the Outlook mail app — When Okta receives a request from the Outlook Mail app on iOS and Android devices, the header contains both iOS and Android, which prevents Okta from precisely identifying the OS type. To ensure that the client access policy is applied in this case, select the Others option in the Mobile (Exchange ActiveSync) client access policy. For more information, see Configuring Rules for Office 365 Client Access Policies.