Configure the Okta Template App and Okta Plugin Template App
Template apps allow you to create application integrations in real time on a running system.
To create custom apps, choose from these common Secure Web Authentication (SWA) template apps:
- Template App: If the app supports authenticating through a form POST
- Template Plugin App: If the app site has username, password, or submit button fields on the page
- Template App 3 Fields: Similar to Template Plugin App. If an app page has other fields such as Company ID
- Template 2 Page Plugin App: Also similar to the Template Plugin App. If the sign-in flow is spread over two separate pages. This template doesn't support Browser plugin auto-submit
- Template Basic Auth App: If the app supports basic auth
- Template Frame Plugin App: If the app supports iframes
Procedure
-
In the Admin Console, go to .
- Click Browse App Catalog.
- Search for
Template. - From the search results, add the desired type of template app:
Template App
Use the template app if the app supports authenticating through a form POST to the specified URL. It contains the username and password of a user filled in with the named parameters and static fields that you provide.
Enter information in the General Settings page.
- URL: Enter the URL of the login form to which you're submitting the POST (not the URL where you view the form).
- Username parameter and Password parameter fields: Enter the parameter names that contain the username and password data.
-
Optional parameter fields: Enter extra static field data in the name/value pairs.
- From the Chrome browser, log in to the app you want to integrate with.
- Use Chrome developer tools to view the traffic that is being sent to the page.
- Open to the page with the target login form, and switch to the Network tab.
- Select the Preserve log checkbox.
- Clear out the existing traffic and perform your login.
- In the Headers tab, click the POST to the page to see all the data posted and the URL to which it's being sent.
- Application Visibility: Specify whether to display the application icon to users.
- Browser plugin auto-submit: Specify whether to log users in automatically when they land on the login page.
Template Plugin App/Template App 3 Fields/Template 2 Page Plugin App/Template Frame Plugin App
Knowing when to use the Template Plugin or Template Plugin 3 Fields app
If the app has cross-site request forgery XSRF protection, you need to use the Template Plugin App or Template Plugin 3 Fields app. To check, inspect the page to see if the server generated an XSRF token. Also look for fields such as EVENTVALIDATION or FORMVALIDATION which are generated on asp pages. In such cases, the Template Plugin App is required.
When you configure a Template Plugin App or Template Frame Plugin App, you provide CSS selectors to the relevant fields because the plugin is used to populate these fields.
Enter information in the General Settings page.
- Application label: Enter the label that you want to display under the app on the end users' home page.
- Login URL: Enter the URL of the log-in form (the actual URL where you can view the form).
- Frame URL: Enter the Frame URL (the URL that contains the frame)
- Redirect URL: If going to the login page URL redirects to another page, then enter that URL here.
-
Regular Expression: (Optional) This allows you to create a regular expression that serves as an allow list. This is done to improve app security by restricting access to the URLs that match the pattern that you define. For example, if your log-in URL is
https://example.com/login, and your change password URL ishttps://example.com/change_password, then you can create a regular expression that matcheshttps://example.com/(login|change_password). - Username field: Enter the CSS selector for the username field.
- Password field: Enter the CSS selector for the password field.
- Login Button: Enter the CSS selector for the login button.
- Checkbox: Enter the CSS selector for the checkbox (for example, the checkbox for the Remember me, Agree terms, and so forth).
- Next Button: Enter the CSS selector for the next button that would redirect you to the next page.
- Extra Field Selector: Enter the CSS selector for the extra field.
- Extra Field Value: Enter the value for the extra field.
- The fields you see depend upon the type of template you're configuring.
- If no regular expression field is provided, Okta generates a secure regular expression from the Login URL that omits the path from the URL. For example, if you specify
https://www.example.com/login, the Okta-generated regular expression is(?:^https://example\.com(?:$|/)).The login path is omitted, the URL is escaped, and the resulting URL is surrounded with
(?:^and(?:$|/)).
Find the CSS selector fields
When you configure a Template Plugin App, you provide CSS selectors to the relevant fields because the plugin is used to populate these fields.
To determine the CSS selectors, inspect the individual elements on a page. Using the Chrome developer tools:
- Open to the page containing the target login form.
- Right-click an input field or button and select the Inspect option to see the actual Document Object Model (DOM) element. In the Elements tab, view the id and class of the element and, using this information, compose a CSS selector.
You may need the full hierarchy when you can't uniquely identify elements by id or class. For the Okta Sign In page, for example, the selectors would be:
-
Username:
#okta-signin-username
-
Password:
#okta-signin-password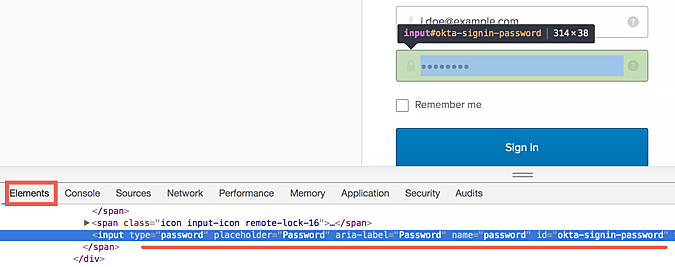
-
Button:
#okta-signin-submit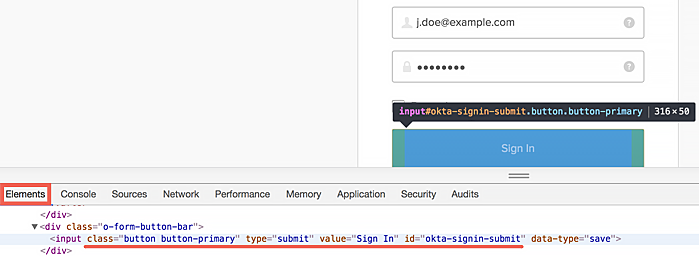
In cases where the app only uses a name attribute, and not id for its username, password, or submit buttons, you can try using input[type="text"]. For example, you can use input[type="password"] for a password, and input[type="submit"] for a submit button. Other attributes can be queried; for example, input[class="btn"] as an alternate way to specify the submit button.
Cases where the Template Plugin App doesn't work
The Template Plugin App isn't effective for sites that:
- Contain much dynamic HTML creation. Sites like this may fail with this approach because the elements the plugin is looking for aren't present when the plugin fires.
- Require a parameter beyond just username and password. Use Template Plugin App 3 Fields if the parameter is static and doesn't change.
- Have multiple steps in the login process, or load multiple pages between the initial URL and the one that contains the form.
You can address the previous cases with a plugin integration, but not within the context of the Plugin Template App. If you encounter such a case, you must write the app integration by hand. Contact the Okta Professional Services team to discuss pricing for the app.
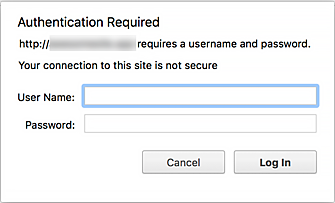
Template Basic Auth App
Use this template if your app supports basic authentication.
- Application label: Enter the label to display under the app on end users' home page.
- URL: Enter the URL of the login form (the actual URL where you can view the form).
- Auth URL: Enter the URL of the authenticating site for the app.
- Application Visibility: Specify whether to display the application icon to users.
- Browser plugin auto-submit: Specify whether to log users in automatically when they land on the login page.
Known issue
The Template Plugin App can't work in cases where the app's login page redirects users back to the URL they came from, as this creates an infinite loop. The SWA application must redirect the user to the website's home page, not back to the login page. This means that the login page accepts the user's credentials, then redirect the user back to the Okta home page.
Related topic