Office 365 Silent Activation: New Implementations
Note
The steps in this topic apply to orgs that implemented this feature for the first time after September 1, 2019 (after the 2019.09.0 release). If you have implemented the Early Access version of this feature before the 2019.09.0 release, refer to the instructions in Office 365 Silent Activation (Deprecated).
Okta Silent Activation for Microsoft Office 365 provides a seamless experience for accessing Office 365 on laptops, desktops, shared workstations, or VDI environments. Using Okta as an identity provider, once your end users have sign in to a domain-joined Windows machine, they're automatically signed into Office 365.
Before you begin
- Ensure that your Active Directory (AD) domains are integrated with your Okta org. See Active Directory integration.
- Ensure that you have permission to configure a Service Principle Name (SPN) in AD. See Microsoft doc: Delegating Authority to Modify SPNs.
- The user's AD UPN must match the Office 365 UPN. The Office 365 app username can be configured to map any AD attribute. See Prepare to provision users through directory synchronization to Office 365.
- All Office 365 end users must have valid licenses.
- All end users must be assigned the Office 365 app instance that's associated with their specific domain.
- Users must be able to reach domain controllers.
Supported apps and configurations
- All versions of Windows that are currently supported by Microsoft
- Office 2016 and later
- Supported apps: Word, Excel, Outlook, OneNote, Skype for Business, PowerPoint, Access, and Publisher
-
RC4_HMAC_MD5 encryption isn't supported with AD single sign-on and Office 365 Silent Activation. When using ADSSO or Office 365 Silent Activation, Okta recommends using AES 128-bit (AES-128) or AES 256-bit (AES-256) encryption.
Start this procedure
This procedure includes the following steps:
Important
- If a Client Access Policy in Office 365 is set to deny web browsers, it will also block the silent activation.
- If your app or Okta sign-on policy requires MFA for web browsers, there will be no MFA when logging in through silent activation.
- SWA sign-on is not supported.
Create a service account and an SPN
When creating a service account:
- For the Okta tenant Kerberos service, use a domain user account instead of a domain admin account.
- To further lockdown the account, turn on the logon to restriction with a fictitious host name and mark the account as Account is sensitive and can't be delegated.
- Sign in to a server from which you can access Active Directory Users and Computers.
-
Right-click the folder where you want to create the service account and select .
-
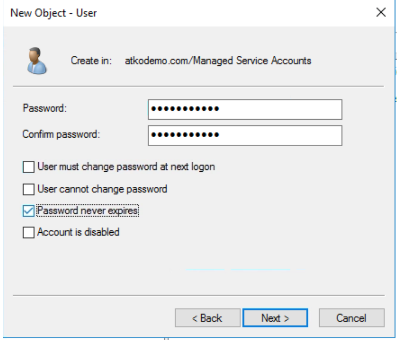
Create the account with the following values:
Field
Value
User logon name <username> User logon name (pre-Windows 2000) <username> (can be any username) Note:The service account username must be 16 characters at minimum, including the domain name. Also, admin permissions aren't required for the service account, but specific permissions are needed to set the SPN. See Delegating Authority to Modify SPNs.
- Click Next.
-
Create a password that is a minimum of 14 characters, and then check the Password never expires box.
- Click Next.
-
Run the following command to configure an SPN for the service account:
setspn -S HTTP/<yourorg>.kerberos.<oktaorgtype>.com <username>Placeholder Value your org Your Okta org name oktaorgtype Your Okta org type. For example, okta,oktapreview,okta-emea, orokta-gov.username Username that you created in the previous steps. Example:
setspn -S HTTP/atkodemo.kerberos.oktapreview.com OktaSilentActivation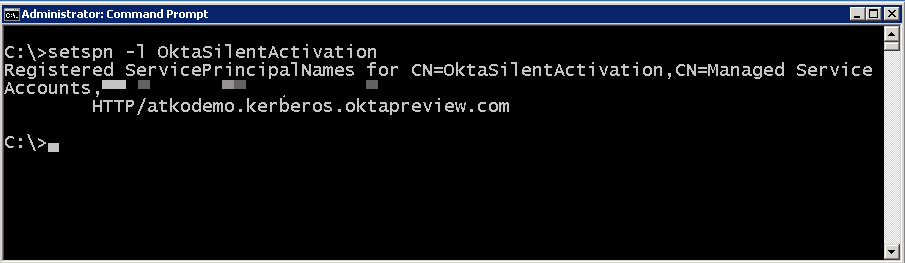
-
Verify that the SPN is correct by running the following command:
setspn -l <username>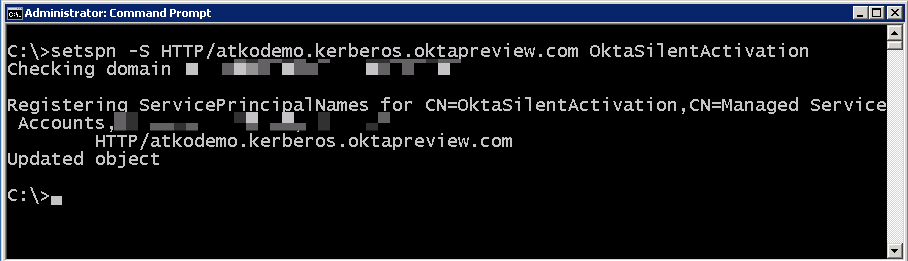
Configure your browsers on Windows
-
Enable Integrated Windows Authentication on the browser.
- In Internet Explorer, go to .
- On the Advanced tab, scroll down to the Security settings, and then select Enable Integrated Windows Authentication.
-
Click OK.
Note:Important
Make sure that Internet Explorer can save session cookies (). If it can't, neither SSO or standard sign-in can work.
-
Configure the Local Intranet Zone to trust Okta.
- In Internet Explorer, go .
- On the Security tab, click .
-
Add the URL for your Okta org as configured in the earlier steps.
https://<yourorg>.kerberos.<oktaorgtype>.comExample:
https://atkodemo.kerberos.oktapreview.com - Click Close and OK on the other configuration options.
- Create a Global Policy Object (GPO) to roll this out to all client machines that use Silent Activation.
Enable Kerberos authentication
-
In the Admin Console, go to .
- On the Delegated Authentication page, click the Active Directory tab.
- Scroll down to the Agentless Desktop SSO and Silent Activation section and click Edit.
- Under Active Directory Instances, find the instance for which you configured the service account.
-
Configure this instance with the following username format:
Field Value Desktop SSO Enabled Service Account Username <username>
This is the Active Directory sign-on name that you created in step 1, without any domain suffix or Netbios name prefix. It can be the sAMAccountName or the username part of the UPN. These two may be the same string unless the org admin chose to use different values. This field is case-sensitive. When the UPN prefix differs from sAMAccountName, the service account username needs to be the same as the UPN and include the domain suffix. For example, agentlessDsso@mydomain.com.
Service Account Password Your Active Directory password -
Click Save.
Kerberos authentication is now enabled for the Office 365 app instance.
Enable Silent Activation
- In the Okta Admin Console, go to .
- In the Silent Activation section, select the checkbox to enable silent activation for the app instance.
- Save the settings.

Silent Activation is now enabled for the Office 365 app instance.
Test Office 365 Silent Activation
-
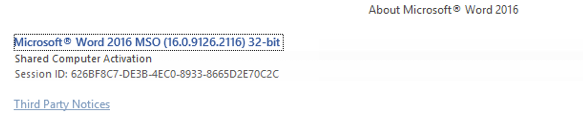
Run the Office 365 Client.
- On a machine that has an Office 2016 client installed, open an Office 2016 client application such as Microsoft Word.
-
Confirm that you're signed in and the client is automatically activated.
You should see a message like the one below:
-
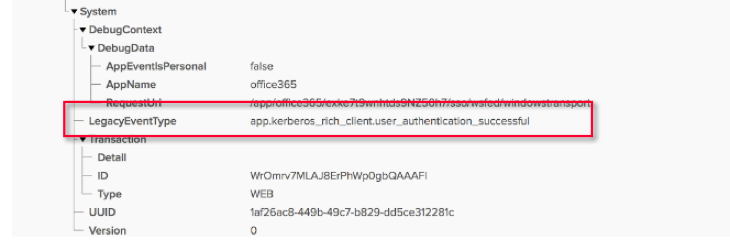
Confirm the authentication through the Kerberos endpoint in Okta.
-
In the Admin Console, go to .
- On the System Log page, find the sign-in event.
-
Expand the event to go to .
The entry should indicate that the user was authenticated through the Kerberos endpoint.
-
Silent Activation is now enabled for Office 365.