Migrate registry-key-based Office 365 Silent Activation to new configuration
-
This topic is intended for orgs that implemented the Early Access version of this feature prior to the 2019.09.0 release. If this applies to your org, you must complete this migration procedure.
-
If you're implementing this feature for the first time after the 2019.09.0 release, follow the instructions in Office 365 Silent Activation: New Implementations.
This procedure describes how to migrate your registry-key-based Office 365 Silent Activation configuration to the new Kerberos-based configuration. The new configuration uses Kerberos authentication, which eliminates the need for registry keys.
Start this procedure
This procedure includes the following main steps:
A. Create and test a new Kerberos subdomain
B. Create and confirm a new DNS record for your org
- If a Client Access Policy in Office 365 is set to deny web browsers, it will also block the silent activation.
- If your app or Okta sign-on policy requires MFA for web browsers, there will be no MFA when logging in through silent activation.
- SWA sign-on is not supported.
A. Create and test a new Kerberos subdomain
1. Add a new kerberos subdomain SPN
Use the same service account that you're using currently. Changing the service account can cause Silent Activation authentication requests to fail.
- In your Active Directory environment, open a command prompt as an administrator.
-
Run the following command to add a Kerberos subdomain SPN:
setspn -S HTTP/<yourorg>.kerberos.<oktaorgtype>.com <serviceAccountName>Placeholder
Value
HTTP/<yourorg>.kerberos.<oktaorgtype>.comYour SPN. oktaorgtypeYour Okta org type. For example: oktapreview, okta-emea, or okta-gov.
serviceAccountNameYour service account name. This is the name that you used when configuring the Early Access version of Agentless Desktop SSO. Example:
setspn -S HTTP/qa-synth.kerberos.oktapreview.com spndefaultNote:This command doesn't create a Active Directory user account. Instead, it adds a new SPN to the existing AD user account. This command is applicable to all orgs, including those that are using a custom URL.
-
If you have multiple AD forests, repeat step 2 for each forest.
SPNs are unique across a forest so you only need to do this once in each forest.
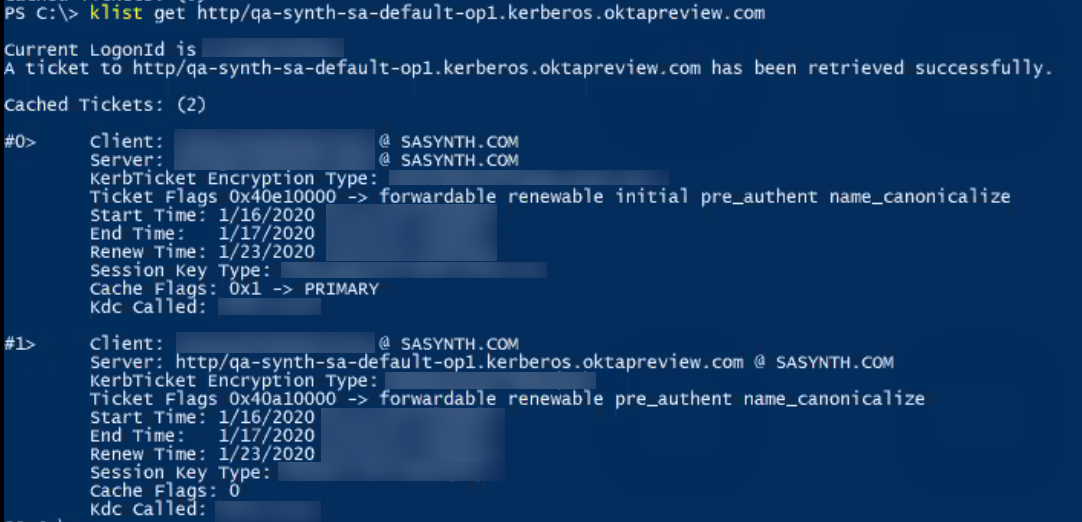
2. Verify the new Kerberos subdomain SPN
-
In Windows PowerShell, enter the following command to confirm that the new DNS and SPN entries are updated:
klist get HTTP/<yourorg>.kerberos.<oktaorgtype>.comFor example:
klist get HTTP/atko.kerberos.oktapreview.com -
Confirm that you get the message about successful ticket retrieval.
3. Add the new Kerberos subdomain to intranet zone
Add https://<yourorg>.kerberos.<oktaorgtype>.com to the intranet site list in your internet settings for all the devices that should use Silent Activation.
- In Internet Explorer, go .
- On the Security tab, click .
-
Add the URL for your Okta org as configured in the earlier steps.
https://<yourorg>.kerberos.<oktaorgtype>.comExample:
https://atkodemo.kerberos.oktapreview.com - Click Close and OK on the other configuration options.
B. Create and confirm a new DNS record for your org
Prerequisite: Domain administrator privileges to set the SPN.
1. Create a DNS record for your org
In the Okta Admin Console,
- Go to .
- On the Delegated Authentication page, click the Active directory tab.
-
Scroll down to the Agentless Desktop SSO and Silent Activation section and click Edit.
-
If the service account username is in the old format (for example:
HTTP/<yourorg>.<oktaorgtype>.com), change it to the sAMAccountname or the username part of the UPN of the service account for which you set up the SPN in Part A.Note:Service account username is case-sensitive.
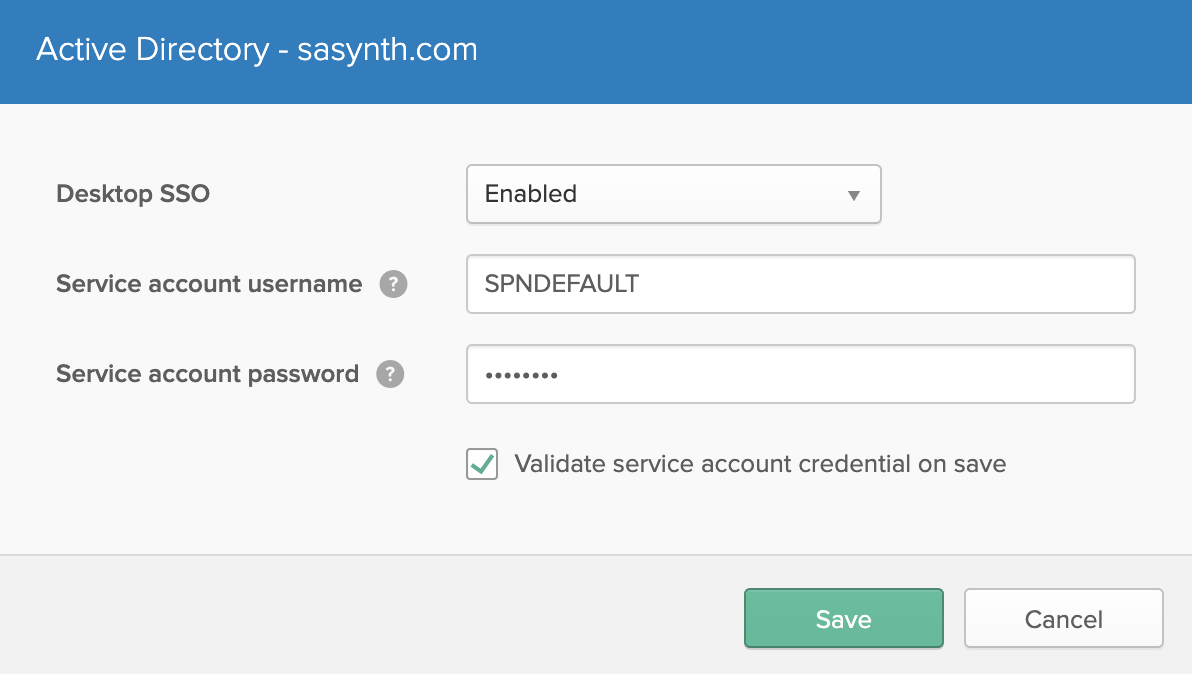
- Select Validate service account credential on save.
- Click Save.
This triggers the creation of a new DNS record for your org. Creating a new DNS record can take a few minutes, or sometimes, a few hours.
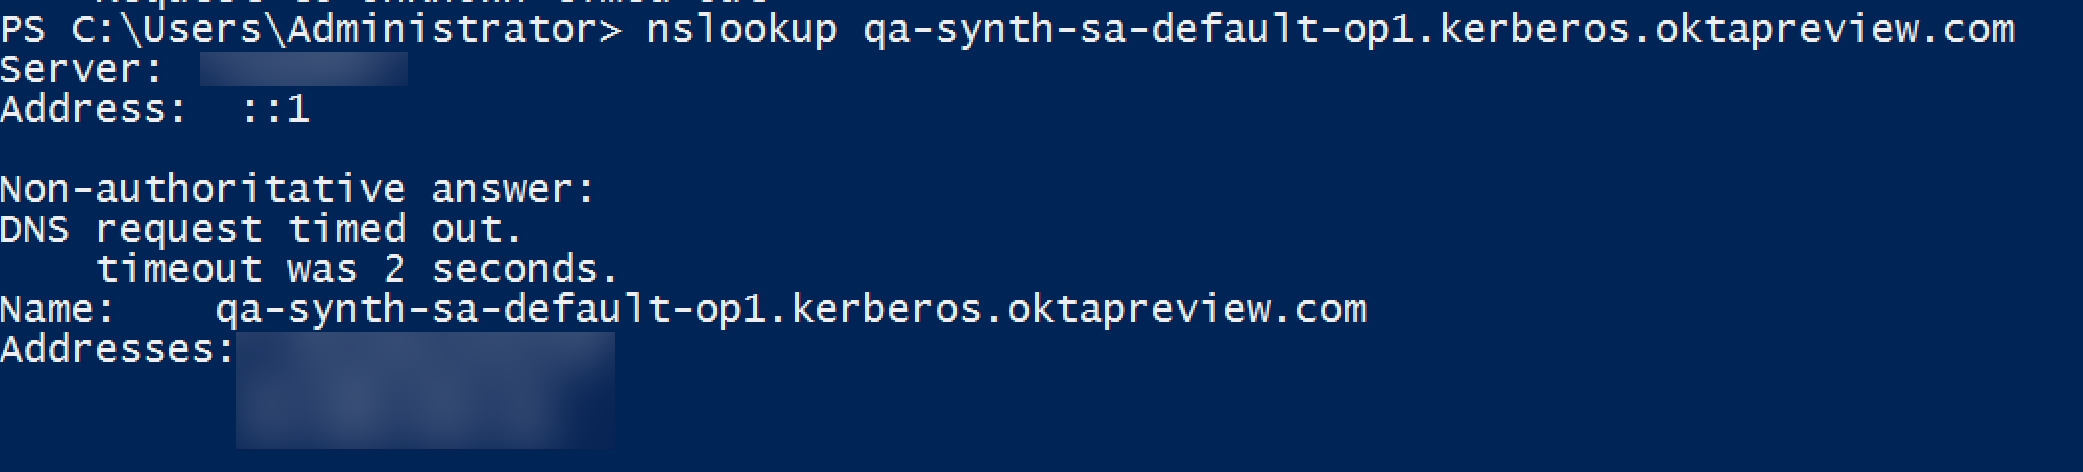
2. Confirm the creation of the new DNS record
Use the following dig (Mac) or nslookup (Windows) commands to confirm that the new Kerberos URL is reachable.
If you don't see a success message, run the command again after a few minutes. Sometimes, record creation can take several hours. Refer to the respective command reference documentation for more information on the output messages.
For Mac
$ dig <yourorg>.kerberos.<oktaorgtype>.com
For example:
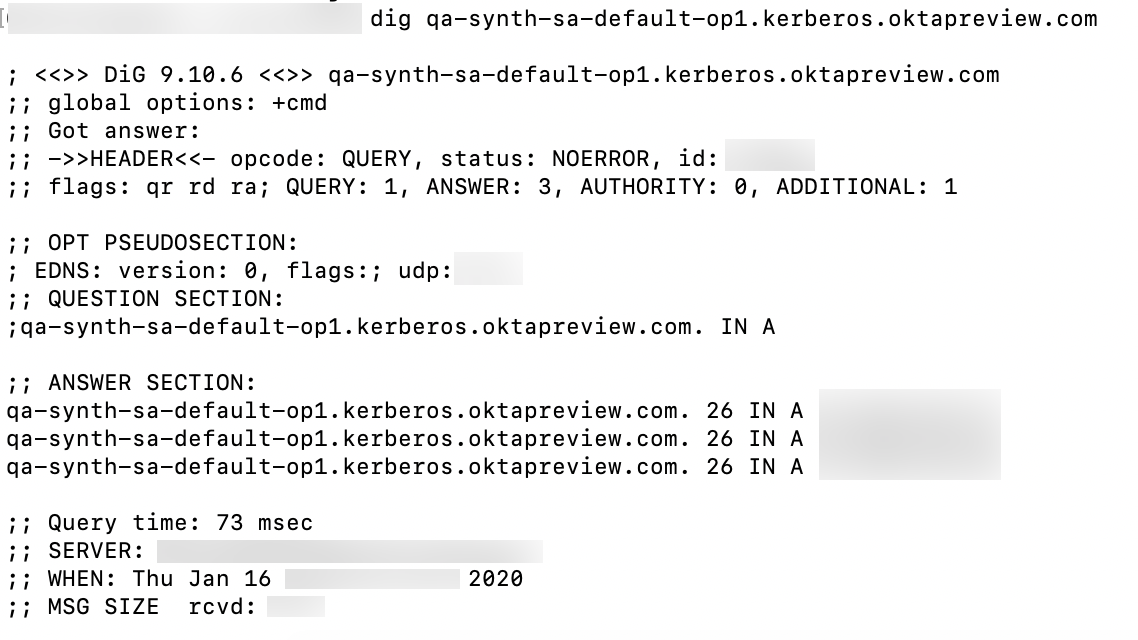
OR
For Windows
$ nslookup <yourorg>.kerberos.<oktaorgtype>.comFor example:
C. Test the new setup
Prerequisites
- Test user account that has assigned Office 365 app instance and works with old Silent Activation configuration.
- Following credentials for the test user account:
-
Domain:
<yourorg>.kerberos.<oktaorgtype>.com - External ID: External ID of the org in which the test user is. You can find this in the script you used for the org's WS-Fed set up.
- Username: Username part of the test user's UPN.
- Password: Password for the test user's account.
-
Domain:
- Admin permissions on Windows.
Procedure
-
On Windows, as an admin run the following PowerShell command:
Get-ExecutionPolicy -
Make a note of the output policy. This value is required for the final step of the procedure.

-
Change the execution policy to
Unrestrictedusing the following command:Set-ExecutionPolicy Unrestricted
-
Test a user account:
-
Copy the following script into a text file and save the file as
Test_windowsTransport.ps1.param ( [Parameter(Mandatory=$true, HelpMessage="Domain for org. No need to pass Kerberos subdomain.")] [string]$domain, [Parameter(Mandatory=$true, HelpMessage="External id of the Office365 app instance.")] [string]$externalId, [Parameter(Mandatory=$true, HelpMessage="Username for the account on the box that should be used for authentication.")] [string]$username, [Parameter(Mandatory=$true, HelpMessage="Password for the account on the box that should be used for authentication.")] [string]$password ) $HTTPREQUEST_SETCREDENTIALS_FOR_SERVER = 0; $path = "app/office365/{0}/sso/wsfed/windowstransport" -f $externalId $url = "https://{0}/{1}" -f $domain, $path Write-Host ("Url: {0}" -f $url) $soapPayload = @' <s:Envelope xmlns:s='http://www.w3.org/2003/05/soap-envelope' xmlns:wsa='http://www.w3.org/2005/08/addressing' xmlns:wsu='http://docs.oasis-open.org/wss/2004/01/oasis-200401-wss-wssecurity-utility-1.0.xsd'> <s:Header> <wsa:Action s:mustUnderstand='1'>http://schemas.xmlsoap.org/ws/2005/02/trust/RST/Issue</wsa:Action> <wsa:messageID>urn:uuid:099B1123-4E9C-4244-8F51-B92937BFA08E</wsa:messageID> <wsa:ReplyTo> <wsa:Address>http://www.w3.org/2005/08/addressing/anonymous</wsa:Address> </wsa:ReplyTo> <wsa:To s:mustUnderstand='1'>{0}</wsa:To> </s:Header> <s:Body> <wst:RequestSecurityToken xmlns:wst='http://schemas.xmlsoap.org/ws/2005/02/trust'> <wsp:AppliesTo xmlns:wsp='http://schemas.xmlsoap.org/ws/2004/09/policy'> <wsa:EndpointReference> <wsa:Address>urn:federation:MicrosoftOnline</wsa:Address> </wsa:EndpointReference> </wsp:AppliesTo> <wst:KeyType>http://schemas.xmlsoap.org/ws/2005/05/identity/NoProofKey</wst:KeyType> <wst:RequestType>http://schemas.xmlsoap.org/ws/2005/02/trust/Issue</wst:RequestType> </wst:RequestSecurityToken> </s:Body> </s:Envelope> '@ -f $url $winHttp = New-Object -Com "WinHttp.WinHttpRequest.5.1" $winHttp.open("POST", $url, $false) $winHttp.SetRequestHeader("Content-Type", "application/soap+xml; charset=utf-8") $winHttp.SetRequestHeader("SOAPAction", "http://schemas.xmlsoap.org/ws/2005/02/trust/RST/Issue") $winHttp.SetRequestHeader("x-client-OS", "10.0.14393") $winHttp.SetRequestHeader("x-client-SKU", "Win32") $winHttp.SetRequestHeader("x-client-Ver", "v2.2.1.28801") $winHttp.send($soapPayload) if ($winHttp.Status -ne [int]401) { Write-Error ("Received unexpected response status: {0}, expected 401." -f $winHttp.Status) } Write-Host "Received 401 response status." $winHttp.SetCredentials($username, $password, $HTTPREQUEST_SETCREDENTIALS_FOR_SERVER) $winHttp.send($soapPayload) if ($winHttp.Status -ne [int]200) { Write-Error ("Received unexpected response status: {0}, expected 200." -f $http.Status) } Write-Host ("Received {0} response status." -f $winHttp.Status) $samlTicket = [XML]$winHttp.ResponseText if (-not $samlTicket.Envelope.Body.RequestSecurityTokenResponse.RequestedSecurityToken) { Write-Error ("Response did not contain saml ticket.") } Write-Host ("Valid SAML ticket received.") -
Run the following command in PowerShell:
.\Test_windowsTransport.ps1 -domain <yourorg>.kerberos.<oktaorgtype>.com -externalId <orgexternalid> -username <testusername> -password <-testpassword> -
Confirm that you get the following successful SAML message:
Valid SAML ticket received.
This confirms that Silent Activation is successful for the test user.
-
-
Restore the execution policy to the original value using the following command:
Set-ExecutionPolicy <initialPolicy>
See also
Office 365 Silent Activation: New Implementations