ServiceNow UD Provisioning migration guide
Learn how to migrate a ServiceNow integration to use Universal Directory (UD).
This guide supports the following product versions and features:
- ServiceNow Geneva version and later
- User's Schema Discovery with unlimited custom attributes
- Flexible user attribute mapping
- The Okta ServiceNow plugin isn't required for provisioning
Before you begin
- Know the settings that you're using for your current ServiceNow app instance. See Determine your current ServiceNow configuration.
- Configure your new ServiceNow UD app instance to be as similar to your current ServiceNow instance as possible. Follow the instructions provided by Configure a new ServiceNow UD app instance.
Procedure
- Determine your current ServiceNow configuration
- Configure a new ServiceNow UD app instance
- Migrate your Service Now app
- Migrate using Group Assignment
- Migrate using Import and Auto-confirm
- Migrate users with the same email address in ServiceNow
- Migration for Pushed Groups
- Verify your migration
Determine your current ServiceNow configuration
-
In the Admin Console, go to .
- Search for and select your ServiceNow - Eureka and later integration.
- Select the Sign On tab and check the following settings:
- Sign on method: Either Secure Web Authentication (SWA) or SAML 2.0. Use the same mode for your new ServiceNow UD app.
- For SWA-configured apps, do the following:
- Check the password settings (for example, User sets username and password). Use the same settings for your new ServiceNow UD app.
- Check the Application username format. Use the same value for your new ServiceNow UD app.
- Select the Provisioning tab and click To App. Make note of the provisioning features that are enabled. Enable the same features for your new ServiceNow UD app to avoid missing or overwriting user's data. Enable all provisioning features if you want to manage all user's data from Okta.
- If the Sync Password feature isn't enabled for your existing ServiceNow app, it means that you may allow end users to set their passwords based on which of the following Secure Web Authentication settings you chose on the Sign On tab.
- Administrator sets username and password: In this case, you have to manually enter passwords for all migrated users. Okta recommends that you enable Sync Password in your current app instance before migration to avoid having to manually enter passwords for all migrated users.
- User sets username and password: After migration, end users must enter the username and password that they use with the current ServiceNow SWA app.
- Administrator sets username, user sets password: After migration, end users must enter the password that they use with the current ServiceNow SWA app.
- If the Update user attributes feature is disabled for your existing ServiceNow app, you may have some unsynchronized users, which can be missed during migration. If you have users with updated profiles in ServiceNow, for example, an updated email address, these users can't be auto-confirmed during import. Instead, you must manually confirm these users to import them.
- If Deactivate Users is disabled for your existing ServiceNow app, you may run into issues during user migration to your new ServiceNow UD instance. If you have unassigned users from your existing ServiceNow app, but who aren't deactivated on the ServiceNow side, these users are auto-confirmed for the new ServiceNow UD app. You can manually unassign such users after migration.
- If the Sync Password feature isn't enabled for your existing ServiceNow app, it means that you may allow end users to set their passwords based on which of the following Secure Web Authentication settings you chose on the Sign On tab.
- Open the Profile Editor, locate your current ServiceNow app and check the current mappings. Copy these mappings, including any custom mappings, to your new ServiceNow UD app.
Configure a new ServiceNow UD app instance
-
In the Admin Console, go to .
- Click Browse App Catalog.
- Search the catalog for
ServiceNow UD. Select it and click Add Integration. - Enter the Base URL for your ServiceNow tenant.
- If your ServiceNow integration uses SWA, enter the SWA Base URL.
- Click Next.
- Select the same sign-on method as your existing app instance, and then click Done. See Determine your current ServiceNow configuration.
- Select the Provisioning tab and then click Configure API Integration.
- Select Enable API integration.
- Enter your ServiceNow credentials and click Save.
- Click
- If you have the Location attribute in your existing app instance, add it to the new ServiceNow UD app. Click Add Attribute, select the Location attribute, then click Save.
- Configure your attributes to match those of your existing app instance, and then click Save Mappings. See Set mappings to match existing app instance.
Set mappings to match existing app instance
If you have your current ServiceNow app configured with Active Directory, you also need to ensure that the mappings for all attributes are the same as your current app.
If you have custom mappings for your current ServiceNow app, you need to configure the same mapping for your new app instance. Suppose that you have the following custom mapping:
adUser.tshirt → oktaUser.title → snowUser.title
If you configured tshirt as the column name for the title attribute in ServiceNow Provisioning, you need to configure the same mapping for your new app instance as follows:
- Import user attributes from ServiceNow.
- Add the
tshirtattribute to the user profile. - Configure the mapping as follows:
adUser.tshirt→oktaUser.tshirt→snowUser.tshirt.
For example, if there's a t-shirt size attribute in the Okta profile; and the ServiceNow title attribute isn't currently used by the org:
- Mappings are set to
user.tshirt→ServiceNow appuser.title - In the provisioning section of the ServiceNow app,
tshirtis configured as the column name thattitlemaps to.
Migrate your Service Now app
The migration steps might differ if your current ServiceNow app is configured with SWA or SAML SSO. The differences are highlighted.
- Disable all provisioning features for your existing ServiceNow app.
- Configure a new ServiceNow UD app instance. See Configure a new ServiceNow UD app instance.
- Depending on how your current ServiceNow app integration is configured, choose one of the following recommended migration flows:
-
Migrate using Group Assignment
Use this method if the following criteria are met, otherwise use Migrate using Import and Auto-confirm:
- All users are assigned by group level from your current app instance.
- All users in groups are sorted by the following attributes and have the same values for them:
Department,Cost CenterandLocation(if your existing instances usedLocation; see Configure a new ServiceNow UD app instance). - All users in groups have the same values for the
Time zoneandCompanyattributes on the ServiceNow side. The previous ServiceNow app integration doesn't support these attributes, unlike the new ServiceNow UD integration.
Note:The values of some attributes could be overwritten for all users during the migration. If this isn't critical for you, proceed with the migration flow using Group assignment.
- Migrate using Import and Auto-confirm
-
Migrate using Group Assignment
Migrate using Group Assignment
Contact Okta Support to ensure that your organization has the APPLICATION_ENTITLEMENT_POLICY feature flag enabled. This feature allows you to map user attributes instead of static values in group assignments (for example, user.department instead of Financial for all users in the group).
Before migration, Okta recommends that you try a test migration:
Your current ServiceNow app isn't configured with Active Directory and all attributes are mapped to the Okta user profile
- Create a test group in Okta.
- Create a test user in Okta and set values for attributes mapped to ServiceNow (manager, department, cost center).
- Add this user to the test group.
- Assign the test group to your current ServiceNow app (ensuring that you have provisioning features enabled) and verify that the user is created on the ServiceNow side with the correct attributes values.
- Disable provisioning for your current ServiceNow app.
- Assign the test group to your new ServiceNow UD app and map the same Active Directory attributes.
- Check that the user is linked and the user's profile is updated in ServiceNow only for attributes that don't exist in the old Service Now app.
Your current ServiceNow app is configured with Active Directory:
- Create a test group in Active Directory.
- Create a test user in Active Directory and set up all attributes that are mapped from Active Directory to ServiceNow (such as manager, department, cost center).
- Add the new test user to the test group.
- Go to Okta and perform an import from Active Directory.
- Confirm the test user exists in Okta.
- Assign the test group with the test user to your old ServiceNow app.
- Ensure that the user is created with the correct attribute values.
- Disable provisioning for your old ServiceNow app.
- Assign the test group to your new ServiceNow UD app and map the same Active Directory attributes.
- Verify users and their profiles.
- If you encountered issues during your test migration, check the settings for inconsistencies, make any necessary corrections, and try again. If the test migration is successful, you can start the migration process for all users.
- During migration you might encounter data loss for some users and might have to rewrite the user's profile.
After testing is complete, you can continue with migration:
- Identify one or more groups in Okta which collectively include all users assigned to your current ServiceNow integration.
- Ensure that you've disabled provisioning features for your current ServiceNow app.
- Go to your new ServiceNow UD app and assign the group.
- During the assignment, set all group level attributes accordingly.
If you have blank values for some attributes for users in the group, you may set Not Selected from the dropdown list, or specify a value.
Hide or deactivate the old ServiceNow app
When your new ServiceNow UD app is set up and assigned, you can either hide or deactivate your old ServiceNow app tile from the Okta End-User Dashboard to avoid confusion.
Hide the old ServiceNow app
- Open the old ServiceNow app and go to the General tab.
- Click Edit.
- Select Do not display application icon to users.
- Click Save.
Deactivate the old Service now app
After performing the following steps, all previously imported groups for old ServiceNow app are deleted in Okta:
- Open the old ServiceNow app.
- Click the Active button, then select Deactivate.
- Click Save.
End-user migration flow
After you've assigned the new ServiceNow UD app, end users must click the new app tile on their dashboard. If they're able to sign in to ServiceNow, there's no further action.
Migrate using Import and Auto-confirm
Before you migrate your current integration, it's recommended that you try a test migration by completing the following steps.
- In your existing ServiceNow UD app instance, go to . In the User Creation & Matching section select Email matches to define whether an imported user is an exact match for an Okta user.
- Import new users in your new ServiceNow UD instance. Ensure that all users are matches and can be linked to existing users.
Notes:
- If the Push Profile feature is disabled for your existing ServiceNow app, you might be missing some users after migration to the new Service Now UD app. You need to manually confirm them after migration.
- If the Deactivation feature is disabled for your existing ServiceNow app, you may find some matches for users who aren't assigned to your current ServiceNow app. Manually unassign these users after migration.
- If you have different users in ServiceNow with the same email address, you may encounter mismatch issues. In this case, see Migrating users with the same email address in ServiceNow.
- Confirm the test user and verify that the import is successful.
- If you encountered issues during your test migration, check the settings for inconsistencies, correct them to be the same as for your current ServiceNow app, and try again. If the test migration is successful, you can start the process of migration for all users.
- During migration you might encounter loss of data for some users and might have to rewrite the user's profile.
When the testing is complete, you may continue with migration:
- In your ServiceNow UD app instance, go to . In the User Creation & Matching section set Imported user is an exact match to Okta user if to Email matches and set Confirm matched users to Auto-confirm exact matches:
- Import new users in your new ServiceNow UD instance. All existing users should be auto-confirmed. All groups are also imported to the new ServiceNow UD, so you may have duplicate groups.
- You may need to perform the following actions depending on how your previous ServiceNow app was configured:
- If the Push Profile feature is disabled for your previous ServiceNow app and you miss some users during migration to the new ServiceNow UD app, you need to manually confirm them.
Important: Don't create new users. Instead, link existing users by completing the following steps.
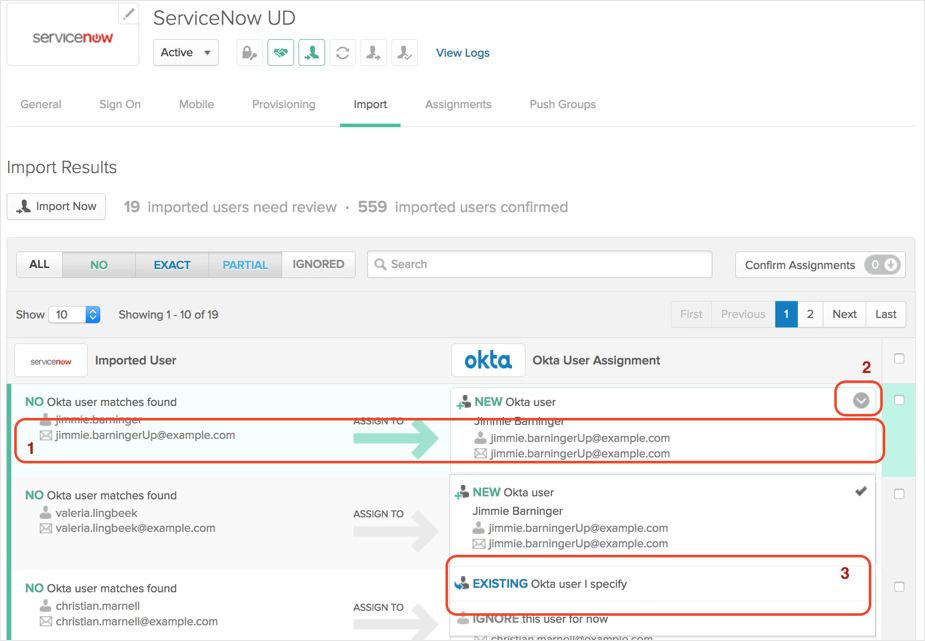
- Find your user.
- Click the arrow to expand the entry.
- Select EXISTING Okta user I specify and enter the username for your existing user.
- If the Deactivation feature is disabled for your existing ServiceNow app and you find any confirmed users that shouldn't be, you can manually unassign these users after migration.
- For SWA configurations only: If you have configured Administrator sets username and password for your existing ServiceNow app, you need to manually enter passwords for all migrated users: Go to Assignment, select the user, click Edit then Set password.
- For SWA configurations only: If you have configured User sets username and password, your end users need to enter the valid username and password they're using for the current ServiceNow SWA app, after migration.
- For SWA configurations only: If you have configured Administrator sets username, user sets password, your end users need to enter the valid password they're using for the current ServiceNow SWA app, after migration.
- If the Push Profile feature is disabled for your previous ServiceNow app and you miss some users during migration to the new ServiceNow UD app, you need to manually confirm them.
- When the import is complete, Okta suggests you either Hide or Deactivate the old ServiceNow app from the Okta End-User Dashboard.
Hide or deactivate the old ServiceNow app
When your new ServiceNow UD app is set up and assigned, you can either hide or deactivate your old ServiceNow app tile from the Okta End-User Dashboard to avoid confusion.
Hide the old ServiceNow app
- Open the old ServiceNow app and go to the General tab.
- Click Edit.
- Select Do not display application icon to users.
- Click Save.
Deactivate the old Service now app
After you complete the following steps, all previously imported groups for the old ServiceNow app are deleted in Okta:
- Open the old ServiceNow app.
- Click Active, and then select Deactivate.
- Click Save.
End-user migration flow
After you have assigned the new ServiceNow UD app, end users must click the new app tile on their dashboard. If they're able to sign in to ServiceNow, there's no further action.
Migrate users with the same email address in ServiceNow
If you're migrating users with the same email address in ServiceNow, Okta recommends that you use single user assignment, as follows:
- Verify that you've disabled provisioning for your current (old) Service Now app instance.
- Identify the users in Okta who have the same email address in both ServiceNow and Okta.
- Check that all attribute values are the same for both Okta and ServiceNow users to avoid overwriting values.
- Assign these users to the new ServiceNow UD app instance.
- Check users in ServiceNow; the user profile should be updated only for the new attributes.
Migration for Pushed Groups
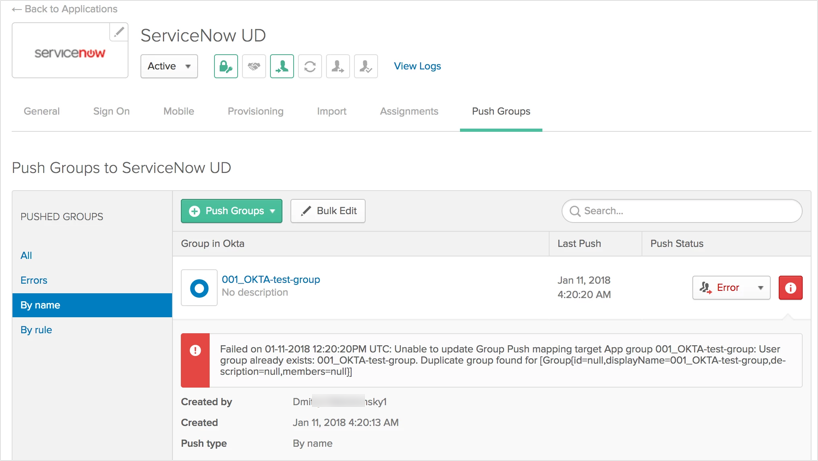
- Go to your old ServiceNow - Eureka or any later released app instance, unlink and delete the pushed group.
- Go to your new ServiceNow UD app instance and push this group.
An error occurs when you attempt to push the same group from you new ServiceNow app, without first deleting it from your old ServiceNow app.
Verify your migration
- Check System Logs about importing users.
- Verify that the number of imported users matches the number of existing users for your existing ServiceNow app instance.
- Sign in using the app tile for the new ServiceNow UD app and check the user's permissions.
- Check the End-User Dashboard for errors.