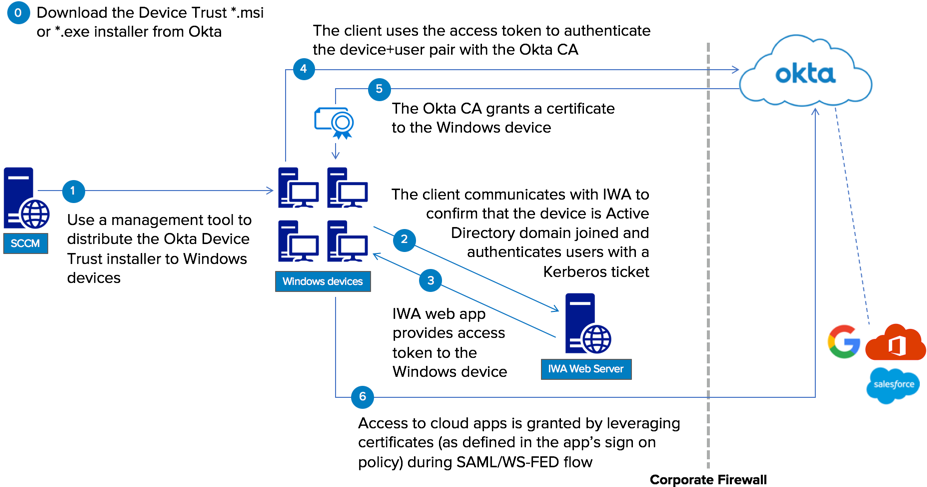
Enforce Okta Device Trust for managed Windows computers
Okta Device Trust for Windows allows you to prevent unmanaged Windows computers from accessing corporate SAML and WS-Fed cloud apps. This enforcement works with any browser or app that can access the certificate store when performing the federated authentication flow to Okta.
Okta Device Trust for Windows provides these key benefits:
- Ensures that only end users on domain-joined Windows computers can seamlessly SSO into SAML and WS-Fed cloud apps
- Protects enterprise data even when there's no defined network boundary
- Provides a frictionless end user experience by using the Okta Certificate Authority
- Support for Device Trust enrollment in multi-forest environments.
Prerequisites
Client workstations
-
Active Directory domain-joined computers running a supported version of Microsoft Windows. See Supported platforms, browsers, and operating systems.
-
.NET framework version 4.5.2 and later. The Device Registration Task checks whether a supported version of .NET Framework is present, and if not, installs a supported version automatically. See Known Issues.
Active Directory and IWA servers
See Manage your Active Directory integration and IWA agent documentation.
IWA agent
Device Trust-capable version of the Okta IWA web agent. For installation details, see IWA documentation.
Device Trust enrollment in multi-forest environments requires IWA web app version later than 1.12.2.
An IWA web app running in one forest can detect and assess the trust posture of Windows desktop devices in another trusted forest. It can then allow these devices to enroll in Device Trust for Windows.
Supported browsers
- The current and previous release of Microsoft Edge
- The current and previous release of Google Chrome
- Version 10 and version 11 of Microsoft Internet Explorer
Before you begin
-
The web view must have access to the device certificate store. Okta Device Trust for Windows computers work with any SAML or WS-Fed-enabled app that supports authentication through a web view. The web view in which authentication is performed must have access to the certificate store on the device. This includes Office 365 clients that support Modern Authentication. See the Microsoft article: Updated Office 365 modern authentication.
-
Using device and end user authentication together requires a network connection. For the IWA web app to authenticate end users and devices, end users must be signed in to your company's network when the Device Registration Task runs. See IWA web app.
-
You can't enroll devices in Device Trust if the cell in which your Okta org resides is in read-only mode.
-
To ensure that this Device Trust solution works in environments that implement a proxy server, you must install Device Registration Task version 1.2.1 or later through a command line. Append the appropriate
HttpProxyparameter to the installation command. See Install the Registration Task. -
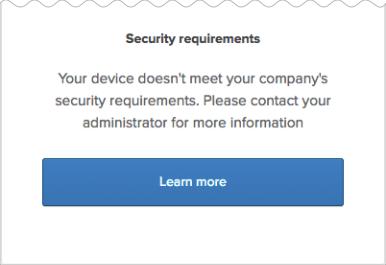
Make sure that certificates are installed on targeted computers. Before you configure the Trusted option for apps in App Sign On Policy rules, you must make sure that certificates are installed in the certificate store on the domain-joined computers you have targeted for this Device Trust solution.
If certificates aren't installed and you enable the Trusted setting, users are denied access to the app and are redirected to a security message that advises them to contact their administrator. You can configure the message to include a Learn more link to more information. See Enable the global Device Trust setting for your org.
To verify certificate enrollment, Okta recommends that you use your management tool to parse the Windows Event Viewer, or use a command line to query the user certificate store directly. Look for Okta MTLS certificate.
-
Don't disable the Windows Device Trust setting on the page if you have also configured an app sign-on policy that allows trusted Windows devices.
Otherwise, your Device Trust configuration will be in an inconsistent state. Users with untrusted devices don't receive the security message advising them to contact their administrator. They also don't receive the Learn more link to more information if you have configured that link. See Enable the global Device Trust setting for your org.
-
Before you ask Okta Support to disable Okta Device Trust for Windows, make sure to change the Device Trust setting in the app sign-on policy rules to Any. This setting is found in .
If you don't make this change and then later have Okta Support re-enable Device Trust capability for your org, the Device Trust setting in the app sign-on policy rules takes effect immediately, which may be unexpected.
-
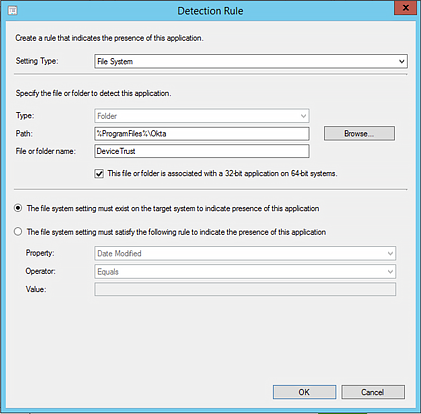
To verify installation of the Device Registration Task, use an appropriate detection setting. After installing the Device Registration Task on your managed Windows computers, the System Center Configuration Manager (SCCM) runs a script to verify that installation was successful.
Make sure to specify either File System or Registry in your Detection Rule. Don't use the Windows Installer setting type to detect the installation, as SCCM can't detect the Device Registration Task using that setting.
-
Ensure that clients can complete the MTLS handshake. If your org implements proxy server, proxy clients, or endpoint protection software, make sure to configure them in a way that doesn't block the Mutual TLS certificate exchange (handshake) that occurs during this Device Trust flow. See Troubleshooting.
-
Okta Device Trust for Windows doesn't support shared-terminal scenarios in which multiple end users sign in to the same domain-joined workstation.
-
Apps secured by Device Trust are shown as locked on the Okta End-User Dashboard. A lock icon is shown beside apps secured by Device Trust under these conditions:
- The end users accessed the dashboard in a desktop or mobile browser (not in Okta Mobile).
- Device Trust is enabled for the org.
- The device isn't trusted.
- The end user tried to access any Device Trust-secured app from their dashboard.
Procedures
Enable the global Device Trust setting for your org
Don't disable the Windows Device Trust setting on the page if you have also configured an app sign-on policy that allows trusted Windows devices.
Otherwise, your Device Trust configuration will be in an inconsistent state. Users with untrusted devices aren't shown the security message advising them to contact their administrator. They also don't receive the Learn more link to more information if you have configured that link.
-
In the Admin Console, go to .
-
In the Windows Device Trust section, click Edit.
-
Select Enable Windows Device Trust .
-
Optional. In the Learn more link field, you can enter an externally accessible redirect URL where end users with untrusted devices can find more information. The security message shown to these end users includes a Learn more link that redirects to your specified URL.
If you choose not to specify a URL in this optional field, these end users see the same message but without the Learn more link.
-
Click Save.
Enroll the Device Trust certificate on domain-joined Windows computers
Perform the four procedures in this section to ensure that the Device Trust certificate is installed successfully on domain-joined Windows computers.
2.1 Install a Device Trust-supported version of the Okta IWA web app in your AD domain
Okta Device Trust for Windows uses the IWA web app to confirm the security posture of Windows computers and users by validating that both are joined to your Active Directory domain. Okta then issues a certificate to the Windows computer which enables Device Trust flows to Okta-federated apps.
Private keys associated with the Okta certificate never leave the Windows computer. Certificates are renewed automatically once a year, approximately 30 days before they expire.
Enrollment is also supported in multi-forest environments. See Prerequisites.
The role of the IWA web app is limited to the certificate enrollment and renewal process. After the certificate is installed, the Device Registration Task no longer needs to communicate with the IWA web app for end users to access apps. Desktop SSO doesn't need to be On in for the Okta Device Trust for Windows desktop to function.
-
To download the IWA web app, configure a link as follows:
https://<org>.<okta/oktapreview>.com/static/agents/iwa/OktaSsoIwa-x.x.x.exe
Where:
-
<org>is the name of your org -
<okta/oktapreview>denotes either your Okta Production or Preview environment. -
oktaSsoIwa-x.x.x.exeis the version of the IWA web app that supports Device Trust for Windows. For the current Device Trust-capable version, see SSO IWA Web App Version History.
For example, a link for downloading version 1.11.0 to the org
example.oktapreview.comwould look like this:https://example.oktapreview.com/static/agents/iwa/OktaSsoIwa-1.11.0.exe -
-
Install the Okta IWA web app as detailed in Install and Configure the Okta IWA Web App for Desktop SSO.
-
To make sure that the IWA web agent is operational, test it as described in the guide.
-
If you use HTTPS for IWA, you must modify the IWA
web.configfile as follows:-
On the server running the IWA web agent, access the file
C:\inetpub\wwwroot\IWA\web.config -
Locate the section
<system.serviceModel>and replace it with the following:<system.serviceModel> <bindings> <webHttpBinding> <binding name = "SecureBindingForDeviceTrust"> <security mode="Transport"> <transport clientCredentialType = "Windows" proxyCredentialType="Windows"/> </security> </binding> <binding name = "HttpBindingForDeviceTrust"> <security mode="TransportCredentialOnly"> <transport clientCredentialType = "Windows" proxyCredentialType="Windows"/> </security> </binding> </webHttpBinding> </bindings> <services> <service name="OktaSSO.DeviceTrust" behaviorConfiguration="OktaSSO.DeviceTrustBehavior"> <endpoint binding="webHttpBinding" bindingConfiguration="SecureBindingForDeviceTrust" contract="OktaSSO.IDeviceTrust" behaviorConfiguration="webHttp"/> </service> </services> <behaviors> <endpointBehaviors> <behavior name="webHttp"> <webHttp/> </behavior> </endpointBehaviors> <serviceBehaviors> <behavior name="OktaSSO.DeviceTrustBehavior"> <!-- To avoid disclosing metadata information, set the value below to false before deployment --> <serviceMetadata httpGetEnabled="false"/> <!-- To receive exception details in faults for debugging purposes, set the value below to true. Set to false before deployment to avoid disclosing exception information --> <serviceDebug includeExceptionDetailInFaults="false"/> <serviceCredentials> <windowsAuthentication allowAnonymousLogons="False" includeWindowsGroups="True"/> </serviceCredentials> </behavior> </serviceBehaviors> </behaviors> </system.serviceModel>Here's a detailed look at the values that configure HTTPS or HTTP binding:
HTTPS binding configured:
<services>
<service name="OktaSSO.DeviceTrust" behaviorConfiguration="OktaSSO.DeviceTrustBehavior">
<endpoint binding="webHttpBinding" bindingConfiguration="SecureBindingForDeviceTrust" contract="OktaSSO.IDeviceTrust" behaviorConfiguration="webHttp"/>
</service>
</service
HTTP binding configured:
<services> <service name="OktaSSO.DeviceTrust" behaviorConfiguration="OktaSSO.DeviceTrustBehavior"> <endpoint binding="webHttpBinding" bindingConfiguration="HttpBindingForDeviceTrust" contract="OktaSSO.IDeviceTrust" behaviorConfiguration="webHttp"/> <endpoint address="mex" binding="mexHttpBinding" contract="IMetadataExchange" /> </service> </services> -
Save and close the
web.configfile. -
From your Windows command prompt, restart Internet Information Services (IIS) by issuing the following commands:
iisreset /stopiisreset /start -
Before proceeding, retest the IWA web app as described in Install and Configure the IWA Web App for Desktop SSO.
-
If you haven't already, install the Device Registration Task as described in Obtain and install the Device Registration Task.
-
2.2 Obtain and install the Device Registration Task
Review this information before you begin.
Trusted Platform Module (TPM)
See Enhance Windows Device Trust security with Trusted Platform Module (TPM).
Schedule the registration task to run when end users are on the corporate network
After the registration task is installed on domain-joined computers, it runs in these circumstances:
- Immediately after installation
- Whenever the user signs on to the computer
- Every 24 hours, starting with the time when the Device Registration Task first ran.
Configure your management tool to schedule the registration task to run when end users are on the corporate network. When the registration task runs, it triggers the certificate enrollment flow and creates a scheduled task that runs every 24 hours and whenever the user signs on to the computer. This retry behavior helps in both certificate enrollment and renewal scenarios.
Automatic certificate renewal can only occur when end users are on the corporate network
Certificates are valid for one year and are renewed automatically sometime within 30 days before expiration.
For automatic renewal to succeed, end users must be signed in to the domain-joined computer and connected to your corporate network.
Manually force certificate renewal
You can manually force a certificate renewal (this requires Device Registration Task 1.3.1 or later) to try to fix the following problems:
- An end user's certificate was incorrectly or accidentally revoked by the admin through the Admin Console (see Revoke).
- The certificate was corrupted on the client due to accidental deletion, file corruption, or loss of the private key.
See Force certificate renewal in some circumstances.
Automatic certificate selection
By default, the Device Registration Task configures registry keys on domain-joined Windows computers to allow supported Chrome, Edge, and Internet Explorer browsers to automatically select the Device Trust certificate to present to Okta.
If appropriate for your environment, you can disable this behavior by adding the SkipBrowserSetup=true flag to the installation command. See Obtain the registration task.
For example, this would be necessary if you want to configure automatic certificate selection using a Group Policy Object (GPO) tool.
If you opt not to configure automatic certificate selection, either through the Device Registration Task or a GPO, end users are prompted to select the certificate when accessing the app. In that case, to make the selection easier for end users, only the Okta Device Trust certificate is shown to them.
Proxy server environment
If your organization routes internet traffic through a proxy server, note the following:
- Install Device Registration Task version 1.2.1 or higher through a command line and append the appropriate
HttpProxyparameter to the installation command. - If your org implements proxy servers, proxy clients, or endpoint protection software, configure them in a way that doesn't block the Mutual Transport Layer Security (MTLS) certificate exchange (handshake) that occurs during this Device Trust flow.
See Troubleshooting.
Certificate revocation
You may need to revoke an end user's Device Trust certificates from the Okta Certificate Authority. This is recommended if the computer is lost or stolen.
To resecure an end user's computer with Device Trust after revoking their certificates, remove the Device Trust certificate from their computer before you enroll a new certificate. Certificate revocation doesn't remove existing certificates from managed Windows computers.
See Revoke and remove Device Trust certificates.
Use an appropriate Setting Type in SCCM to verify Device Registration Task installation
After installing the Device Trust client on your managed Windows computers, SCCM runs a script to verify that installation was successful.
Specify either File System or Registry in your Detection Rule. Don't use the Windows Installer setting type to detect the installation, as SCCM can't detect the Device Trust client using that setting.
Obtain the Registration Task
To apply the security benefits of the Trusted Platform Module (TPM), see Enhance Windows Device Trust security with Trusted Platform Module (TPM).
To obtain an Early Access (EA) version of the Device Registration Task
Unlike the GA version, EA versions of the Device Registration Task aren't available from the Downloads page in the Okta Admin Console. To obtain an EA version, you must configure a link as follows:
https://<org>.<okta/oktapreview>.com/static/devicetrust/OktaDeviceRegistrationTaskSetup-x.x.x.<msi/exe>
Where:
-
<org> is the name of your org
-
<okta/oktapreview> denotes either your Okta Production or Preview environment.
-
OktaDeviceRegistrationTaskSetup-x.x.xis the version of the Registration Task. For the latest version of the Registration Task, see Device Trust for Windows Desktop Registration Task Version History. -
<msi/exe>is the file type of the Device Registration Task, either.msior.exe.
For example, a link for the .msi
Device Registration Task version 1.4.0 to example.oktapreview.com is:
https://example.oktapreview.com/static/devicetrust/OktaDeviceRegistrationTaskSetup-1.4.0.msiFor version history, see Device Trust for Windows Desktop Registration Task Version History.
To obtain a Generally Available (GA) version of the Device Registration Task
The latest GA version of the Device Registration Task is available from the Downloads page in .msi and .exe formats. For version history, see Device Trust for Windows Desktop Registration Task Version History.
-
In the Admin Console, go to .
- Scroll to and then click Download Latest for the type of installer you want.
Install the Registration Task
Install the Registration Task using either of the following methods:
Method 1: Distribute the Registration Task with a management tool (SCCM)
Follow your organization's procedure for distributing software to domain-joined workstations. If your organization uses SCCM, see the Microsoft article How to Deploy Applications in Configuration Manager.
Execute the appropriate command for either .exe or .msi installation.
About the Device Registration Task and proxy servers
If your organization routes internet traffic through a proxy server, you must do the following:
Use a command line to install the Device Registration Task and include parameters
Install Device Registration Task version 1.2.2 or later through a command line and append the appropriate HttpProxy parameter to the installation command. This is necessary because the Device Registration Task installer installs these two scheduled tasks:
- A user task that runs as the signed-in user.
- A device task that runs as a network service. If you set up your proxy server as part of your Internet Explorer (IE) configuration, the device task doesn't detect your IE settings unless you specify that behavior through a command line as shown in the following examples.
Include the parameter appropriate for your environment:
Proxy server environments
HttpProxy=http://<your proxy http url>:<port number>For example, the installation command that includes the proxy server parameter would look similar to this for:
MSI installation:
msiexec /i OktaDeviceRegistrationTaskSetup-1.x.x-xxxxxxx INSTALLDIR="c:\Program Files\Okta\DeviceTrust" EXEOPTIONS="/q2 OktaURL=https://<your Okta org>/ HttpProxy=http://<your proxy http url>:<port number>"EXE installation:
OktaDeviceRegistrationTaskSetup-1.0.0-XXXX.exe /q2 OktaURL=https://<your-okta-org-url>.com HttpProxy=http://<your proxy http url>:<port number>Make sure to add a space if you're also adding the parameter to disable automatic certificate handling.
Proxy Auto-Configuration (PAC) environments
A. Specify the PAC location.
HttpProxyPacLocation=http://mypacfile.url.location
For example, the installation command that includes the PAC location parameter would look similar to this for:
MSI installation:
msiexec /i OktaDeviceRegistrationTaskSetup-1.x.x-xxxxxxx INSTALLDIR="c:\Program Files\Okta\DeviceTrust" EXEOPTIONS="/q2 OktaURL=https://<your Okta org>/ HttpProxyPacLocation=http://mypacfile.url.location"EXE installation:
OktaDeviceRegistrationTaskSetup-1.0.0-XXXX.exe /q2 OktaURL=https://<your-okta-org-url>.com HttpProxyPacLocation=http://mypacfile.url.locationMake sure to add a space if you're also adding the parameter to disable automatic certificate handling.
B. Optional. Allow your Okta org.
If you implement a PAC file in your proxy environment, consider allowing your Okta org by adding an exception to the PAC file like this:
if(localHostOrDomainIs(host,"*.okta.com"))
{ return "DIRECT"; }
Ensure that clients can complete the MTLS handshake
The Mutual TLS certificate exchange (handshake) in this Device Trust flow occurs on Okta URLs that are separate from your Okta org URL (indicated by the wildcard character (*) in the following examples). Make sure to configure proxy servers, proxy clients, and any endpoint protection software you may implement, in a way that doesn't block your clients from completing the certificate exchange with Okta. For example, if your org uses an allowlist to limit outbound traffic, add these exact URLs to the allowlist, including the wildcard character (*):
-
*.okta.com -
*.okta-emea.com -
*.okta-gov.com
With automatic certificate challenge handling:
-
MSI installation
msiexec /i OktaDeviceRegistrationTaskSetup-1.x.x-xxxxxxx INSTALLDIR="c:\Program Files\Okta\DeviceTrust" EXEOPTIONS="/q2 OktaURL=https://<your Okta org>" -
EXE installation
OktaDeviceRegistrationTaskSetup-1.0.0-XXXX.exe /q2 OktaURL=https://<your-okta-org-url>.com
Without automatic certificate challenge handling:
-
MSI installation
msiexec /i OktaDeviceRegistrationTaskSetup-1.x.x-xxxxxxx INSTALLDIR="c:\Program Files\Okta\DeviceTrust" EXEOPTIONS="/q2 OktaURL=https://<your Okta org>/ SkipBrowserSetup=true" -
EXE installation
OktaDeviceRegistrationTaskSetup-1.0.0-XXXX.exe /q2 OktaURL=https://<your-okta-org-url>.com/ SkipBrowserSetup=true
Method 2: Manually install the Registration Task
This procedure is provided in case you want to install the Device Registration Task manually during the testing or proof of concept phase of your implementation.
- Copy the Device Registration Task to the domain-joined Windows computer.
- Run the command prompt as an administrator.
- Click Start.
- In the search box, enter
cmd, and then press CTRL+SHIFT+ENTER.
- Change directories to the location of the file.
- Issue the command appropriate for the file type, either
.msior.exe. For installation and proxy server details, see the previous section Distribute the Registration Task using a management tool (SCCM).
2.3 Verify certificate enrollment before you configure the Trusted option in app sign-on policy rules
Before you configure the Trusted option for apps in app sign-on policy rules, you must make sure that certificates are installed in the certificate store on the domain-joined computers you have targeted for this Device Trust solution.
If certificates aren't installed and the Trusted setting is enabled, users are denied access to the app and are redirected to a security message advising them to contact their administrator. You can configure the message to include a Learn more link to more information. See Enable the global Device Trust setting for your org.
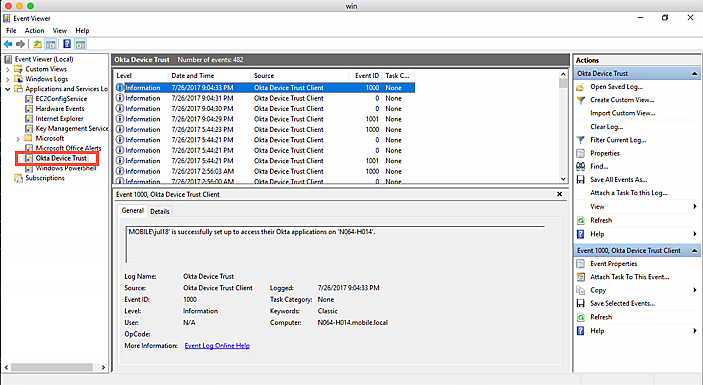
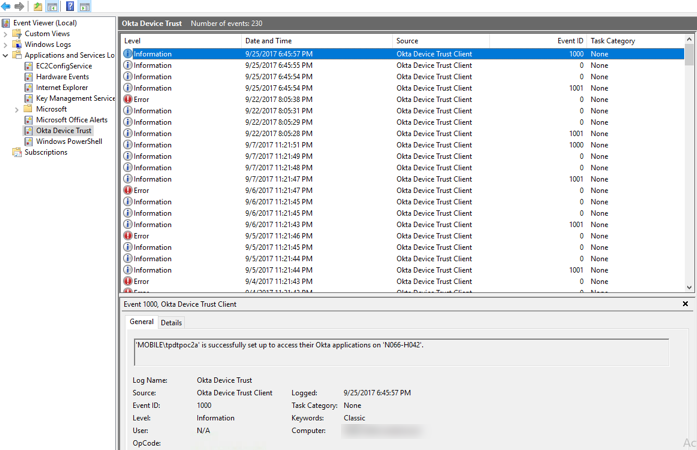
To verify certificate enrollment, Okta recommends that you use your management tool to parse the Windows Event Viewer, or use a command line to query the user certificate store directly. Look for the Okta MTLS certificate.
If an end user is deactivated, all Device Trust certificates installed on their domain-joined Windows computers are revoked (but not removed) automatically. To remove revoked certificates, see Revoke and remove Device Trust certificates.
While a management tool is the simplest way to verify that certificates are installed on multiple domain-joined computers, here are two ways to check enrollment on a single computer:
Verify with Windows Event Viewer
-
Go to Start and enter the word
eventin the search field. -
When the Event Viewer appears at the top of the Start menu, press Enter to open it.
-
Expand Applications and Services Logs.
-
Click Okta Device Trust and find event ID 1000.
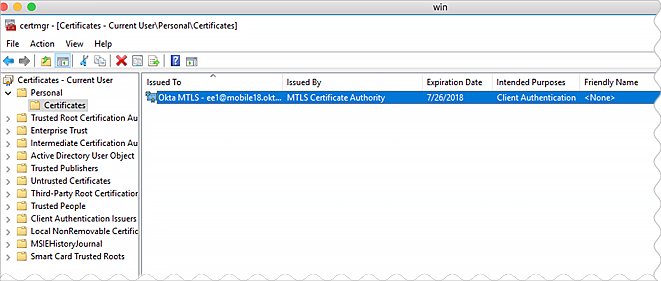
Verify with Microsoft Management Console
-
Go to Start and enter
mmcin the search field to open the console. -
Go to File and click Add/Remove Snap-in.
-
Select Certificates and then click Add.
-
In the Certificates snap-in dialog, select My user account.
-
Click Finish.
-
Click OK.
-
Under Console Root, expand Certificates - Current User.
-
Expand the Personal folder and click Certificates. Verify the Okta MTLS certificate.
2.4. Optional. Use GPO to configure browsers to select the certificate automatically.
If appropriate for your environment, you can use a Group Policy Object (GPO) tool instead of the default capability of the Device Registration Task to configure browsers to automatically select the Device Trust certificate. If you use a GPO tool, make sure that you have added the flag SkipBrowserSetup=true to the Device Registration Task installation command. See Install a Device Trust-supported version of the Okta IWA web app in your AD domain.
If you don't configure automatic certificate selection, either through the Device Registration Task or a GPO, then end users are prompted to select the certificate when accessing the app. To make the selection easier for end users in this case, only the Okta Device Trust certificate appears.
Depending on the refresh interval, changes you make using GPO may not be seen immediately on Windows client computers. For more information, see the Microsoft article Group Policy refresh interval for computers.
To configure Chrome to select the Device Trust certificate automatically
-
Download the policy templates and extract the zip file to the desktop of the Active Directory domain controller.
Copy files to folders:
-
Copy
C:\end users\Administrator\Desktop\policy_templates\windows\admx\en-US\chrome.admltoC:\Windows\PolicyDefinitions\en-US\ -
Copy
C:\end users\Administrator\Desktop\policy_templates\windows\admx\chrome.admxtoC:\Windows\PolicyDefinitions\
-
-
Open the Group Policy Management Console (GMPC).
-
In the Start menu, type Run.
-
In Run, enter
gpmc.msc.
-
-
Expand to the appropriate domain, go to Group Policy Objects, right-click Default Domain Policy, and then click Edit.
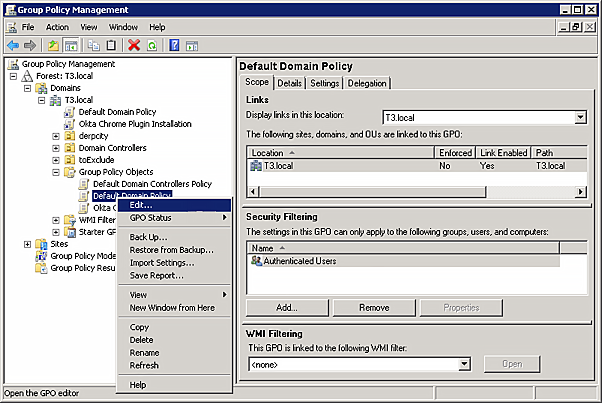
-
Go to .
-
In the right pane click Automatically select client certificate for these sites, and then under Content Settings, click Edit policy setting.
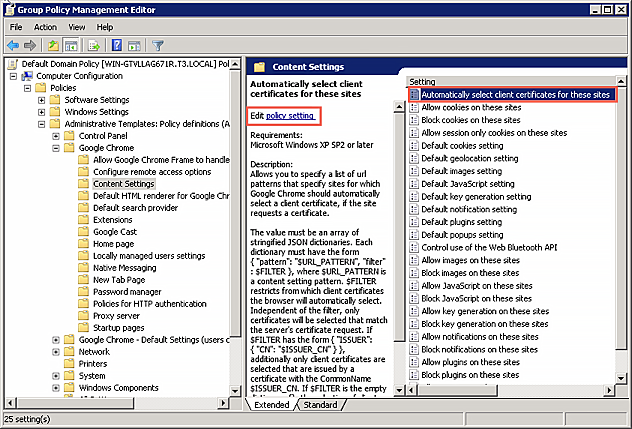
-
In the dialog that opens, click Enabled.
-
Under Options, click Show.
-
In the Show Contents dialog, enter a value that specifies the subdomain of your org and indicates whether it applies to your Preview or Production org.
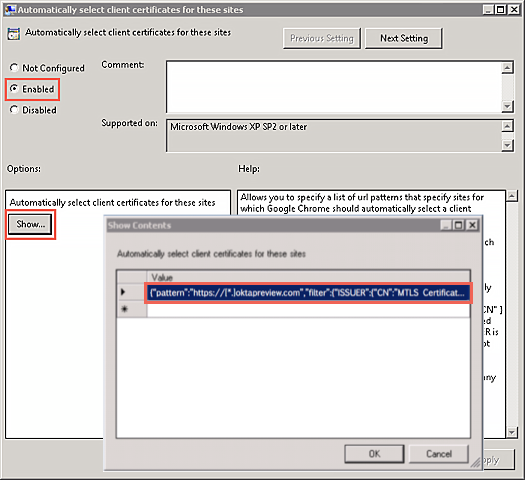
For example, if your Okta Preview org URL is
https://[*.]oktapreview.com, you would enter the following value:{"pattern":"https://[*.]oktapreview.com","filter":{"ISSUER":{"CN":"MTLS Certificate Authority"}}}If your Okta Production org URL is
https://[*.]okta.com, you would enter the following value:{"pattern":"https://[*.]okta.com","filter":{"ISSUER":{"CN":"MTLS Certificate Authority"}}} -
Click OK.
-
Confirm that auto certificate settings are configured:
-
Refresh GPO, either by waiting for the next GPO refresh interval, or by issuing the
gpupdatecommand. -
In Chrome, enter
chrome://policyin the address bar, and then press Enter.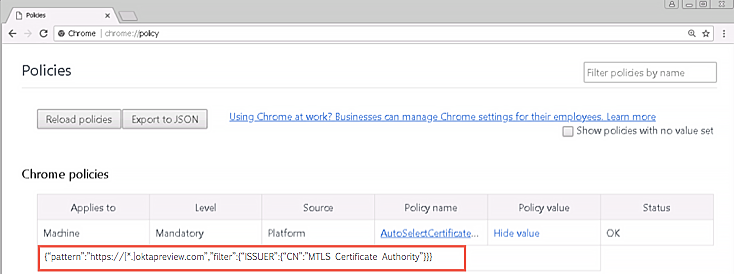
-
Click Show value and verify that the policy AutoSelectCertificateForUrls displays this value:
{"pattern":"https://[*.]oktapreview.com","filter":{"ISSUER":{"CN":"MTLS Certificate Authority"}}}
You can also confirm settings through the Windows registry editor:
-
Go to Start and enter
regeditin the search field. -
In the registry editor, go to:
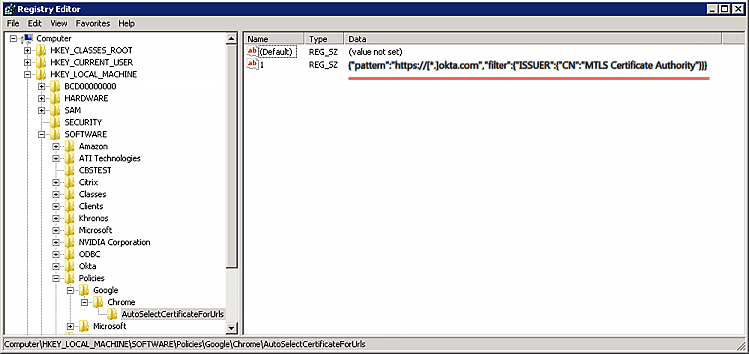
-
To configure IE to select the Device Trust certificate automatically
-
From the Active Directory domain controller, open the Group Policy Management Console (GMPC).
-
In the Start menu type
Run. -
In Run, enter
gpmc.mscand then press Enter.
-
-
Expand to the appropriate domain, go to Group Policy Objects, right-click Default Domain Policy, and then click Edit.
-
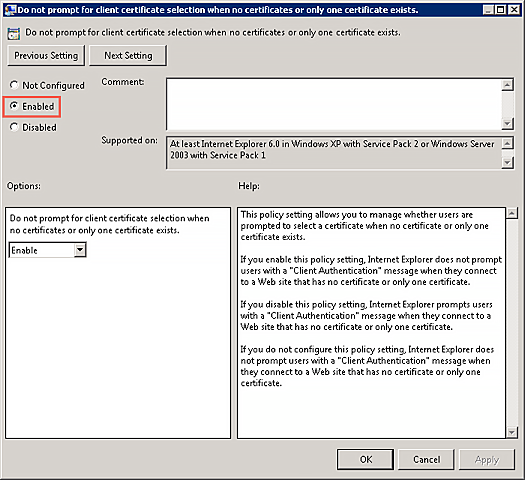
Go to .
-
In the right pane under Settings, double-click Don't prompt for client certificate selection when no certificates or only one certificate exists.
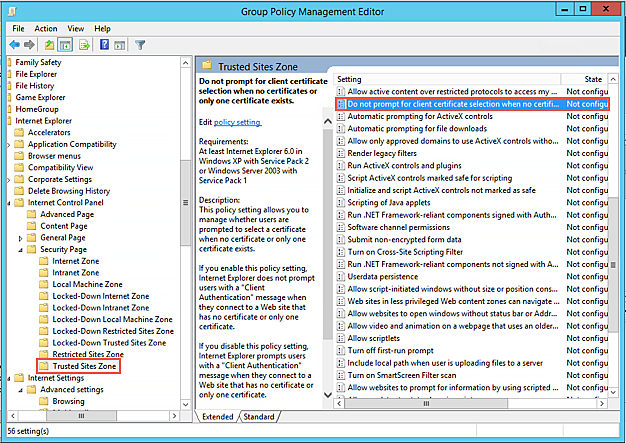
-
In the dialog that opens, click Enabled.
-
Close open windows.
-
Go to .
-
In the right pane under Settings, double-click Site to Zone Assignment List.
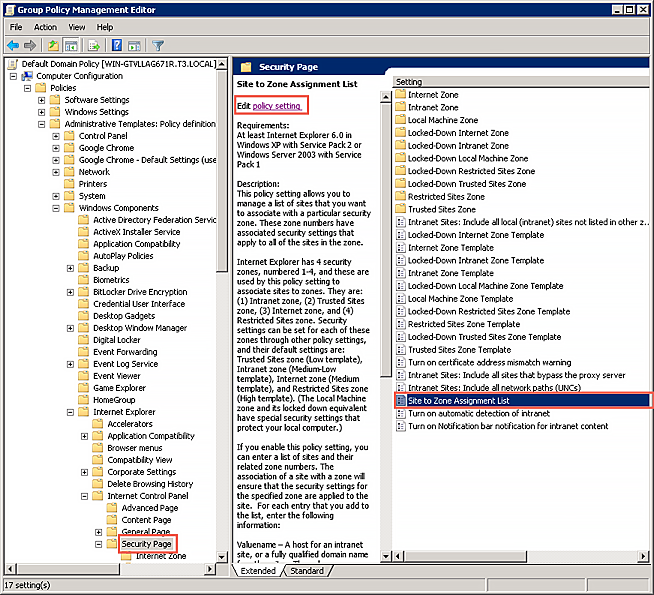
-
In the dialog that opens, click Enabled.
-
Under Options, next to Enter the zone assignments here, click Show.
-
Enter the following in the Show Contents dialog:
-
In the Value name column, enter either
https://*.okta.comorhttps://*.oktapreview.comdepending on whether you're deploying this feature in your Okta Production or Preview org. -
In the Value column, enter
2. This value corresponds to the security zone setting Trusted sites zone that you configured in Step 3.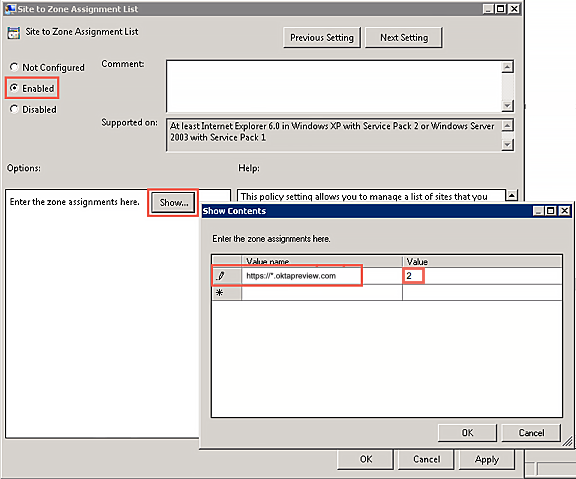
-
-
Click OK to close open windows.
-
Confirm that the GPO settings are configured:
-
Refresh GPO, either by waiting for the next GPO refresh interval or by issuing the
gpupdatecommand in a command line. -
In the Start menu type
Run. -
In Run, enter
gpedit.mscand then press Enter. -
Go to .
-
In the right pane under Settings, double-click Don't prompt for client certificate selection when no certificates or only one certificate exists.
-
In the dialog that opens, confirm that the setting is Enabled.
-
Step 3. Configure app sign-on policy rules in Okta
About app sign-on policy rules
By default, all Client options in the App Sign On Rule dialog box are pre-selected. To configure more granular access to the app, create rules that reflect:
- Who users are, or the groups to which they belong
- Whether they are on or off network, or within a defined network zone
- The type of client running on their device (Office 365 apps only)
- The platform of their mobile or desktop device
- Whether or not their devices are Trusted
Taking an allow-list approach to sign-on policy rules
- Create one or more Allow rules to support the scenarios that will allow access to the app, then assign those rules the highest priority.
- Create a Deny catch-all rule that will apply to users who don't match the permissive scenarios you created in Step 1. Assign the Deny catch-all rule the lowest priority, just above the default rule. In the allow-list approach described here, the default rule is never reached because it is effectively negated by the Deny catch-all rule.
For important security information about creating app sign-on policy rules, see About app sign-on policies.
Procedure
- In the Admin Console, go to , and then click the SAML or WS-enabled app that you want to protect with Device Trust.
- Click the Sign On tab.
- Scroll down to the Sign On Policy, and click Add Rule.
- Configure one or more rules using the following example as a guide.
This example shows Device Trust rules for managing access to Office 365. For other apps the section If the user's client is any of these isn't present.
Example Allowlist
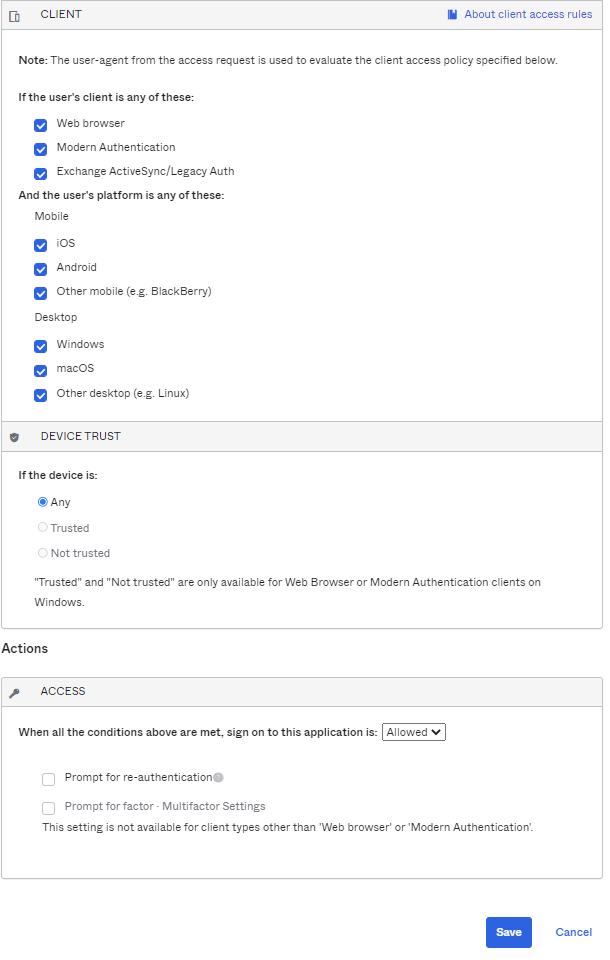
Example Rule 1: Exchange ActiveSync or Legacy Auth; All platforms; Any Trust; Allow access
-
Enter a descriptive rule name.
-
Under PEOPLE, specify whether to apply the rule to individuals only or to individuals and groups. The option you select must be the same for all the rules you create for this example.
-
Under LOCATION, specify the user location to which the rule applies. The option you select must be the same for all the rules you create for this example.
-
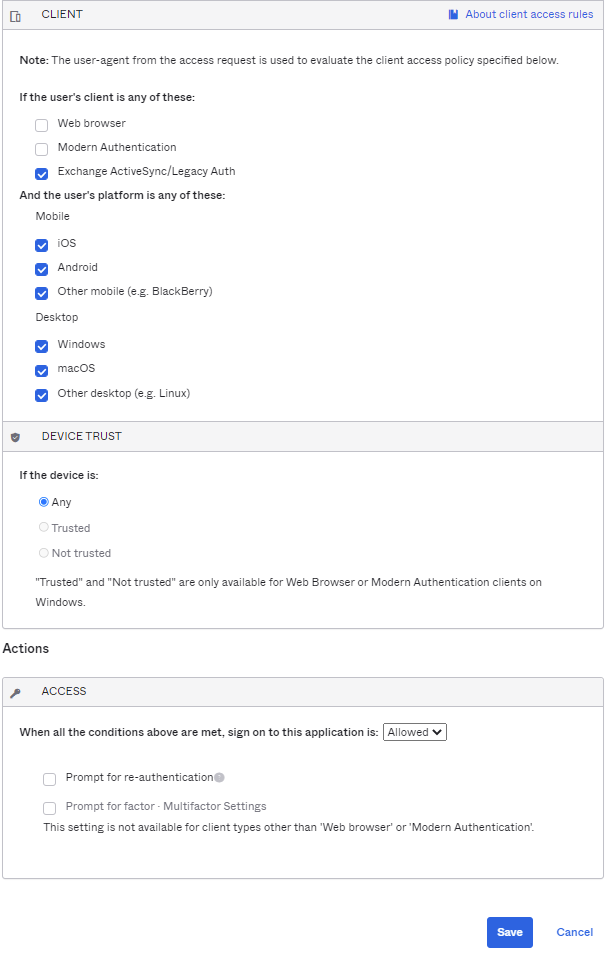
Under CLIENT, configure the following settings:
-
Web browser is cleared.
-
Modern Auth client is cleared.
-
Exchange ActiveSync client or Legacy Auth client is selected.
-
Mobile
-
iOS is selected.
-
Android is selected.
-
Other mobile (e.g. BlackBerry) is selected.
-
Desktop
-
Windows is selected.
-
macOS is selected.
-
Other desktop (e.g. Linux) is selected
-
-
Under DEVICE TRUST, configure the following:
You can select the Trusted and Not trusted options in the Device Trust section only if all of the following options in the Client section are unselected:
- Exchange ActiveSync or Legacy Auth client
- Other mobile (for example, BlackBerry)
- Other desktop (for example, Linux)
-
Any is selected.
-
Trusted is cleared.
-
Not trusted is cleared.
-
Configure Access.
Allowed is selected.
-
Click Save.
-
Create Rule 2.
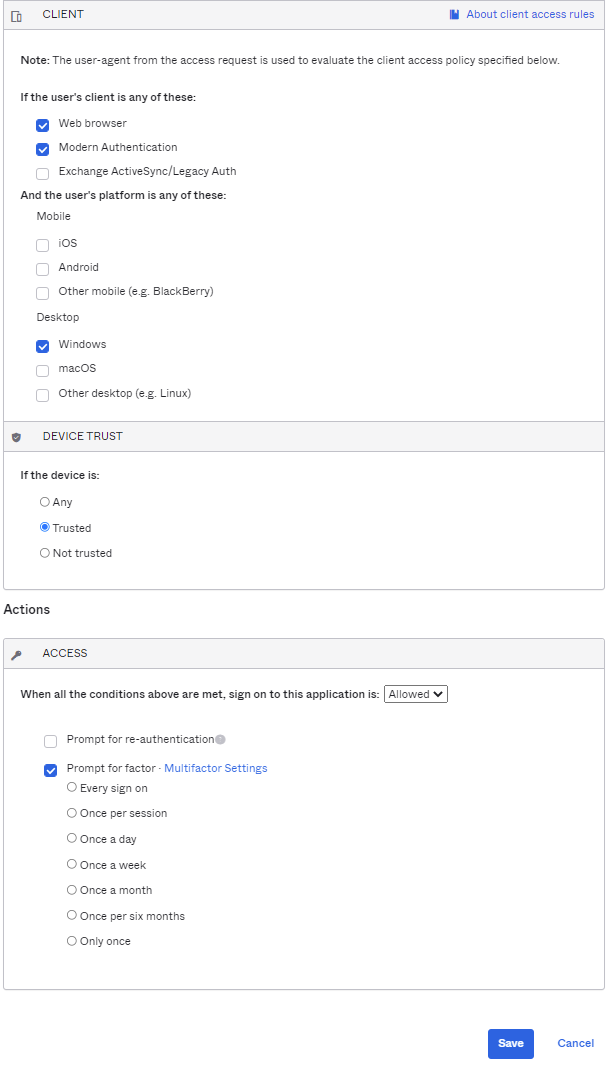
Example Rule 2: Web browser or Modern Auth; Windows; Trusted; Allow access + MFA
-
Enter a descriptive name for the rule.
-
Under PEOPLE, select the same people option that you selected in Rule 1. The people option needs to be the same for all rules in this example.
-
Under LOCATION, select the same location option that you selected in Rule 1. The location option needs to be the same for all rules in this example.
-
Under CLIENT, configure the following settings:
-
Web browser is selected.
-
Modern Auth client is selected.
-
Exchange ActiveSync client is cleared.
-
Mobile
-
iOS is cleared.
-
Android is cleared.
-
Other mobile (e.g. BlackBerry) is cleared.
-
Desktop
-
Windows is selected.
-
macOS is cleared.
-
Other desktop (e.g. Linux) is cleared.
-
-
Under DEVICE TRUST, configure the following:
You can select the Trusted and Not trusted options in the Device Trust section only if all of the following options in the Client section are unselected:
- Exchange ActiveSync or Legacy Auth client
- Other mobile (for example, BlackBerry)
- Other desktop (for example, Linux)
-
Any is cleared.
-
Trusted is selected.
-
Not trusted is cleared.
-
Configure Access:
-
Allowed is selected.
-
Prompt for factor is selected.
-
-
Click Save.
-
Create Rule 3.
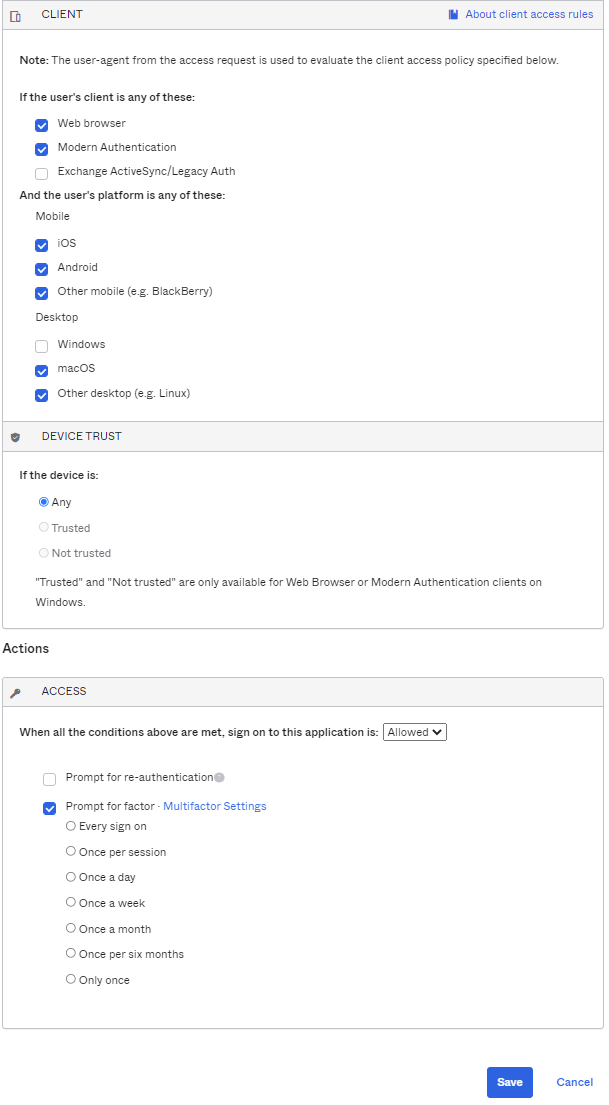
Example Rule 3: Web browser or Modern Auth; All platforms except Windows; Any Trust, Allow access + MFA
-
Enter a descriptive name for the rule.
-
Under PEOPLE, select the same people option that you selected in Rule 1. The option must be the same for all rules in this example.
-
Under LOCATION, select the same Location option that you selected in Rule 1. The option must be the same for all rules in this example.
-
Under CLIENT, configure the following settings:
-
Web browser is selected.
-
Modern Auth client is selected.
-
Exchange ActiveSync client is cleared.
-
Mobile
-
iOS is selected.
-
Android is selected.
-
Other mobile (e.g. BlackBerry) is selected.
-
Desktop
-
Windows is selected
-
macOS is selected
-
Other desktop (e.g. Linux) is selected
-
-
Under DEVICE TRUST, configure the following:
-
You can select the Trusted and Not trusted options in the Device Trust section only if all of the following options in the Client section are unselected:
- Exchange ActiveSync or Legacy Auth client
- Other mobile (for example, BlackBerry)
- Other desktop (for example, Linux)
-
Any is selected.
-
Trusted is cleared.
-
Not trusted is cleared.
-
-
Configure Access.
-
Allowed is selected.
-
Prompt for factor is selected.
-
-
Click Save.
-
Create Rule 4.
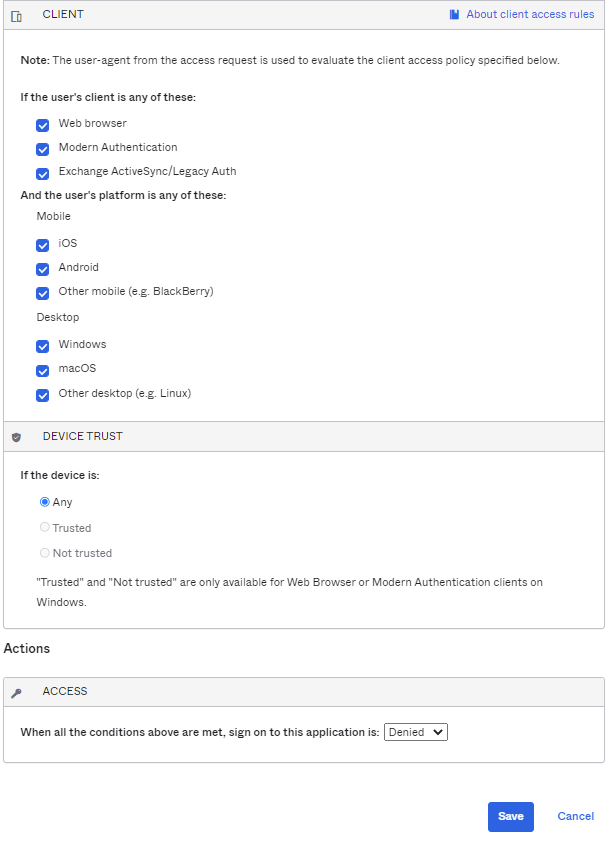
Example Rule 4: Any client; All platforms; Any Trust; Deny access
-
Enter a descriptive name for the rule.
-
Under PEOPLE, select the same people option that you selected in Rule 1. The option must be the same for all the rules you create for this example.
-
Under LOCATION, select the same location option that you selected in Rule 1. The option must be the same for all the rules you create for this example.
-
Under CLIENT, configure the following settings:
-
Web browser is selected.
-
Modern Auth client is selected.
-
Exchange ActiveSync client is selected.
-
Mobile
-
iOS is selected.
-
Android is selected.
-
Other mobile (e.g. BlackBerry) is selected.
-
Desktop
-
Windows is selected.
-
macOS is selected.
-
Other desktop (e.g. Linux) is selected.
-
-
Under DEVICE TRUST, configure the following:
-
You can select the Trusted and Not trusted options in the Device Trust section only if all of the following options in the Client section are unselected:
- Exchange ActiveSync or Legacy Auth client
- Other mobile (for example, BlackBerry)
- Other desktop (for example, Linux)
-
Any is selected.
-
Trusted is cleared.
-
Not trusted is cleared.
-
-
Configure Access.
Denied is selected.
-
Click Save.
Example Rule 5: Default sign on rule – Any client; All platforms; Any Trust; Allow access
The Default sign-on rule is already created, and you can't edit it. In this allowlist example, the default rule is never reached because it's effectively negated by Rule 4.
Revoke and remove Device Trust certificates
You may need to revoke an end user's Device Trust certificates from the Okta Certificate Authority. This is recommended if the computer is lost or stolen, or if the end user is deactivated. To re-secure an end user's computer with Device Trust after revoking their Device Trust certificates, you need to remove the revoked certificate from their computer before enrolling a new certificate.
Be aware of the following:
- Steps 1 - 4 of this procedure revoke all Device Trust certificates from the Okta Certificate Authority that were issued to the end user. Certificate revocation doesn't remove existing certificates from managed Windows computers. To re-secure a Windows computer with Device Trust after revoking certificates, you must first remove any existing Device Trust certificate from the computer and then re-enroll the computer with a new certificate as detailed in step 5. The Device Registration Task won't enroll a new certificate if another certificate (whether revoked or not) is present.
- Deactivating an end user in Okta also revokes their Device Trust certificate from the Okta Certificate Authority (but doesn't remove the certificate from their computer).
-
In the Admin Console, go to .
-
Click the end user whose Device Trust certificate you want to revoke.
- In the More Actions menu, click Revoke Trust Certificate.

-
Read the message that displays, and then click Revoke Trust Certificate.
-
Optional. If you want to re-secure the end user's computer with Device Trust, first remove any existing Device Trust certificate from the computer.
-
To remove a certificate from a single computer (such as during testing or the proof of concept phase of your implementation), use a third-party management tool such as Certificate Manager Tool (Certmgr.exe) to remove the certificate issued by the Okta MTLS Certificate Authority.
-
To remove certificates from multiple computers, use a third-party management tool such as GPO or SCCM to remove the certificate issued by the Okta MTLS Certificate Authority.
-
Troubleshooting
Okta Device Trust for Windows generates a certificate on domain-joined Windows devices and presents it to Okta when a Device Trust-secured WS-Fed or SAML app is launched. The two problems that you're most likely to encounter are:
- Trusted devices are unable to access Device Trust-secured apps.
- Untrusted devices are able to access Device Trust-secured apps.
If you encounter either problem, try to correct it by performing basic troubleshooting. If the problem persists, perform advanced troubleshooting.
Basic Troubleshooting
To perform basic troubleshooting, review the following areas:
IWA web app installation and setup
Verify the following:
- You have installed a Device Trust-capable version of the IWA web app in your Active Directory domain.
- If you use HTTPS for IWA, you have modified the IWA web.config file to support HTTPS binding.
If the problem persists, proceed to Advanced Troubleshooting.
Enablement
Verify that you have enabled the global Device Trust setting in .
Registration task
Verify that you have distributed the Device Registration Task to Windows domain-joined workstations.
Proxy server environments: For the Registration Task installation to succeed in environments that implement a proxy server, you must install Device Registration Task version 1.2.1 or later using a command line and append the appropriate HttpProxy parameter to the installation command.
See Install the Registration Task.
Certificate
Verify that the certificate is installed
-
Open Microsoft Management Console. See Verify with Microsoft Management Console.
-
Open the end user's personal store (not the Local computer store).
-
Verify that a single certificate appears under issued by the MTLS Certificate Authority.
-
If no certificate appears, see Advanced Troubleshooting.
Known Issue – Auth failure caused by blocked Mutual TLS certificate exchange
The Mutual TLS certificate exchange (handshake) in this Device Trust flow occurs on Okta URLs that are separate from your Okta org URL (indicated by the wildcard character (*) in the following examples). Make sure to configure proxy servers, proxy clients, and any endpoint protection software in a way that doesn't block your clients from completing the certificate exchange with Okta. For example, if your org uses an allowlist to limit outbound traffic, add these exact URLs to the allowlist, including the wildcard character (*):
-
*.okta.com -
*.okta-emea.com -
*.okta-gov.com
Sign-on policy
Verify the following:
You have configured a sign-on policy that:
-
Is applied to the WS-Fed or SAML app that you want to secure with Device Trust.
-
Is applied to the correct users or groups.
-
Includes, at minimum, an active rule that denies access to untrusted devices.
System Log
Review the System Log to verify the following Device Trust System Log events:
Authentication
-
DisplayMessage: Authentication of the device through a certificate -
EventType:user.authentication.authenticate
Enrollment
-
DisplayMessage: Device Trust certificate enrollment -
EventType:user.credential.enroll
Issuance
-
DisplayMessage: Device Trust certificate issuance -
EventType:pki.cert.issue
Revocation
-
DisplayMessage: Device Trust certificate revocation -
EventType:pki.cert.revoke
Renewal
-
DisplayMessage: Device Trust certificate renewal -
EventType:pki.cert.renew
View unique device IDs in DebugContext
DebugData shows the unique ID of the devices associated with Device Trust events and is useful for debugging purposes. This information can also help you verify that Device Trust is enforced on devices in your inventory, which may be useful before rolling out the feature to a large group of users.
The information contained in debugContext.debugData is intended to add context when troubleshooting customer platform issues. Key names and values are subject to change without notice and should be used primarily as a debugging aid, not as a data contract. See DebugContext Object in Okta developer documentation.
-
In the Admin Console, go to .
- Search for the Device Trust Event (date) that you're interested in, then go to:
Advanced Troubleshooting
If basic troubleshooting didn't resolve the problem you're experiencing, and the certificate isn't installed on the Windows workstation, check in the following locations:
In the Okta Admin Console
Verify the following:
-
The org has an active Active Directory (AD) integration ()
-
The end user of the domain-joined Windows computer is:
-
Present in
-
Activated
-
A member of the Active Directory domain
-
-
The IWA web app is:
-
Primary
-
Enabled
-
-
A Device Trust-capable version
On the IWA server
Check IIS settings for the IWA web app
- Click Start.
- In the search box, enter IIS.
- Right-click Internet Information Services Manager and select Run as administrator.
- If the IWA web app is configured for SSL, open the SSL settings and make sure the option Require SSL is selected.
- Open the Authentication feature and make sure that Windows Authentication is Enabled.
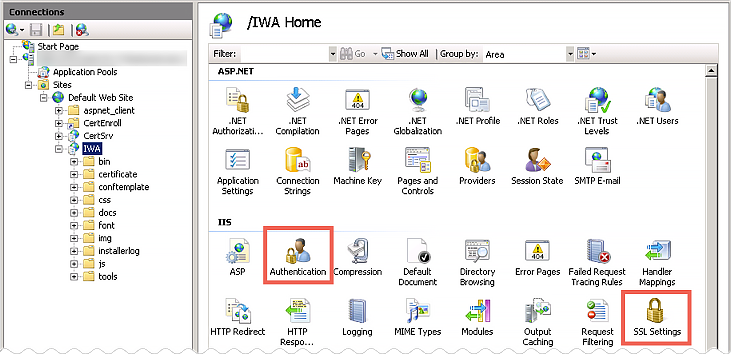
Check for errors in the web.config file
- Go to
C:\Inetpub\wwwroot\IWA\web.config. - Use a validation tool to make sure the web.config file contains valid XML syntax.
- If HTTPS was enabled in IIS on the site, make sure that the web.config file enables
SecureBindingForDeviceTrust.
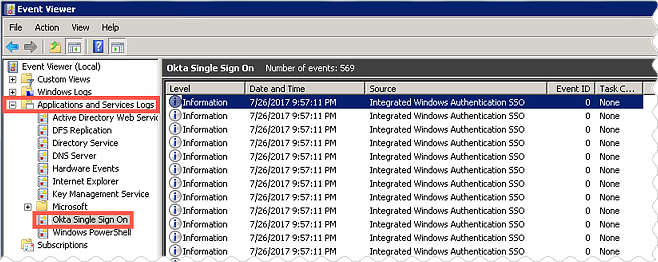
Check for errors in Windows logs
- Click Start.
- In the search box, enter Event Viewer.
- Expand Application and Services Logs.
- Check for errors in
Okta Single Sign On.
On the domain-joined Windows computer
Make sure Okta Device Trust Tasks were installed and successful:
- Click Start.
- In the search box, enter Task Scheduler.
- Right-click Task Scheduler and select Run as administrator.
- Make sure the
okta-devicetrust-devicetaskandokta-devicestrust-usertasktasks appear and have been completed successfully.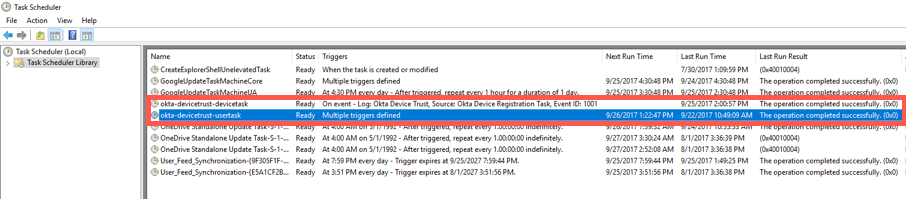
Check for errors in Windows logs:
- Click Start.
- In the search box, enter Event Viewer.
- Expand Application and Services Logs.
- Click
Okta Device Trust
.
Force certificate renewal in some circumstances
Certificates are valid for one year and are renewed automatically sometime within 30 days before expiration. For automatic renewal to succeed, end users must be logged on to the domain-joined computer and connected to your corporate network.
You can manually force certificate renewal to try to fix the following problems (requires Device Registration Task 1.3.1 or later):
- An end user's certificate was incorrectly or accidentally revoked by the admin through the Admin Console (see Revoke).
- The certificate was corrupted on the client due to accidental deletion, file corruption, or loss of the private key.
Open a command prompt and issue the following command: "C:\Program Files\Okta\DeviceTrust\OktaDeviceReg.exe" --user --forceRenewal
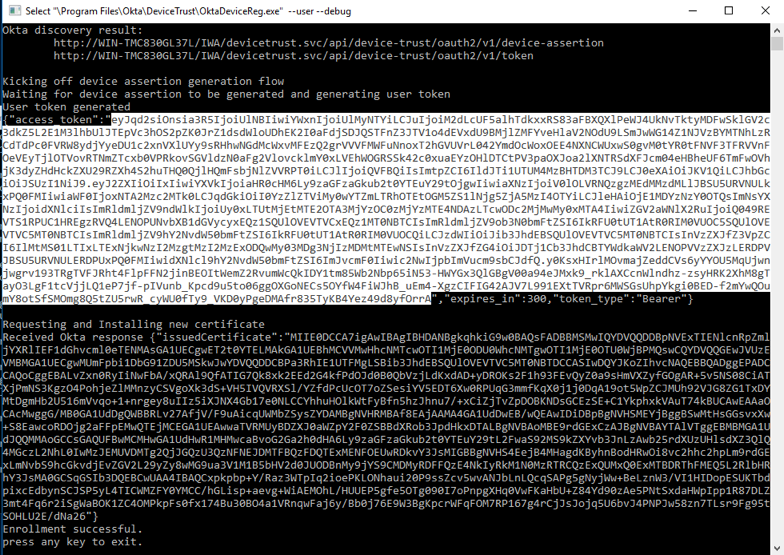
Run the task in debug mode as the logged-on user
-
Make sure that the IWA server is reachable when the task is run (either directly over the internet or through a VPN).
-
Open a command prompt and issue the following command:
"C:\Program Files\Okta\DeviceTrust\OktaDeviceReg.exe" --user --debug -
If the Device Trust certificate isn't generated on the device, the task executes the following actions:
-
Contacts Okta at the registry value pointed to by
HKLM\Software\Okta\DeviceTrust\OktaOrgUrland gets the location of the IWA server for the org. -
Contacts the IWA server to generate the device token for the device.
-
Contacts the IWA server to generate a user token based on the device token.
-
Contacts Okta with the generated user token to generate the certificate.
-
Installs the certificate in the user's personal store.
-
The user token is a set of JWT claims signed by the IWA server. You may be asked to copy the token and provide it to Okta Support for analysis.
Known issues
-
If multiple apps secured by Device Trust are configured to open automatically when end users sign in to their Okta dashboard from Internet Explorer or Edge browsers, only one of the apps completes the Device Trust flow. Access to the remaining apps fails and end users are shown a message advising them to contact their administrator. (See Enable the global Device Trust setting for your org.)
-
Okta Device Trust for Windows and certificate-based IWA for SSO: Configuring this Device Trust solution may cause an incompatibility issue if your org is configured with certificate-based IWA to support SSO for iOS and Android mobile devices.
In this scenario, end users that sign in to Okta using IWA from Windows computers with a Device Trust certificate and an IWA certificate installed may be presented with a certificate picker that contains both certificates during the Desktop SSO flow, which may cause confusion. If end users select the Device Trust certificate, they get a 403 error during the IWA flow.
It may be possible to enable certificate hinting in IIS so that only one certificate is shown to users. See the Microsoft article Schannel SSP Technical Overview.
-
The Device Registration Task checks the version of the .NET Framework running on managed Windows computers. If the version isn't 4.5.2 or later, the Device Registration Task automatically installs version 4.5.2. During installation, progress indicators and other installation dialogs appear on the end user page.