Configure Okta Workflows for an external telephony provider
This Okta Workflows use case falls into the Yellow Zone as described in the Workflows system limits. It requires careful attention to architecture and best practices because it has a higher risk of running into system limits or other caveats.
Use the Okta API instead. See the Telephony inline hook reference developer documentation.
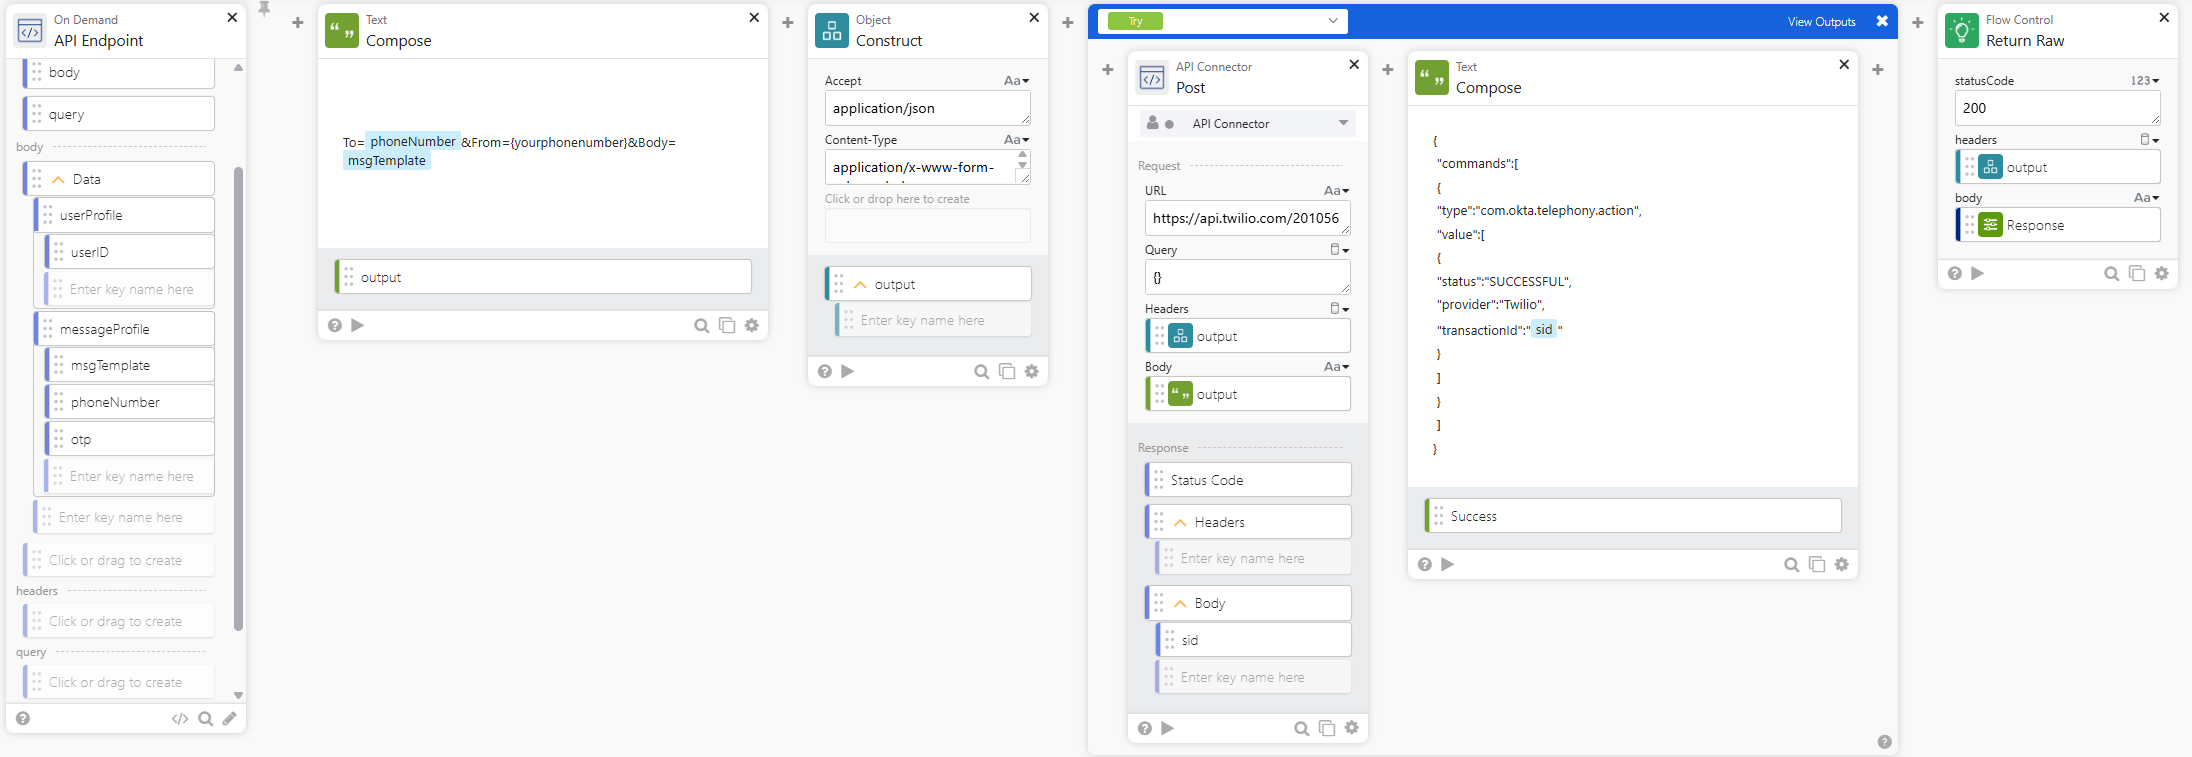
This task explains how to create a flow in Okta Workflows to send the one-time pass code (OTP) to your end users through the telephony provider of your choice. The flow looks like this:
Before you begin
- Review the Telephony documentation to understand regulatory requirements, toll fraud, and technical considerations.
- Set up Okta Workflows.
- Set up a connection from the Okta org. See Authorize the Okta connector.
- Set up a connection for the API Connector. See Authenticate with API Connector cards.
- Set up a telephony provider of your choice. Take note of this information:
- Account SID
- Auth token
- Phone number
- SMS message URL to send POST requests. For example, the Twilio URL is this:
https://api.twilio.com/2010-04-01/Accounts/{yourtwilioaccountid}/Messages.jsonIn this example,
{yourtwilioaccountid}is your Twilio account ID.
Create a flow
- In the Admin Console, go to .
- In the Workflows Console, click .
Create the API Endpoint event card
- Click Add Event. Search for and select the Okta app for API Endpoint.
- In the API Endpoint settings window, set the Security level to Secure with client token.
- Leave the Client token field blank and then click Close.
- In the Body section, create the following fields. Click the dropdown menu for the field to change its type.
| Field | Type |
|---|---|
|
data |
Object |
|
> userProfile |
Object |
|
> > userId |
Text |
|
> messageProfile |
Object |
|
> > msgTemplate |
Text |
|
> > phoneNumber |
Text |
|
> > otp |
Text |
Create a Compose function card
- Click Add function. Search for and select the Compose function card.
- In the card, enter the following text:
To=phoneNumber&From={yourphonenumber}&Body=msgTemplate - To map the phoneNumber and msgTemplate fields, drag and drop these fields from the API Endpoint event card.
- Replace
{yourphonenumber}with your phone number, including the country code. This is the number that your telephony provider assigned to you.
Create a Construct function card
- Click Add function. Search for and add the Object Construct function card.
- In the card, add these input text fields: Accept and Content-Type.
- Enter these values in the fields:
-
Accept:
application/json -
Content-Type:
application/x-www-form-urlencoded
-
Accept:
Create an If Error function card
- Click Add function. Search for and select the If Error function card.
- Ensure that the If Error function card is in the Try mode.
Inside this card, create the following cards.
Create an API Connector card
- Inside the + menu, click the cloud icon. Search for and select the API Connector card.
- Select the Post type.
- In the Post card, enter the SMS message URL for your telephony provider.
- Drag and drop the Output field from the Construct function card to the field.
- Drag and drop the Output field from the Compose function card to the field.
- In the , create the sid text field.
Create a Compose function card for success
- Next to the Post card, inside the + menu, click the calculator icon. Search for and select the Compose function card.
-
In the card, enter the following code:
{ "commands":[ { "type":"com.okta.telephony.action", "value":[ { "status":"SUCCESSFUL", "provider":"<YOURPROVIDER>", "transactionId":"sid" } ] } ] } - Replace
<YOURPROVIDER>with the name of your telephony provider, likeTwilio. - Drag and drop the sid field from the Post card.
- Click the dropdown menu for the Output field and rename it
Success. - Click View outputs for the If Error card.
- Create an output object field called
Response. - Under this Response field, drag and drop the Success field from the Compose card.
Add error fields
- In the If Error card, switch the Try mode to the If Error mode.
- In the Error output, create the following fields. Click the dropdown menu for the field to change its type.
| Field | Type |
|---|---|
|
body |
Object |
|
> code |
Text |
|
> status |
Text |
|
> message |
Text |
Create a Compose function card for error
- Next to the Error output fields, inside the + menu, click the calculator icon. Search for and select the Compose function card.
-
In the card, enter the following code:
{ "error":{ "errorSummary":"Failed to deliver SMS to phoneNumber", "errorCauses":[ { "errorSummary":"Couldn't deliver OTP", "reason":"message" } ] } } - Drag and drop the phoneNumber field from the API Endpoint event card.
- Drag and drop the message field from the Error output.
- Click the dropdown menu for the Output field to rename it
Error. - Drag and drop the Error field under the Response section of the If Error card.
The card in the If Error mode looks like this:
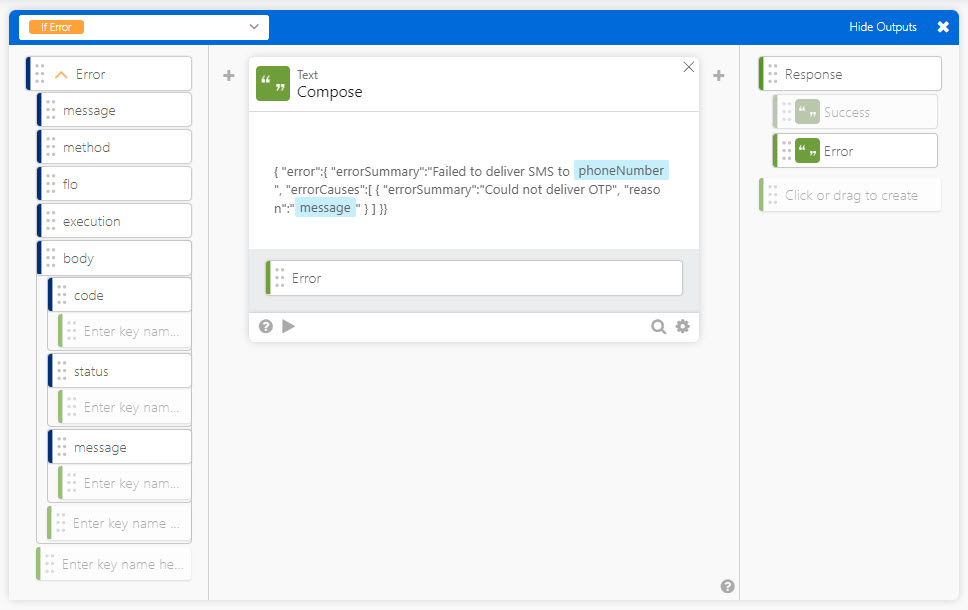
The If Error function card is now complete.
Create a Return Raw card
- In the flow, click Add function. Search for and select the Return Raw function card.
- Drag and drop the Output field from the Construct card to the Headers field.
- Drag and drop the Response field of the If Error card to the Body field.
- Save the flow and turn it on.
Copy information for telephony inline hook
- Go to the API Endpoint event card, and then click the </> icon to open the API Endpoint settings.
- From the settings dialog, copy the following information: Invoke URL, Alias, and Client Token. You need this information in the next step when creating a telephony inline hook.