
Enforce Okta Device Trust for Jamf Pro managed macOS devices
Okta Device Registration Task v1.3.1 was released to support Python 3. If you require the Python 2.x script, see Device Registration Task v1.2.1.
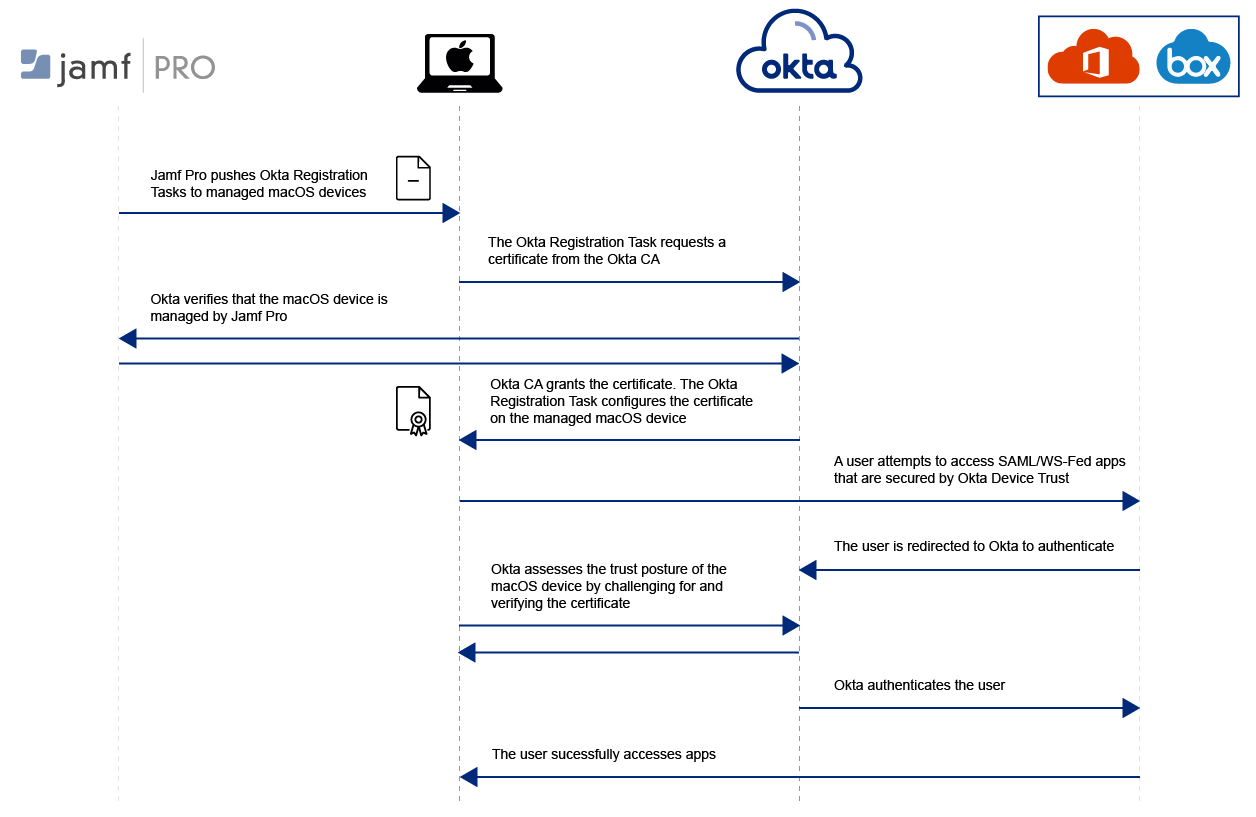
Okta Device Trust for Jamf Pro managed macOS devices allows you to prevent unmanaged macOS devices from accessing corporate SAML and WS-Fed cloud apps. Okta Device Trust ensures that only known and secured devices can access your Okta-managed applications.
Prerequisites
This solution works with:
- Apple computers running Supported platforms, browsers, and operating systems of macOS.
- Jamf Pro MDM solution
- The following browsers and native apps capable of accessing the Okta Keychain on the managed computer when performing the federated authentication flow to Okta:
- Browsers: Chrome and Safari browsers
- Modern Auth-enabled native apps:
- Box
- Google Drive
- Microsoft Office
- Skype for Business
- Slack
- The Okta Device Registration Task is a Python script that completes various tasks (for example, enrollment, and registration). Depending on your OS, complete one of the following, to make sure you use the appropriate version of this script:
- If you have macOS 10.15.xx (Catalina), 11.xx (Big Sur), or 12.xx (Monterey), use registration version 1.3.3 or later, which is based on Python 3.
- If you have macOS 10.14.xx (Mojave) and are currently using registration script 1.2.1 or earlier, continue to use it as-is, or upgrade to Catalina, Big Sur, or Monterey before using Python 3.
Before you begin
-
Device Trust deployment is not renewed on devices that are not used to access secure applications. For this reason, it is recommended to issue certificates only to the devices that require access to secure resources.
- Modern Authentication required for securing Microsoft Office apps: To secure Microsoft Office apps with this Device Trust solution they must be enabled to support Modern Authentication. For more information, see this Microsoft article. For information about securing Office 365 clients that use legacy protocols, see Office 365 Client Access Policies.
-
Device Trust isn't supported with all versions of Microsoft Office thick clients: This Device Trust solution has been tested to work with Microsoft Office thick client versions 16.13.1 and 16.15. However, it doesn't work with Microsoft Office thick client version 16.14 (build 180610).
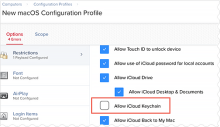
- Prevent iCloud from transferring the Okta keychain to other Apple devices: To prevent iCloud from transferring the Okta keychain from DT-secured macOS devices to other Apple devices, Okta strongly recommends that you create a Configuration Profile in Jamf Pro that disables Allow iCloud Keychain syncing. (Note: Be aware that disabling syncing blocks all keychain transfers.) See the Add the modified Okta Device Registration Task to Jamf Pro and distribute it to macOS devices.
-
Webview must have access to the device keychain: Device Trust for managed macOS computers works with any SAML/WS-Fed-enabled app that supports authentication through a webview. The webview in which authentication is performed must have access to the Okta Keychain on the device. To prevent end users from being prompted for consent when the certificate is used in the authentication flow, Okta allows the following apps. See Modify the default allowlist:
- Box
- Chrome
- Safari
- Microsoft Office
- Skype for Business
- Google Drive
- Slack
- Per-device unbound certificate limit: A certificate becomes bound to a given user the first time that user accesses a device trust-secured application from a device trust-secured macOS device. Unused certificates are unbound. Okta can issue up to five unbound certificates to the device, one each time you perform the enrollment procedure. As a security precaution, Okta will not issue more than five unbound certificates to a given device. To avoid reaching the unbound certificate limit, ensure that users use the unbound certificates already on the device before you attempt to obtain more certificates through enrollment. If you reach the enrollment limit, the Syslog indicates an enrollment failure and the error message Maximum enrollment limit of 5 certificates for a device is reached appears in the JAMF log.
- Per-org enrollment limit: A given macOS device can only be secured by the Device Trust configuration of a single Okta org. Put another way, macOS devices can't be secured by the Device Trust configuration of multiple Okta orgs simultaneously. This is because the client certificate issued to the device is signed by the CA of a particular org. This limit applies to Okta Preview and Production orgs.
- Shared-terminal scenarios are not supported: This Device Trust solution doesn't support shared-terminal scenarios in which multiple Okta end users log in to the same account from the same macOS workstation.
- Device Trust enrollment is not supported when Okta is in read-only mode: Devices cannot be enrolled in Device Trust if the cell in which your Okta org resides is in read-only mode.
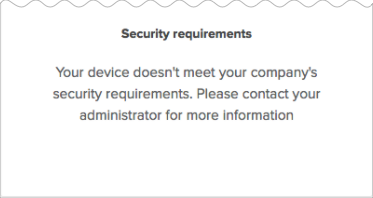
- End users may need to clear the browser cache: Some browsers (for example, Chrome) cache the Device Trust certificate. After the certificate is renewed automatically (once per year), these browsers may continue to present the expired certificate to Okta instead of the new certificate. In that case, end users are shown the Security requirements message and are denied access to Device Trust-secured apps. Okta recommends that you advise affected end users to clear browser cache by quitting and then restarting the browser (not just closing the browser window).
-
Apps secured by Device Trust are shown as locked on the Okta End-User Dashboard. A lock icon is shown beside apps secured by Device Trust under these conditions:
- The end users accessed the dashboard in a desktop or mobile browser (not in Okta Mobile).
- Device Trust is enabled for the org.
- The device is not trusted.
- The end user tried to access any Device Trust-secured app from their dashboard.
-
Apps must support Modern Authentication: To secure Microsoft Office apps with this Device Trust solution they must be enabled to support Modern Authentication. For more information, see the Microsoft article How modern authentication works for Office 2013 and Office 2016 client apps. Also see Office 365 Client Access Policies.
-
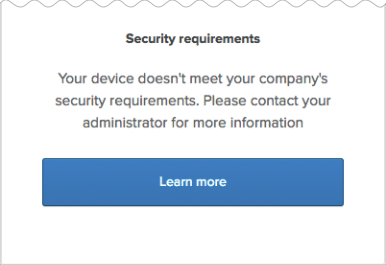
Make sure that certificates are installed in the keychain on the devices you have targeted for this Device Trust solution. If certificates are not installed and the Trusted setting is enabled in your app sign-on policy, users are denied access to the app and are redirected to a security message advising them to contact their administrator. (You can configure the message to include a Learn more link to more information. See Step 1 — Enable the global Device Trust setting for your org).
-
Take care when disabling the macOS Device Trust setting: Do not disable the macOS Device Trust setting on the SecurityDevice Trust page if you have also configured an app sign-on policy that allows trusted macOS devices. Otherwise, your Device Trust configuration will be in an inconsistent state. To disable Device Trust for your org, first remove any app sign on policies that contain a Device Trust setting, then disable macOS Device Trust in .
- Before asking Okta Support to disable Device Trust: If you ask Okta Support to disable Device Trust capability for your org, make sure to first change the Device Trust setting in the app sign-on policy rules to Any (). If you don't make this change and then later have Okta Support re-enable Device Trust capability for your org, the Device Trust setting in app sign-on policy rules takes effect immediately, which you may not have expected.
- Verify that clients can complete the MTLS handshake: The Mutual TLS certificate exchange (handshake) in this Device Trust flow occurs on Okta URLs that are separate from your Okta org URL (indicated by the wildcard character (*) in the following example). If you implement endpoint protection software, make sure to configure it in a way that does not block your clients from completing the certificate exchange with Okta. For example, if your organization uses an allowlist to limit outbound traffic, add these exact URLs to the allowlist, including the wildcard character (*):
*.okta.com
*.okta-emea.com
*.okta-gov.com
Procedures
Step 1. Enable the global Device Trust setting for your org
- In the Admin Console, go to .
- In the macOS Device Trust section, click Edit.
- In the wizard that launches, select Enable macOS Device Trust.
- Optional. In the Learn more field, you can enter an externally-accessible redirect URL where end users with untrusted devices can find more information. The security message shown to these end users will include a Learn more link that redirects to your specified URL.
If you choose not to specify a URL in this optional field, these end users will be shown the same message but without the Learn more link.
- In Trust is established by, select Jamf Pro.
- Enter information about the Jamf Pro API, such as the Jamf Pro tenant URL (for example, https://example.jamfcloud.com, not the API URL), credentials, and key.
This information allows Okta to verify that end user devices are managed by Jamf Pro at the time of certificate enrollment. For Jamf Pro, you need at least these READ privileges to access Jamf APIs in order for Okta to verify that the device is managed:
- Computers — READ
- Jamf Pro User Accounts & Groups — READ
- Users — READ
- Click Test API credentials. A success message appears if a connection is established with your MDM provider's API.
- Click Next.
- On the Configure MDM Provider screen, click Download to obtain a python script. You'll modify the script later in Step 2. Modify the Okta Device Registration Task.
- To copy the provided Secret Key Value and Org URL to your clipboard, click the copy icon adjacent to the fields.
- Click Done.
- Modify the downloaded Okta Device Registration Task as described in Step 2.
The latest version of the Okta Device Registration Task is available from the Okta Admin Console page.
Okta strongly recommends that you create a separate user for API access that is separate from the user your organization uses to access the Jamf Pro admin interface.
Make a note of the provided Secret Key Value and Org URL, as this is the only time these will appear in Okta. Also, if you later want to edit your configuration and generate a new Secret Key through the Reset macOS Secret Key button, you must perform this procedure again.
Step 2. Modify the Okta Device Registration Task
The Mutual TLS certificate exchange (handshake) in this Device Trust flow occurs on Okta URLs that are separate from your Okta org URL (indicated by the wildcard character (*) in the following example). If you implement endpoint protection software, make sure to configure it in a way that doesn't block your clients from completing the certificate exchange with Okta. For example, if your organization uses an allowlist to limit outbound traffic, add these exact URLs to the allowlist, including the wildcard character (*):
*.okta.com
*.okta-emea.com
*.okta-gov.com
- On the Admin's computer, go to the Downloads folder and open the script you downloaded from Okta.
- Modify the script by pasting in the Secret Key Value and Org URL you generated in Step 1. Enable the global setting for your org.
- Optional. Modify the default app allowlist.
- Save the script.
- Proceed to Step 4. Add the modified Okta Device Registration Task to Jamf Pro and distribute it to macOS devices.
When entering the key and the URL, retain the single quotation marks ( ' ) but replace the parentheses and the placeholder text with the actual Secret Key Value and Org URL, as shown in the following example:
Example of an unmodified script

Example of a modified script. Retain the single quotation marks but not the parentheses.

By default, the Okta Device Registration Task allows some popular apps so that end users aren't prompted for the keychain password when accessing them. To modify the default allowlist, see Modify the app allowlist.
Step 3. Install Python 3 and Device Trust dependencies
-
If Python 3 is already installed, go to step 2.
There are different ways to install Python 3. This step provides installation instructions using the macOS Xcode command line tool. Okta recommends that you use your preferred method.
Optional. Run the following script on your macOS machine to update your macOS environment to Python 3:
Copy#!/bin/sh
echo "Checking for the existence of the Apple Command Line Developer Tools"
/usr/bin/xcode-select -r
xcodepath='which xcode-select'
echo "xcode path is $xcodepath"
$xcodepath -r &> /dev/null
$xcodepath -p &> /dev/null
if [[ $? -ne 0 ]]; then
echo "Apple Command Line Developer Tools not found."
touch /tmp/.com.apple.dt.CommandLineTools.installondemand.in-progress;
installationPKG=$(/usr/sbin/softwareupdate --list | /usr/bin/grep -B 1 -E 'Command Line Tools' | /usr/bin/tail -2 | /usr/bin/awk -F'*' '/^ \\/ {print $2}' | /usr/bin/sed -e 's/^ *Label: //' -e 's/^ *//' | /usr/bin/tr -d '\n')
echo "Installing ${installationPKG}"
/usr/sbin/softwareupdate --install "${installationPKG}" --verbose
else
echo "Apple Command Line Developer Tools are already installed."/usr/bin/xcode-select -s /Library/Developer/CommandLineTools
fi
exit -
Install the Device Trust Dependencies. The updated macOS Device Registration Task requires “python3“ and “pip3“ alias on the device to point to the correct Python 3 installation.
Run the following script to install the required Device Trust dependencies:
-
Install the Device Trust Dependencies. The updated macOS Device Registration Task requires “python3“ and “pip3“ alias on the device to point to the correct Python 3 installation.
Run the following script to install the required Device Trust dependencies:
Copy#!/bin/sh
echo "Running pip3 install --upgrade pip"
sudo pip3 install --upgrade pip
echo "Running pip3 install pyobjc-framework-SystemConfiguration"
sudo pip3 install pyobjc-framework-SystemConfiguration
exit
Step 4. Add the modified Okta Device Registration Task to Jamf Pro and distribute it to macOS devices
The Okta Device Registration Task is a script that is distributed by Jamf Pro to the macOS devices you have targeted for this Device Trust solution. When deployed on the device, the Okta Device Registration Task does the following:
-
Registers with Okta to obtain a Device Trust certificate. Okta checks with Jamf Pro to make sure the device is managed.
-
Configures Chrome and Safari browsers and tested native apps on the device to present the certificate automatically during secure app access.
-
Schedules a lightweight task that runs once a day and whenever users log in to their computer. The task checks whether the Device Trust certificate is expired and tries to renew the certificate 30 days before expiry. Certificates are valid for 1 year.
- During renewal, Okta performs checks similar to those that occur during registration, such as checking whether the device is managed before issuing a new certificate.
- After the script runs on the device once, Jamf Pro removes it from the device automatically.
- You can use the following query to determine which version of the Registration Task is installed on the device: python3 ~/Library/Okta/okta_device_trust.py version
Create the workflows that make sense for your organization. Make sure the script successfully runs at least once to enroll the Okta certificate.
- In Jamf Pro click the gear icon to go to All Settings.
- Go to .
- Create a new script and paste into it the Okta Device Registration Task you downloaded from Okta in Step 1. Enable the global Device Trust setting for your org and modified in Step 2. Modify the Okta Device Registration Task.
- Click Save.
- Create a policy to deploy the script to one or more Target Computers and/or Target Users:
- Go to .
- Click + New.
- Click General in the left pane.
- Enter a policy a name in the Display Name field.
- Select the following Trigger events that will initiate the policy:
- Enrollment Complete – the script runs immediately after devices complete the enrollment process.
- Recurring Check-in – the script runs according to the recurring check-in frequency configured in Jamf Pro.
- Set the Execution Frequency to Once per computer per user.
Note: There are other approaches that you can implement in Jamf Pro to trigger deployment of the script (for example, Extension Attributes, which allow you to validate that the certificate is on the device and to deploy the certificate if it is missing).
- Click Save.
- Click Scripts in the left pane, and then click Configure.
- Locate the script you created for this policy in step 3, and then click Add.
- Click Scope.
- In Target Computers and/or Target Users, specify the computers and users to whom the policy will apply.
- Click Save.
- Recommended. To prevent iCloud from transferring the Okta keychain from Device Trust-secured macOS devices to other Apple devices, you should create a Configuration Profile in Jamf Pro that disables Allow iCloud Keychain syncing.
- Check the logs in Jamf Pro to verify that the Okta Device Registration Task ran successfully.
- Go to Policies and click your policy.
- Click Logs at the bottom of the screen.
- Proceed to Step 5. Configure app sign-on policy rules in Okta.
Step 5. Configure app sign-on policy rules in Okta
About app sign-on policy rules
By default, all Client options in the App Sign On Rule dialog box are pre-selected. To configure more granular access to the app, create rules that reflect:
- Who users are, or the groups to which they belong
- Whether they are on or off network, or within a defined network zone
- The type of client running on their device (Office 365 apps only)
- The platform of their mobile or desktop device
- Whether or not their devices are Trusted
Taking an allow-list approach to sign-on policy rules
- Create one or more Allow rules to support the scenarios that will allow access to the app, then assign those rules the highest priority.
- Create a Deny catch-all rule that will apply to users who don't match the permissive scenarios you created in Step 1. Assign the Deny catch-all rule the lowest priority, just above the default rule. In the allow-list approach described here, the default rule is never reached because it is effectively negated by the Deny catch-all rule.
For important security information about creating app sign-on policy rules, see App sign-on policies.
Procedure
- In the Admin Console, go to . Click the SAML or WS-enabled app that you want to protect with Device Trust.
- Click the Sign On tab.
- Scroll down to the Sign On Policy, and click Add Rule.
- Configure one or more rules using the following example as a guide.
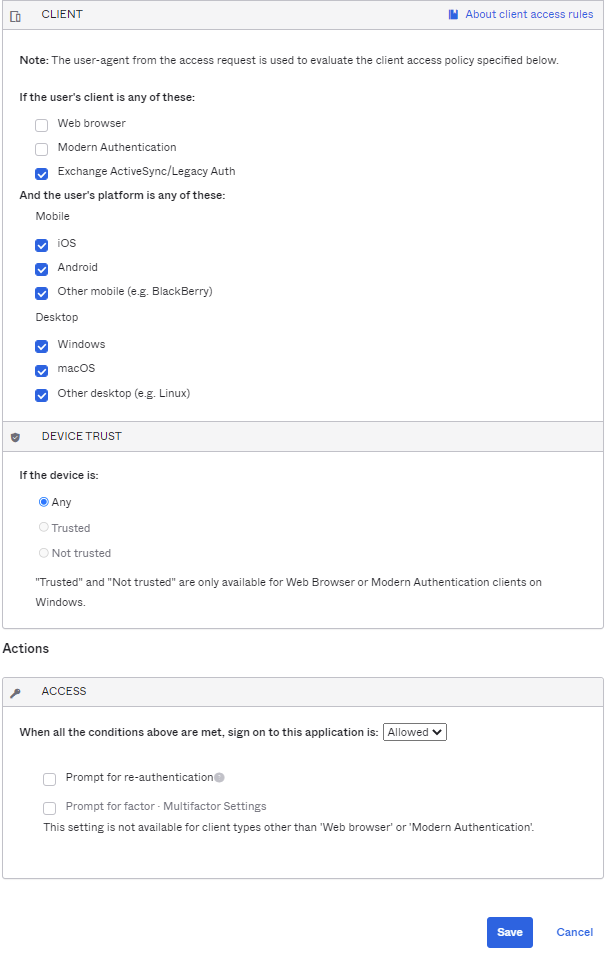
This example shows Device Trust rules for managing access to Office 365. For other apps, note that the section If the user's client is any of these isn't present.
Example Allowlist
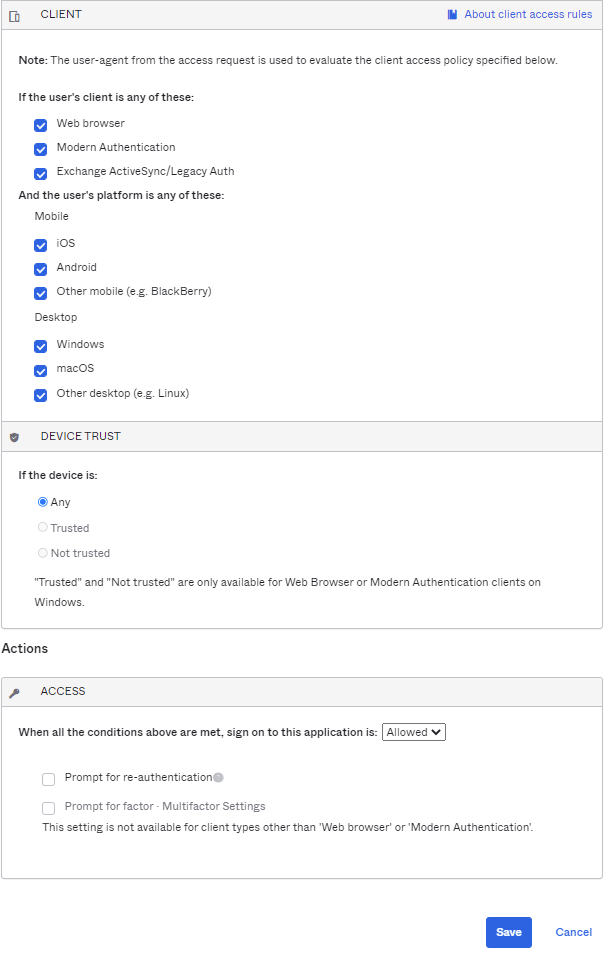
Example Rule 1, Exchange ActiveSync; All platforms; Any trust; Allow access
- Enter a descriptive name for the rule.
Conditions
- Under PEOPLE, specify whether to apply the rule to individuals only or to individuals and groups. The option you select must be the same for all the rules you create for this example.
- Under LOCATION, specify the user location to which the rule will apply. The option you select must be the same for all the rules you create for this example.
- Under CLIENT, configure the following settings:
- Under DEVICE TRUST, configure the following:
-
Trusted and Not trusted options in the Device Trust section are selectable only when all of the following options in the Client section are not selected:
- Exchange ActiveSync or Legacy Auth client
- Other mobile (for example, BlackBerry)
- Other desktop (for example, Linux)
Web browser unselected.
Modern Auth client unselected.
Exchange ActiveSync client or Legacy Auth client is selected.
Mobile
iOS is selected.
Android is selected.
Other mobile is selected.
Desktop
Windows is selected.
macOS is selected.
Other desktop is selected.
Any is selected.
Trusted is unselected.
Not trusted is unselected.
ACTIONS
- Configure Access:
- Click Save.
- Create Rule 2.
Allowed is selected.
Prompt for factor is unselected.
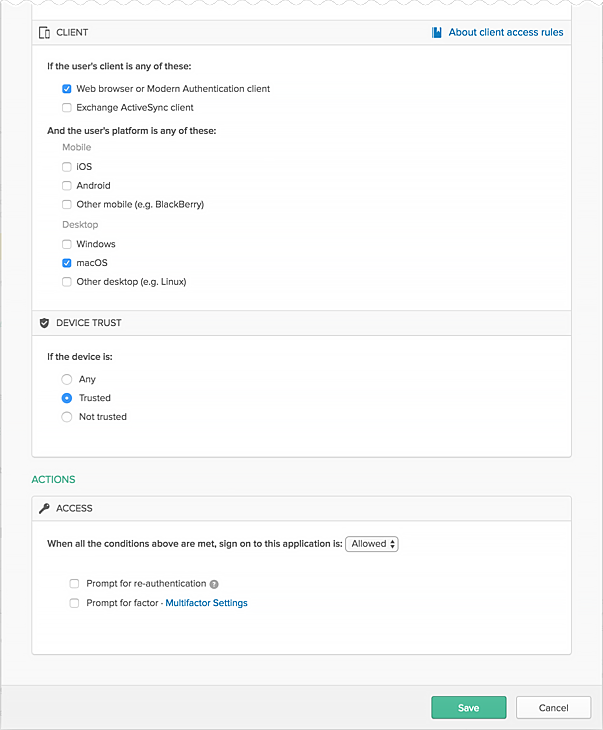
Example Rule 2, Web browser or Modern Auth; macOS; Trusted; Allow access
- Enter a descriptive name for the rule.
Conditions
- Under PEOPLE, select the same People option that you selected in Rule 1. The option you select must be the same for all the rules you create for this example.
- Under LOCATION, select the same Location option that you selected in Rule 1. The option you select must be the same for all the rules you create for this example.
- Under CLIENT, configure the following settings:
- Under DEVICE TRUST, configure the following:
-
Trusted and Not trusted options in the Device Trust section are selectable only when all of the following options in the Client section are not selected:
- Exchange ActiveSync or Legacy Auth client
- Other mobile (for example, BlackBerry)
- Other desktop (for example, Linux)
Web browser selected.
Modern Auth client selected.
Exchange ActiveSync client is is unselected.
Mobile
iOS is unselected.
Android is unselected.
Other mobile is unselected.
Desktop
Windows is unselected.
macOS is selected.
Other desktop is unselected
Any is unselected.
Trusted is selected.
Not trusted is unselected.
ACTIONS
- Configure Access.
- Click Save.
- Create Rule 3.
Allowed is selected.
Prompt for factor is unselected.
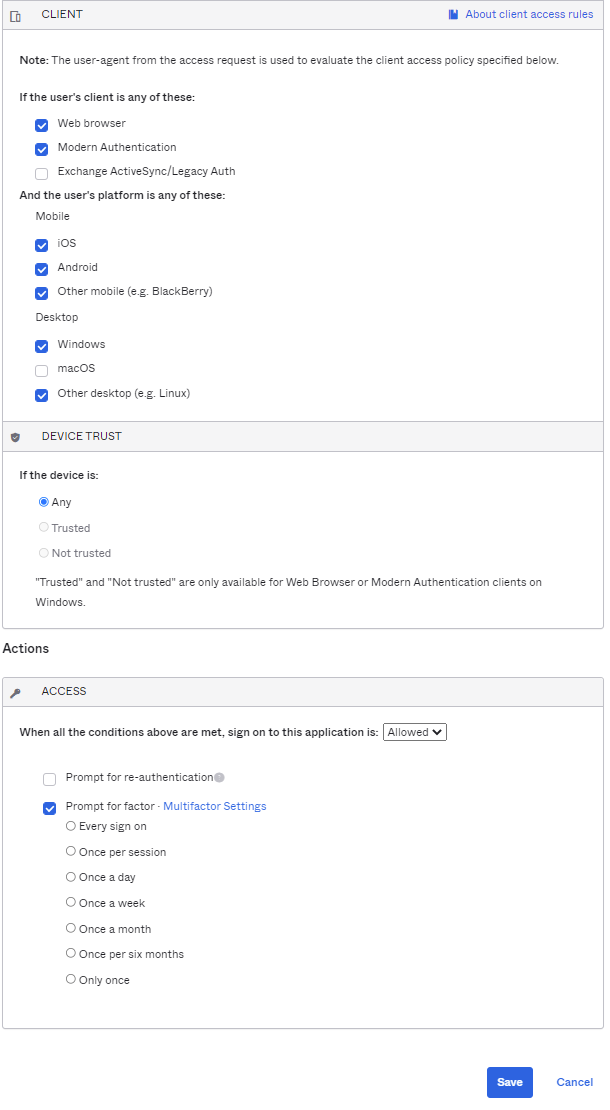
Example Rule 3, Web browser or Modern Auth; All platforms except macOS; Any Trust; Allow access + MFA
- Enter a descriptive name for the rule.
Conditions
- Under PEOPLE, select the same People option that you selected in Rule 1. The option you select must be the same for all the rules you create for this example.
- Under LOCATION, select the same Location option that you selected in Rule 1. The option you select must be the same for all the rules you create for this example.
- Under CLIENT, configure the following settings:
- Under DEVICE TRUST, configure the following:
-
Trusted and Not trusted options in the Device Trust section are selectable only when all of the following options in the Client section are not selected:
- Exchange ActiveSync or Legacy Auth client
- Other mobile (for example, BlackBerry)
- Other desktop (for example, Linux)
Web browser selected.
Modern Auth client selected.
Exchange ActiveSync client is is unselected.
Mobile
iOS is unselected.
Android is selected.
Other mobile is selected.
Desktop
Windows is selected.
macOS is selected.
Other desktop is selected.
Any is selected.
Trusted is unselected.
Not trusted is unselected.
ACTIONS
- Configure Access.
- Click Save.
- Create Rule 4.
Allowed is selected.
Prompt for factor is selected.
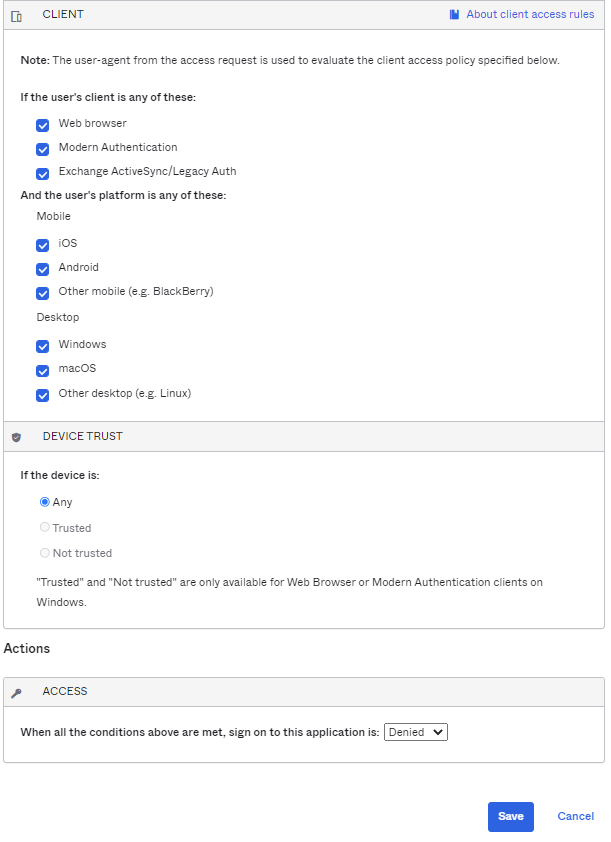
Example Rule 4, Any client type; All platforms; Any Trust; Deny access
- Enter a descriptive name for the rule.
Conditions
- Under PEOPLE, select the same People option that you selected in Rule 1. The option you select must be the same for all the rules you create for this example.
- Under LOCATION, select the same Location option that you selected in Rule 1. The option you select must be the same for all the rules you create for this example.
- Under CLIENT, configure the following settings:
- Under DEVICE TRUST, configure the following:
-
Trusted and Not trusted options in the Device Trust section are selectable only when all of the following options in the Client section are not selected:
- Exchange ActiveSync or Legacy Auth client
- Other mobile (for example, BlackBerry)
- Other desktop (for example, Linux)
Web browser selected.
Modern Auth client selected.
Exchange ActiveSync client is selected.
Mobile
iOS is selected.
Android is selected.
Other mobile is selected.
Desktop
Windows is selected.
macOS is selected.
Other desktop is selected.
Any is selected.
Trusted is unselected.
Not trusted is unselected.
ACTIONS
- Configure Access.
- Click Save.
Denied is selected.
Example Rule 5, Default sign on rule – Any client, All platforms; Any Trust; Allow access
The Default sign on rule is already created and can't be edited. In this example, the Default rule is never reached because it is effectively negated by Rule 4.
Revoke and remove Device Trust certificates
You may need to revoke an end user's Device Trust certificate(s) from the Okta Certificate Authority. This is recommended if the computer is lost or stolen, or if the end user is deactivated. To re-secure an end user's computer with Device Trust after revoking their Device Trust certificate(s), you need to remove the revoked certificate from their computer before enrolling a new certificate.
- Steps 1 - 4 of this procedure revoke all Device Trust certificates from the Okta Certificate Authority that were issued to the end user. Certificate revocation does not remove existing certificates from macOS computers. In order to re-secure a macOS computer with Device Trust after revoking certificates, you must first remove any existing Device Trust certificate from the computer and then re-enroll the computer with a new certificate as detailed in Step 5. The Device Registration Task will not enroll a new certificate if another certificate (whether revoked or not) is present on the computer.
- When an end user is deactivated Okta also revokes their Device Trust certificate from the Okta Certificate Authority automatically (but does not remove the certificate from their computer). To remove the certificate from the computer, use either removal method described in Step 5.
-
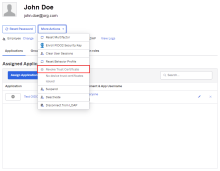
In the Admin Console, go to .
-
Click the end user whose Device Trust certificate you want to revoke.
-
In the More Actions menu, click Revoke Trust Certificate.
-
Read the message that appears, and then click Revoke Trust Certificate.
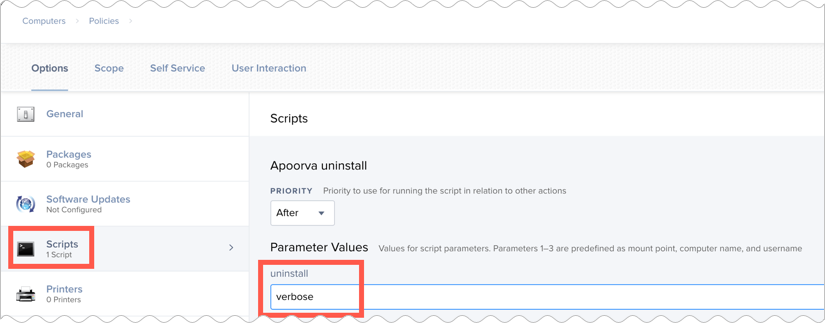
- To remove the Device Trust certificate for any reason (such as prior to re-securing a computer with Device Trust), first remove any existing Device Trust certificate from the computer. You can use a command line or create an uninstall script in Jamf Pro. Both uninstall methods remove all Device Trust related artifacts from the macOS device.
- Remove through a command line: Open a terminal on the target computer and issue the command python <fileName>.py uninstall where <fileName> is the name of Okta Device Registration Task. For example, if the name of the Okta Registration Task is MacOktaDeviceRegistrationTaskSetup.1.0.2.py, you would issue this command:
python MacOktaDeviceRegistrationTaskSetup.1.0.2.py uninstall
- Remove with an uninstall script: Create an uninstall script in Jamf Pro configured to pass the uninstall parameter. For details, see the procedure Adding a Script to Jamf Pro in Jamf Pro documentation.

If you plan to reuse the script that you downloaded and modified in Step 2. Modify the Okta Device Registration Task , make sure to first remove the Org Token before using it. Also, the token is not necessary for the uninstall operation.
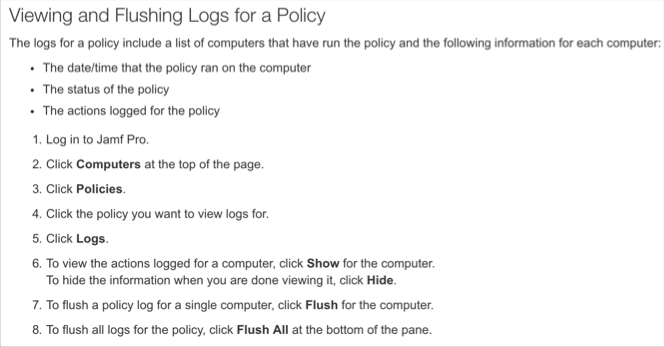
View certificate enrollment logs
View logs in Jamf Pro
During deployment, the Okta Device Registration Task publishes logs in Jamf at three log levels (INFO, WARN, ERROR). To diagnose deployment issues, Jamf administrators can view deployment logs on a policy or individual computer basis. To generate more granular logs, use the verbose option as the Parameter Value in Jamf Pro.
In addition, end users can view log messages on their local macOS computers by having the Console app open while the script runs on their computer.
View logs on macOS computers
You can watch and monitor Okta-related log messages during certificate enrollment. The method depends on the operating system running on the device.
If running version 10.11.6 (OS X El Capitan):
- Open .
- Click All Messages.
- Type Okta in the search field and press Enter to filter all Okta-related messages.
If running either of the following operating systems:
- macOS 10.12.6 (Sierra)
- macOS 10.13.4 (High Sierra)
- Open .
- Click your device under Devices in the left pane.
- Type Okta in the search field and press Enter to filter all Okta-related messages.
To view past logs for all supported operating systems:
- Open .
- Go to /var/log > asl in the left pane.
- Select the date you want to search on.
- Type Okta in the search field and press Enter to filter all Okta-related messages.
To see the system calls executed on the device, run the following command and then execute the Device Registration Task:
log stream --predicate 'eventMessage contains "okta"'
Modify the app allowlist
The Okta Device Registration Task allows some popular apps by default so that end users aren't prompted for the keychain password when trying to access them. You can customize the default allowlist as described in this procedure.
Keep in mind the following:
- Keep a copy of your preferred allowlist. Your modified allowlist is overwritten whenever you push a new Okta Device Registration Task to your targeted macOS computers, so you'll have to recreate it.
- If you add apps to the original Okta-defined allowlist, you should consider testing your modified allowlist with a subset of users before rolling it out to all users.
- Unlike TeamIdentifiers for the other allowed apps, the TeamIdentifier for Safari is simply apple: (notice the colon) without a teamid: prefix.
- You can allow any SAML/WS-Fed-enabled app that supports authentication through a webview. The webview in which authentication is performed must have access to the Okta Keychain on the device. The original Okta-provided allowlist currently includes the following apps:
- Box
- Chrome
- Safari
- Microsoft Office
- Skype for Business
- Google Drive
- Slack
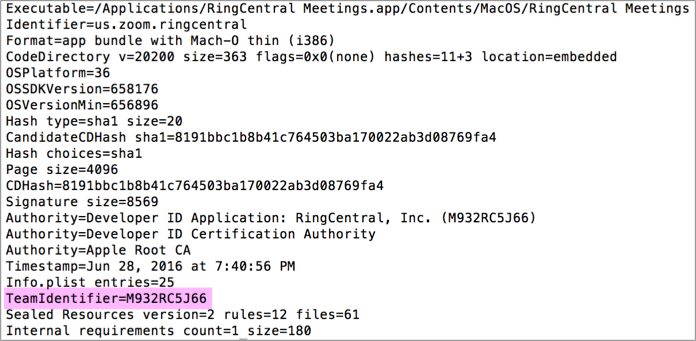
- Find the TeamIdentifier for the app(s) you want to allow:
- On a macOS device that has the apps you want to allow, open a command line and list the apps in the Applications folder:
- Find an app's TeamIdentifier codesign -dv --verbose=4 /Applications/exampleapp.app.
- Locate the TeamIdentifier value in the output and make a note of it.
- Modify the allowlist in the Okta Device Registration Task:
- Save your changes.
- When appropriate, push the Okta Device Registration Task. See Step 4 - Add the modified Okta Device Registration Task to Jamf Pro and distribute it to macOS devices.
ls /Applications
exampleapp is the app you're investigating.
For example, here's how to find the team TeamIdentifier for RingCentral:
codesign -dv --verbose=4/App /Applications/RingCentral\ Meetings.app
Example before modification
Allowlist includes the original Okta-defined allowlist:

Example after modification
Allowlist with RingCentral added:

Keep a copy of your preferred allowlist. Your modified allowlist is overwritten whenever you push a new Okta Device Registration Task to your targeted macOS computers, so you'll have to recreate it.
Troubleshooting
The Okta Device Registration Task is a python script that you obtain from Okta, modify, and then upload to Jamf Pro for distribution to the macOS devices you have targeted for this Device Trust solution.
About the Okta Device Registration Task
When deployed on the device, the Okta Device Registration Task does the following:
-
Registers with Okta to obtain a Device Trust certificate. Okta checks with Jamf Pro to make sure the device is managed.
-
Configures Chrome and Safari browsers and tested native apps on the device to present the certificate automatically during secure app access.
-
Schedules a lightweight task that runs once a day and whenever users log in to their computer. The task checks whether the Device Trust certificate is expired and tries to renew the certificate 30 days before expiry. Certificates are valid for 1 year.
- During renewal, Okta performs checks similar to those that occur during registration, such as checking whether the device is managed before issuing a new certificate.
- After the script runs on the device once, Jamf Pro removes it from the device automatically.
- You can use the following query to determine which version of the Registration Task is installed on the device: python3 ~/Library/Okta/okta_device_trust.py version
Basic and Advanced troubleshooting
The two problems that you are most likely to encounter are:
- Trusted devices are unable to access Device Trust-secured apps.
- Untrusted devices are able to access Device Trust-secured apps.
If you encounter either problem, try to correct it by performing Basic Troubleshooting. If the problem persists, perform Advanced Troubleshooting.
Basic Troubleshooting
To perform basic troubleshooting, review the following areas:
Enablement
Verify the following:
- This device trust feature is included in your org's version of Okta (your SKU)
- You have enabled the global Device Trust setting in .
Registration task
-
Verify that you have correctly configured Jamf Pro to distribute the Device Registration Task to targeted macOS devices as detailed in Part C.
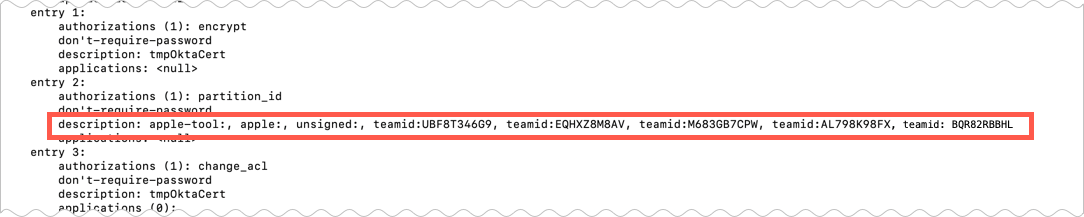
Verify that you added the TeamID of the app to the Python 3 script before you deployed the script?
You can use the following query to determine which version of the Registration Task is running on the device:
python ~/Library/Okta/okta_device_trust.py version
If the TeamID of the app is missing from the script, an access prompt displays when attempting to sign on from a third-party app that previously worked with Device Trust in your environment.

Add the TeamID of the app to the Python 3 script, and then redeploy the policy. This image indicates the section of the script to edit, to specify the apps you want to allowlist:

Python 3 dependency packages
Are the Python 3 dependency packages installed correctly?
If a module not found error (for example, "ModuleNotFoundError: No module named 'Systemconfiguration'") occurs, confirm that the dependencies from [link to 'install the device trust dependencies"] are set up correctly.
Run the following script from Jamf on the computer:
#!/bin/sh
echo "Python location"
python3 -c "import sys; print(sys.executable)"
echo "Python version"
python3 --version
echo "Python3 Dependency version"
echo "********************"
python3 -m pip show pyobjc-framework-SystemConfiguration
echo "********************"Certificate
Verify that the certificate is installed
Make sure that certificates are installed in the keychain on the devices you have targeted for this Device Trust solution. If certificates are not installed and the Trusted setting is enabled in your app sign-on policy, users are denied access to the app and are redirected to a security message advising them to contact their administrator. (You can configure the message to include a Learn more link to more information. See Step 1 — Enable the global Device Trust setting for your org).
To verify installation from a terminal:
Show keychain info
security show-keychain-info okta.keychain
Show the certificate
security find-certificate -a -c 'Okta MTLS' -Z -p okta.keychain
Show the password
security find-generic-password -l device_trust -w
To verify installation through the GUI on targeted devices:
- On the macOS device, search for Keychain Access.
- Double click to open the Keychain Access app.
- Verify that the Okta Keychain exists and that it includes the Okta MTLS certificate.
- In the login keychain, verify that the device_trust password and identity preferences appear.
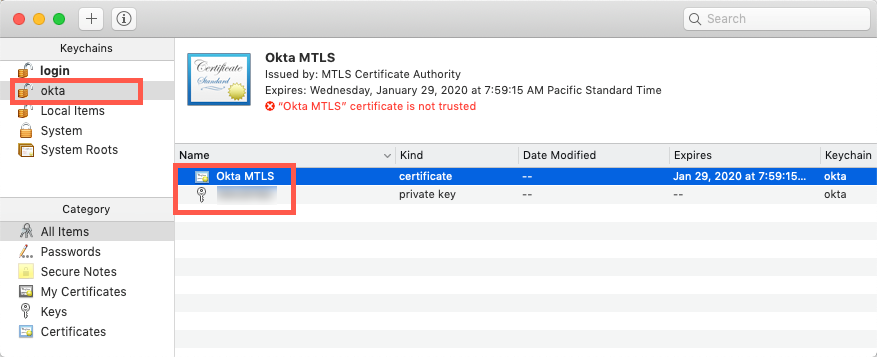
If the Okta Keychain, the certificate, or the private key are missing, the registration task didn't complete successfully. View logs in Jamf Pro.
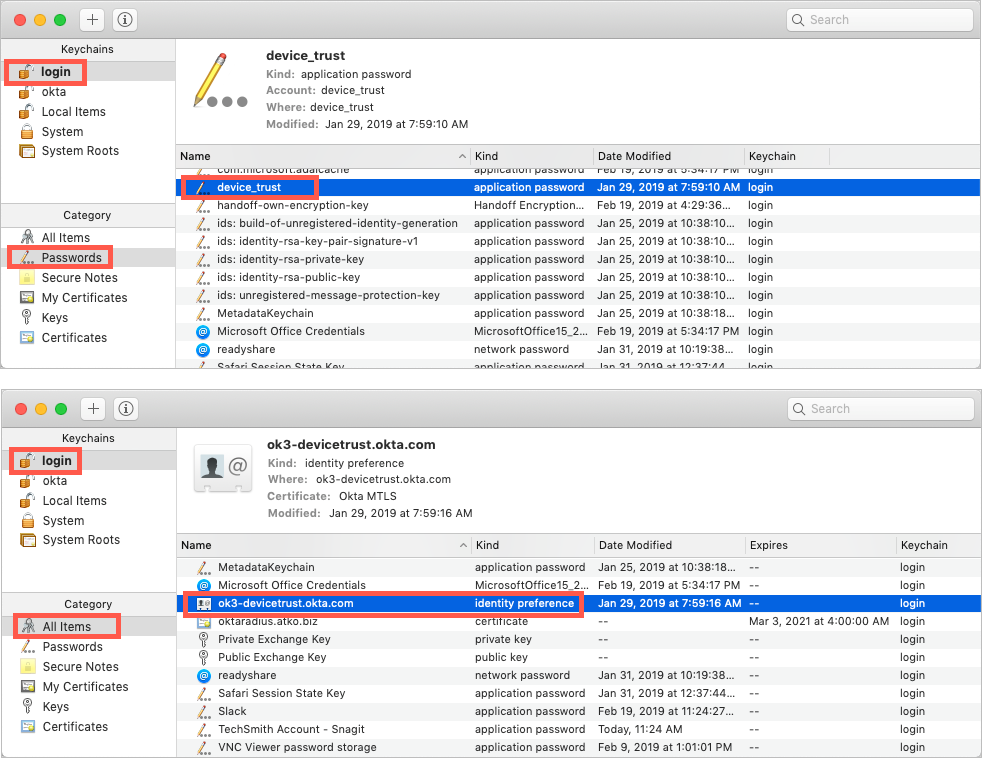
If the device_trust password is not present then device trust-secured apps can't access the Okta keychain. To remedy this, uninstall the certificate. Seee Revoke and remove Device Trust certificates. Re-enroll the device. See Step 4. Add the modified Okta Device Registration Task to Jamf Pro and distribute it to macOS devices.
Maximum certificate enrollment limit
A certificate becomes bound to a given user the first time that user accesses a device trust-secured application from a device trust-secured macOS device. Unused certificates are unbound. Okta can issue up to five unbound certificates to the device, one each time you perform the enrollment procedure. As a security precaution, Okta will not issue more than five unbound certificates to a given device. To avoid reaching the unbound certificate limit, ensure that users use the unbound certificates already on the device before you attempt to obtain more certificates through enrollment. If you reach the enrollment limit, the Syslog indicates an enrollment failure and the error message Maximum enrollment limit of 5 certificates for a device is reached appears in the JAMF log.
Prevent an auth failure caused by blocked Mutual TLS certificate exchange
The Mutual TLS certificate exchange (handshake) in this Device Trust flow occurs on Okta URLs that are separate from your Okta org URL (indicated by the wildcard character (*) in the following example). If your org implements endpoint protection software, make sure to configure it in a way that does not block the Mutual TLS certificate exchange (handshake) that occurs during this Device Trust flow. For example, if your organization uses an allowlist to limit outbound traffic, add these exact URLs to the allowlist, including the wildcard character (*):
*.okta.com
*.okta-emea.com
*.okta-gov.com
Sign-on policy
Verify that you have configured a sign-on policy that:
- Is applied to the WS-Fed or SAML app(s) that you want to secure with Device Trust.
- Is applied to the correct user(s) and/or groups.
- Includes, at minimum, an Active rule that denies access to untrusted devices.
System Log
Verify Device Trust events
Review the System Log to verify the following Device Trust System Log events:
Authentication
- DisplayMessage: Authentication of device via certificate
- EventType: user.authentication.authenticate
Enrollment
- DisplayMessage: Device Trust certificate enrollment
- EventType: user.credential.enroll
Issuance
- DisplayMessage: Device Trust certificate issuance
- EventType: pki.cert.issue
Revocation
- DisplayMessage: Device Trust certificate revocation
- EventType: pki.cert.revoke
Renewal
- DisplayMessage: Device Trust certificate renewal
- EventType: pki.cert.renew
View unique device IDs in DebugContext
DebugData shows the unique ID of the devices associated with Device Trust events and is useful for debugging purposes. This information can also help you verify thatDevice Trust is being enforced on devices in your device inventory, which may be useful prior to rolling out the feature to a large group of users.
The information contained in debugContext.debugData is intended to add context when troubleshooting customer platform issues. Note that key names and values are subject to change without notice and should be used primarily as a debugging aid, not as a data contract. See DebugContext Object in Okta Developer documentation.
- In the Admin Console, go to .
- Search for the Device Trust Event (date) that you’re interested in, then navigate to:
Verify Jamf Pro setup
- In the Okta Admin Console, are the Secret Key Value and the Org URL correctly populated in the Okta Device Registration Task (see Step 2. Modify the Okta Device Registration Task)?
- Is the Okta Device Registration Task that you modified and added to Jamf Pro the latest version? (See Version History.)
- Do the trigger events in your Jamf Pro policy include Enrollment Complete and Recurring Check-in? (See Step 4. Add the modified Okta Device Registration Task to Jamf Pro and distribute it to macOS devices.)
- Have you viewed deployment logs? (See View certificate enrollment logs.)
- Do Jamf Pro Policy Logs show that the script execution status is Completed?
Advanced troubleshooting
If basic troubleshooting did not resolve the problem you are experiencing, and the certificate is not installed on the macOS device, check the following:
In the Okta Admin app
Verify that the end user of the macOS device is present and Activated in .
On the macOS device
Confirm that auto certificate settings are configured in Chrome:
- In Chrome, enter chrome://policy in the address bar, and then press Enter.
- Click Show value and verify that the AutoSelectCertificateForUrls policy displays either of the following values:
{"pattern":"https://[cell]-devicetrust.okta.com","filter":{"ISSUER":{"CN":"MTLS Certificate Authority”}}}
{"pattern":"https://[cell]-devicetrust.okta-emea.com","filter":{"ISSUER":{"CN":"MTLS Certificate Authority”}}}
[cell] is the cell where your Okta org resides as shown in the footer on your Okta Admin Console.
Verify that native apps are allowed in the keychain
Issue the following command to verify that allowed apps can access the certificate. See Modify the app allowlist).
security dump-keychain -a okta.keychain
Validate remediation
Try to access a Device Trust-secured app from a browser or thick client. If an error displays while trying to access the app, Quit and Close the browser (Chrome or Safari), relaunch the browser, and then try to access the app again.
Known issues
- Security requirements page not shown when accessing O365 native apps: End users with unmanaged macOS devices are not shown the Security requirements page when they try to access Office O365 native apps secured by this Device Trust solution. (This problem occurs only with Office Native apps; it doesn't occur when trying to access O365 apps through desktop browsers like Chrome and Safari.)
- Problem accessing Google Backup and Sync app: When signing in to the Backup and Sync app (part of Google Drive), the authentication flow stops on the Google Account page instead of progressing to the app. Google is aware of this issue. To complete signing in, click the Sign in with your browser instead link in the lower portion of the page.