Enforce Okta Device Trust for Native Apps and Safari on MDM-managed iOS devices
Okta Device Trust for iOS allows you to prevent unmanaged iOS devices from accessing enterprise services through browsers and native apps.
Prerequisites
- iOS devices running Okta-supported versions of iOS
- MDM provider support:
- Minimum – any Mobile Device Management (MDM) provider that supports managed app configuration
- Recommended – MDM providers that support (1) managed app configuration and (2) the ability to convert an end user-installed Okta Mobile app instance to a managed app
- Apps:
- Any iOS SAML or WS-Fed cloud app
- Okta Mobile 5.12.0+ for iOS, managed by your MDM provider
Before you begin
- Securing access to Box - To secure access to the Box app, Okta recommends that you use Box for EMM. If you want to use this Okta Device Trust solution instead of Box for EMM, you must contact Box Support and ask them to enable Safari View Controller (SVC) for your Box tenant
- If Device Trust and Okta Mobile Connect are both enabled - End users trying to access an app enabled for Okta Mobile Connect (OMC) and secured by Device Trust go through the Device Trust authentication flow if the app has been configured with any Device Trust sign-on policy rule. Otherwise, they go through the OMC flow.
- Sign-on policy rules with the Trusted or not trusted condition - When processing a sign-on policy rule for an app configured with the Trust or Not trusted condition, Okta suspends normal rule processing and uses Okta Mobile to assess whether or not the device is trusted. If Okta assesses the device to be untrusted, one of the following occurs:
- If you configure a sign-on policy rule to deny untrusted devices, users are prompted to enroll in your MDM provider.
- If you configure a sign-on policy rule to issue an MFA challenge to users with untrusted devices, such users are presented an MFA challenge.
- End users aren't redirected to the app sign-in page sometimes - When this Device Trust solution is enabled, if end users sign in to an Okta-federated Gmail or Salesforce account and later delete the account, they're redirected to the Okta Home page instead of the app's sign out page.
- Okta supports password-less authentication only for Office 365 apps (assumes that Okta Mobile is installed) - For all other apps, end users are presented the Okta Sign In page to enter credentials. Users are then prompted to let Okta Mobile assess the trust status of their device. If the device is trusted (MDM-enrolled), end users can access the app. If Okta Mobile assesses the device to be untrusted, one of the following occurs:
- If you configured a sign-on policy rule to deny untrusted devices, users with such devices are prompted to enroll in your MDM provider.
- If you configured a sign-on policy rule to present an MFA challenge to users with untrusted devices, such users are challenged with MFA.
- Web-based MDM enrollment fails for SVC-enabled apps - For customers integrated with an MDM provider that supports web-based enrollment (such as MobileIron), the automatic enrollment flow designed to occur in this device trust solution fails if end users try to access a Safari View Controller-enabled native app (SVC). This happens because SVC apps don't support opening the device's Settings page, which is required to complete MDM enrollment. If the app includes a button to launch Safari, end users can tap the button and complete MDM enrollment.
- End users might disable Universal Links inadvertently and be prevented from accessing Device Trust-secured apps - If Okta Mobile is installed on the device and an end user taps the upper right corner of the screen (where breadcrumbs are typically located), the user is prompted to install Okta Mobile even though it's already installed. This happens because tapping that part of the screen inadvertently disables the Universal Link configured to open Okta Mobile. An Okta Mobile session is required in order for the user to be authenticated into the app. Advise affected end users that they can open Okta Mobile in this case by performing the following workaround:
- Open the Notes app.
- Create a new note containing this URL: https://login.okta.com/auth/oktamobile
- Click Done. This is necessary to make the URL a hyperlink.
- Long press on the link https://login.okta.com/auth/oktamobile.
- Securing an Okta-federated MDM application with this Device Trust solution - Okta recommends that you not apply a Not Trusted - Deny app sign policy to your Okta-federated MDM application. Doing so will prevent new users from enrolling their device in your MDM application and accessing other device trust-secured apps.
-
Apps secured by Device Trust are shown as locked on the Okta End-User Dashboard. A lock icon is shown beside apps secured by Device Trust under these conditions:
- The end users accessed the dashboard in a desktop or mobile browser (not in Okta Mobile).
- Device Trust is enabled for the org.
- The device isn't trusted.
- The end user tried to access any Device Trust-secured app from their dashboard.
Procedures
Step 1. Enable the global Device Trust setting for your org
-
In the Admin Console, go to .
- In the iOS Device Trust section, click Edit.
- Select Enable iOS Device Trust.
- Select the option(s) that correspond to your MDM provider:
MDM Options Workspace ONE UEM (formerly AirWatch)
- Trust is established by: VMware
- Integration type: Okta client-based (Workspace ONE UEM)
Microsoft Intune - Trust is established by: Microsoft Intune
MobileIron - Trust is established by: MobileIron
None of the above - Trust is established by: Other
- Integration type: Okta client-based.
Important: Don't select the SAML-based option. It doesn't apply to this Device Trust solution. - Click Next.
-
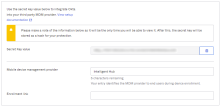
Copy the provided Secret Key to your clipboard by clicking the copy icon adjacent to the field. You'll enter the Secret Key later in your MDM provider's app configuration as described in Step 2.
Make a note of the provided Secret Key Value, as this is the only time it appears in Okta. If you generate a new Secret Key by clicking Reset iOSSecret Key, make sure to also update your MDM configuration with the new key.
- In the Mobile device management provider field, add or modify the name of your MDM provider. The content of this field is displayed to end users when they enroll their device.
- In the Enrollment link field, enter a web address for redirecting end users with unenrolled devices. For example, you may want to redirect these users to a page with enrollment instructions or the enrollment page of your selected MDM (assuming the MDM provider supports web-based enrollment).
- Click Save.
- Proceed to Step 2.
Step 2. Integrate Okta into your third party MDM provider
Recommended MDM capabilities
At minimum, your MDM must support managed app configuration. For best results, we recommend that you integrate with an MDM that can do the following:
- Set Okta Mobile to be a managed app
- Set Okta Mobile to install on end-user devices silently and automatically when they enroll in your chosen MDM
- Set the MDM to convert end user-installed Okta Mobile app instances to a managed app
- Use the managed app configuration to configure the key-value pair
Ensure the best end user experience
Your end users have a better experience when accessing your managed corporate resources if their iOS device is already enrolled in your MDM provider and Okta Mobile is already installed silently on the device through the MDM provider's app store. If Okta Mobile isn't installed already, end users are guided to install it through the MDM app store. If Okta Mobile is installed but not already managed by the MDM provider, end users are guided through the app management process before they can access device trust-secured apps.
- Configure your MDM provider to manage Okta Mobile and to install it on end user devices if it isn't installed already.
- Configure the key-value pairs through your MDM provider's managed app configuration as described in their documentation:
- Key: Domain
- Value: Enter the URL of your Okta org
- Key: managementHint
- Value: Use the Secret Key value that you saved in Step 1.
Note: The key-value pairs are case sensitive.
For example: if your MDM requires XML, use this XML format for guidance.
Copy<?xml version="1.0" encoding="UTF-8"?>
<!DOCTYPE plist PUBLIC "-//Apple//DTD PLIST 1.0//EN" http://www.apple.com/DTDs/PropertyList-1.0.dtd>
<plist version="1.0">
<dict>
<key>Domain</key>
<string>https://"Your domain".okta.com</string>
<key>managementHint</key>
<string>"secret key goes here"</string>
</dict>
</plist> - Proceed to Step 3.
Step 3. Configure app sign-on policy rules in Okta
About app sign-on policy rules
By default, all Client options in the App Sign On Rule dialog box are pre-selected. To configure more granular access to the app, create rules that reflect:
- Who users are, or the groups to which they belong
- Whether they are on or off network, or within a defined network zone
- The type of client running on their device (Office 365 apps only)
- The platform of their mobile or desktop device
- Whether or not their devices are Trusted
Taking an allow-list approach to sign-on policy rules
- Create one or more Allow rules to support the scenarios that will allow access to the app, then assign those rules the highest priority.
- Create a Deny catch-all rule that will apply to users who don't match the permissive scenarios you created in Step 1. Assign the Deny catch-all rule the lowest priority, just above the default rule. In the allow-list approach described here, the default rule is never reached because it is effectively negated by the Deny catch-all rule.
For important security information about creating app sign-on policy rules, see App sign-on policies.
Procedure
Note: This example shows Device Trust rules for managing access to Office 365. For other apps, note that the section If the user's client is any of these isn't present.
- In the Admin Console, go to , and then click the SAML or WS-enabled app that you want to protect with Device Trust.
- Click the Sign On tab.
- Scroll down to the Sign On Policy, and click Add Rule.
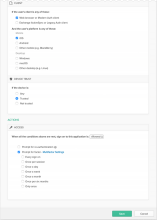
- Configure one or more rules using the following example as a guide.
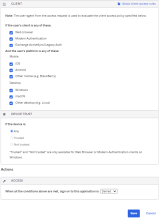
This example illustrates how you can design an app sign-on policy that allows access to web browsers and Modern Auth clients, requires MFA for all access, and denies access to untrusted iOS devices.
Example Rule 1 – Web browser or Modern Auth; iOS; Trusted; Allow access + MFA
- Enter a descriptive name for the rule.
- Under PEOPLE, specify whether to apply the rule to individuals only or to individuals and groups. The option must be the same for all the rules you create for this example.
- Under LOCATION, specify the user location to which the rule will apply. The option must be the same for all the rules you create for this example.
- Under CLIENT, configure the following settings:
Web browser selected.
Modern Auth client selected.
Exchange ActiveSync client is is unselected.
Mobile
iOS is selected.
Android is unselected.
Other mobile is unselected.
Desktop
Windows is unselected.
macOS is unselected.
Other desktop is unselected.
- Under DEVICE TRUST, configure the following:
You can select the Trusted and Not trusted options in the Device Trust section only if all of the following options in the Client section are unselected:
- Exchange ActiveSync or Legacy Auth client
- Other mobile (for example, BlackBerry)
- Other desktop (for example, Linux)
Any is unselected.
Trusted is selected.
Not trusted is unselected.
- Configure Access:
Allowed is selected.
Prompt for factor is selected.
- Click Save.
- Create Rule 2.
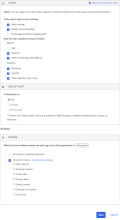
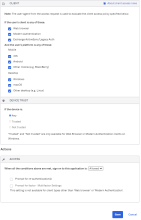
Example Rule 2 – Web browser or Modern Auth; All platforms except iOS; Any Trust; Allow access + MFA
- Enter a descriptive name for the rule.
- Under PEOPLE, select the same People option that you selected in Rule 1. The option must be the same for all the rules you create for this example.
- Under LOCATION, select the same Location option that you selected in Rule 1. The option must be the same for all the rules you create for this example.
- Under CLIENT, configure the following settings:
Web browser selected.
Modern Auth client selected.
Exchange ActiveSync client is is unselected.
Mobile
iOS is unselected.
Android is selected.
Other mobile is selected.
Desktop
Windows is selected
macOS is selected
Other desktop is selected
- Under DEVICE TRUST, configure the following:
You can select the Trusted and Not trusted options in the Device Trust section only if all of the following options in the Client section are unselected:
- Exchange ActiveSync or Legacy Auth client
- Other mobile (for example, BlackBerry)
- Other desktop (for example, Linux)
Any is selected.
Trusted is unselected.
Not trusted is unselected.
- Configure Access.
Allowed is selected.
Prompt for factor is selected.
- Click Save.
- Create Rule 3.
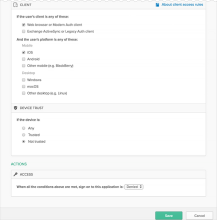
Example Rule 3 – Web browser or Modern Auth; iOS; Not Trusted; Deny access
- Enter a descriptive name for the rule.
- Under PEOPLE, select the same People option that you selected in Rule 1. The option must be the same for all the rules you create for this example.
- Under LOCATION, select the same Location option that you selected in Rule 1. The option must be the same for all the rules you create for this example.
- Under CLIENT, configure the following settings:
Web browser selected.
Modern Auth client selected.
Exchange ActiveSync client is is unselected.
Mobile
iOS is selected.
Androd is unselected.
Other mobile is unselected.
Desktop
Windows is unselected.
macOS is unselected.
Other desktop is unselected.
- Under DEVICE TRUST, configure the following:
You can select the Trusted and Not trusted options in the Device Trust section only if all of the following options in the Client section are unselected:
- Exchange ActiveSync or Legacy Auth client
- Other mobile (for example, BlackBerry)
- Other desktop (for example, Linux)
Any is unselected.
Trusted is unselected.
Not trusted is selected.
- Configure Access.
Denied is selected.
- Click Save.
Example Rule 4 – Any client type; All platforms; Any Trust; Deny access
- Enter a descriptive name for the rule.
- Under PEOPLE, select the same People option that you selected in Rule 1. The option must be the same for all the rules you create for this example.
- Under LOCATION, select the same Location option that you selected in Rule 1. The option must be the same for all the rules you create for this example.
- Under CLIENT, configure the following settings:
Web browser selected.
Modern Auth client selected.
Exchange ActiveSync client is selected.
Mobile
iOS is selected.
Android is selected.
Other mobile is selected.
Desktop
Windows is selected.
macOS is selected.
Other desktop is selected.
- Under DEVICE TRUST, configure the following:
You can select the Trusted and Not trusted options in the Device Trust section only if all of the following options in the Client section are unselected:
- Exchange ActiveSync or Legacy Auth client
- Other mobile (for example, BlackBerry)
- Other desktop (for example, Linux)
Any is selected.
Trusted is unselected.
Not trusted is unselected.
- Configure Access.
Denied is selected.
- Click Save.
Rule 5: Default sign on rule – Any client, All platforms; Any Trust; Allow access
The Default sign on rule is already created and can't be edited. In this example, the Default rule is never reached because it is effectively negated by Rule 4.
Known issues
- If Intune is your MDM provider, O365 isn't supported when using this Device Trust solution - If Microsoft Intune is your MDM provider and is federated to Okta, applying a Not Trusted --> Deny authentication policy to an Okta-federated O365 app blocks end users with unmanaged iOS devices from enrolling their device in Intune. This happens because your O365 authentication policy is applied to Intune as well. Okta is investigating this issue. In the mean time, Okta recommends that you use Microsoft Intune MAM to manage access to O365 apps and this Okta Device Trust solution to manage access to other sensitive apps.


