Enforce Okta Device Trust for Native Apps and Browsers on MDM-managed Android devices
Early Access release. See Enable self-service features.
Okta Device Trust for Android allows you to prevent unmanaged Android devices from accessing enterprise services through browsers and native apps.

Prerequisites
- Android devices running Android 5.1 (Lollipop) or higher
- Google Play services
- Android Enterprise management
- Any Mobile Device Management (MDM) provider that supports managed app configuration
- Apps:
- Any Android SAML or WS-Fed cloud app
- Okta Mobile 5.14.0+ for Android, managed by your MDM provider
Before you begin
- Tapping the Back button prevents access to apps in some case - In orgs that implement Okta MFA, tapping the Back button on the Android device after satisfying the MFA challenge redirects users to their Okta Home page instead of to the Device Trust-secured app they were attempting to access. Advise affected end users to try again without tapping the Back button.
- Delays possible when pushing Okta Mobile and management hint to devices - You may experience long delays when waiting for the MDM to push the managed Okta Mobile app and the management hint to Android devices. In some cases, the delay is indefinite. This issue appears to originate with Google and they're aware of it.
- Sign-on policy rules with the Trusted or not trusted condition - When processing a sign-on policy rule for an app configured with the Trust or Not trusted condition, Okta suspends normal rule processing and uses Okta Mobile to assess whether or not the device is trusted. If Okta assesses the device to be untrusted, one of the following occurs:
- If you configure a sign-on policy rule to deny untrusted devices, users are prompted to enroll in your MDM provider.
- If you configure a sign-on policy rule to issue an MFA challenge to users with untrusted devices, such users are presented an MFA challenge.
- End users aren't redirected to the app sign-in page sometimes - When this Device Trust solution is enabled, if end users sign in to an Okta-federated Gmail or Salesforce account and later delete the account, they're redirected to the Okta Home page instead of the app's sign out page.
- Okta supports password-less authentication only for Office 365 apps (assumes that Okta Mobile is installed) - For all other apps, end users are presented the Okta Sign In page to enter credentials. Users are then prompted to let Okta Mobile assess the trust status of their device. If the device is trusted (MDM-enrolled), end users can access the app. If Okta Mobile assesses the device to be untrusted, one of the following occurs:
- If you configured a sign-on policy rule to deny untrusted devices, users with such devices are prompted to enroll in your MDM provider.
- If you configured a sign-on policy rule to present an MFA challenge to users with untrusted devices, such users are challenged with MFA.
- Securing an Okta-federated MDM application with this Device Trust solution - Okta recommends that you not apply a Not Trusted - Deny app sign policy to your Okta-federated MDM application. Doing so will prevent new users from enrolling their device in your MDM application and accessing other device trust-secured apps.
-
Apps secured by Device Trust are shown as locked on the Okta End-User Dashboard. A lock icon is shown beside apps secured by Device Trust under these conditions:
- The end users accessed the dashboard in a desktop or mobile browser (not in Okta Mobile).
- Device Trust is enabled for the org.
- The device isn't trusted.
- The end user tried to access any Device Trust-secured app from their dashboard.
Procedures
Step 1. Enable the global Device Trust setting for your org
-
In the Admin Console, go to .
- In the Android Device Trust section, click Edit.
- Select Enable Android Device Trust .
- Select the option(s) that correspond to your MDM provider:
MDM Options Workspace ONE UEM (formerly AirWatch)
- Trust is established by: Workspace ONE
- Integration type: Okta client-based (Workspace ONE UEM)
Microsoft Intune Trust is established by: Microsoft IntuneMobileIron Trust is established by: MobileIronNone of the above - Trust is established by: Other
- Integration type: Okta client-based.
Note: Important: Don't select the SAML-based option. It doesn't apply to this Device Trust solution. - Click Next.
-
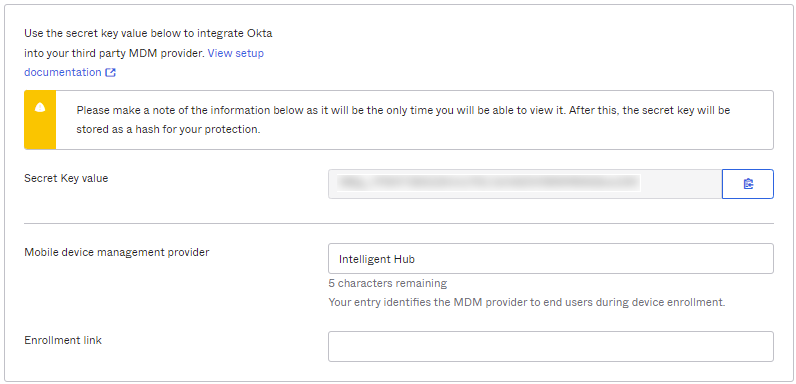
Copy the provided Secret Key to your clipboard by clicking the copy icon adjacent to the field. You'll enter the Secret Key later in your MDM provider's app configuration as described in Step 2.
Note:Make a note of the provided Secret Key Value, as this is the only time it appears in Okta. If you generate a new Secret Key by clicking Reset AndroidSecret Key, make sure to also update your MDM configuration with the new key.
- In the Mobile device management provider field, add or modify the name of your MDM provider. The content of this field is displayed to end users when they enroll their device.
- In the Enrollment link field, enter a web address for redirecting end users with unenrolled devices. For example, you may want to redirect these users to a page with enrollment instructions or the enrollment page of your selected MDM (assuming the MDM provider supports web-based enrollment).
- Click Save.
- Proceed to Step 2.
Step 2. Integrate Okta into your third party MDM provider
Recommended MDM capabilities
At minimum, your MDM must support managed app configuration. For best results, we recommend that you integrate with an MDM that can do the following:
- Set Okta Mobile to install on end-user devices silently and automatically when they enroll in your chosen MDM
- Set Okta Mobile to install on the work profile of end-user devices silently and automatically when they enroll in your chosen MDM
- Use the managed app configuration to configure the key-value pair
Ensure the best end user experience
Your end users have a better experience when accessing your managed corporate resources if their Android device is already enrolled in your MDM provider and Okta Mobile is already installed silently in the device's work profile through the MDM provider's app store. If Okta Mobile isn't installed in the work profile already, end users are guided to install it through the MDM app store. If Okta Mobile is installed but not already managed by the MDM provider, end users are guided through the app management process before they can access device trust-secured apps.
- Configure your MDM provider to manage Okta Mobile and to install it on end user devices if it isn't installed already.
- Configure the key-value pairs through your MDM provider's managed app configuration as described in their documentation:
- Key: Domain
- Value: Enter the URL of your Okta org
- Key: managementHint
-
Value: Use the Secret Key value that you saved in Step 1.
Note: The key-value pairs are case sensitive.
For example: if your MDM requires XML, use this XML format for guidance.
<?xml version="1.0" encoding="UTF-8"?>
<!DOCTYPE plist PUBLIC "-//Apple//DTD PLIST 1.0//EN" http://www.apple.com/DTDs/PropertyList-1.0.dtd>
<plist version="1.0">
<dict>
<key>Domain</key>
<string>https://"Your domain".okta.com</string>
<key>managementHint</key>
<string>"secret key goes here"</string>
</dict>
</plist>
Configuration tips
Below are tips for configuring the key-value pairs in select MDM applications. As MDM configurations may change without notice, Okta recommends that you always consult your MDM's documentation for the most up-to-date information.
Workspace ONE
For how to add, assign, and manage Okta Mobile with Workspace ONE UEM, perform the procedures as described in the following Workspace ONE UEM documentation:
In the Assign Applications . . . procedure, make sure to configure these settings as shown:
- Managed Access – Enable
- App Delivery Method – Auto
- Application Configuration
- Domain – Enter the URL of your Okta org.
- Username – Enter your username for your Okta org.
- Management Hint – Enter the Secret Key value that you saved in Step 1. (Note: The value is case sensitive.)
Microsoft Intune
For how to manage Okta Mobile with Microsoft Intune, perform the procedures as described in the Microsoft Intune document Add app configuration policies for managed Android Enterprise devices.
- Device enrollment type – Managed devices
- Associated App – Okta Mobile
- Configuration settings format – Use configuration designer
- Domain (string) – Enter the URL of your Okta org
- Username (string) – Enter your username for your Okta org
- Management Hint (string) – Enter the Secret Key value that you saved in Step 1. (Note: The value is case sensitive.)
MobileIron
For how to manage Okta Mobile with MobileIron, perform the procedures provided in the MobileIron document App Configuration.
In the App Configurations screen, configure settings for:
- Install on device
-
Managed Configurations for Android
Domain – Enter the URL of your Okta org.
Username – Enter your username for your Okta org.
Management Hint – Enter the Secret Key value that you saved in Step 1. (Note: The value is case sensitive.)
- Proceed to Step 3.
Step 3. Configure app sign-on policy rules in Okta
About app sign-on policy rules
By default, all Client options in the App Sign On Rule dialog box are pre-selected. To configure more granular access to the app, create rules that reflect:
- Who users are, or the groups to which they belong
- Whether they are on or off network, or within a defined network zone
- The type of client running on their device (Office 365 apps only)
- The platform of their mobile or desktop device
- Whether or not their devices are Trusted
Taking an allow-list approach to sign-on policy rules
- Create one or more Allow rules to support the scenarios that will allow access to the app, then assign those rules the highest priority.
- Create a Deny catch-all rule that will apply to users who don't match the permissive scenarios you created in Step 1. Assign the Deny catch-all rule the lowest priority, just above the default rule. In the allow-list approach described here, the default rule is never reached because it is effectively negated by the Deny catch-all rule.
For important security information about creating app sign-on policy rules, see About app sign-on policies.
Procedure
Note: This example shows Device Trust rules for managing access to Office 365. For other apps, note that the section If the user's client is any of these isn't present.
- In the Admin Console, go to , and then click the SAML or WS-enabled app that you want to protect with Device Trust.
- Click the Sign On tab.
- Scroll down to the Sign On Policy, and click Add Rule.
- Configure one or more rules using the following example as a guide.
This example illustrates how you can design an app sign-on policy that allows access to web browsers and Modern Auth clients, requires MFA for all access, and denies access to untrusted Android devices.
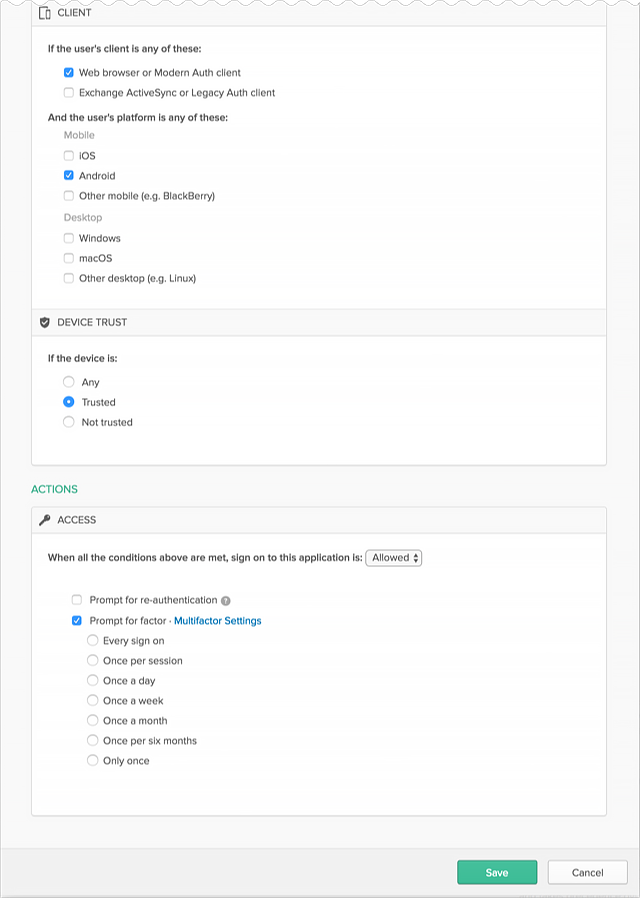
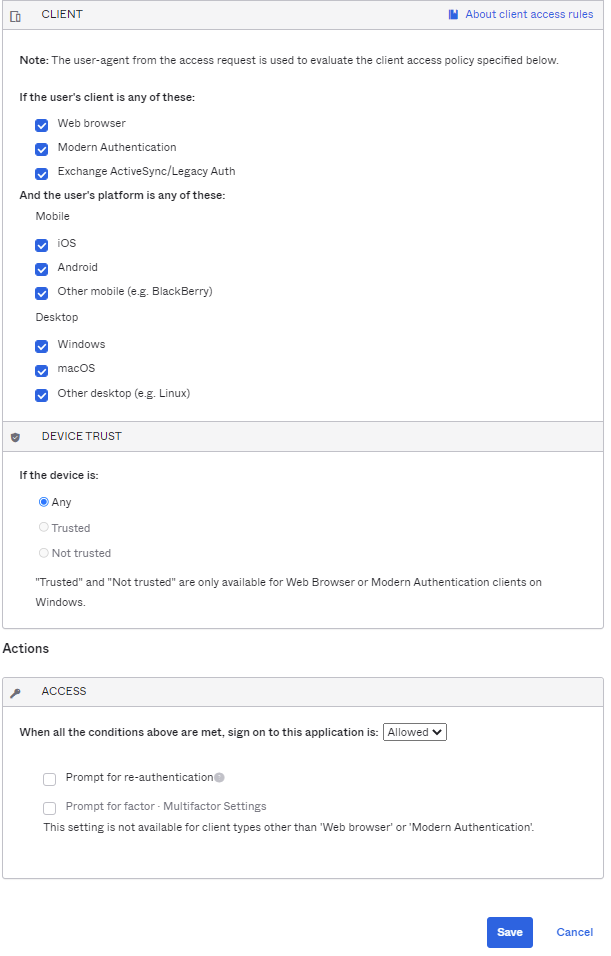
Example Rule 1 – Web browser or Modern Auth; Android; Trusted; Allow access + MFA
- Enter a descriptive name for the rule.
- Under PEOPLE, specify whether to apply the rule to individuals only or to individuals and groups. The option must be the same for all the rules you create for this example.
- Under LOCATION, specify the user location to which the rule will apply. The option must be the same for all the rules you create for this example.
- Under CLIENT, configure the following settings:
Web browser selected.
Modern Auth client selected.
Exchange ActiveSync client is is unselected.
Mobile
iOS is unselected.
Android is selected.
Other mobile is unselected.
Desktop
Windows is unselected.
macOS is unselected.
Other desktop is unselected.
- Under DEVICE TRUST, configure the following:
You can select the Trusted and Not trusted options in the Device Trust section only if all of the following options in the Client section are unselected:
- Exchange ActiveSync or Legacy Auth client
- Other mobile (for example, BlackBerry)
- Other desktop (for example, Linux)
Any is unselected.
Trusted is selected.
Not trusted is unselected.
- Configure Access:
Allowed is selected.
Prompt for factor is selected.
- Click Save.
- Create Rule 2.
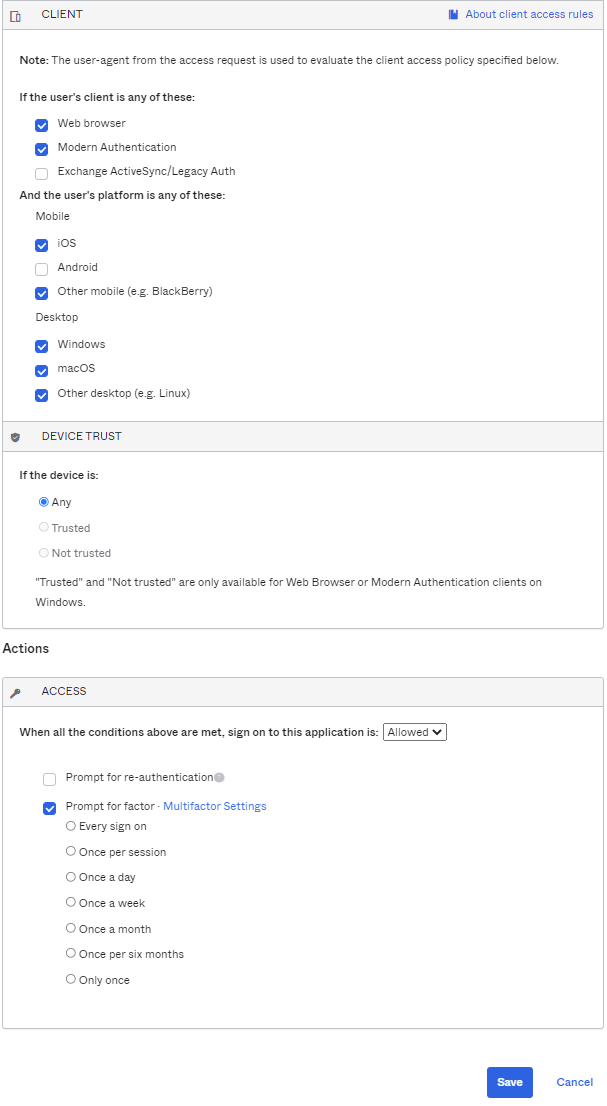
Example Rule 2 – Web browser or Modern Auth; All platforms except Android; Any Trust; Allow access + MFA
- Enter a descriptive name for the rule.
- Under PEOPLE, select the same People option that you selected in Rule 1. The option must be the same for all the rules you create for this example.
- Under LOCATION, select the same Location option that you selected in Rule 1. The option must be the same for all the rules you create for this example.
- Under CLIENT, configure the following settings:
Web browser selected.
Modern Auth client selected.
Exchange ActiveSync client is is unselected.
Mobile
iOS is selected.
Androd is unselected.
Other mobile is selected.
Desktop
Windows is selected
macOS is selected
Other desktop is selected
- Under DEVICE TRUST, configure the following:
You can select the Trusted and Not trusted options in the Device Trust section only if all of the following options in the Client section are unselected:
- Exchange ActiveSync or Legacy Auth client
- Other mobile (for example, BlackBerry)
- Other desktop (for example, Linux)
Any is selected.
Trusted is unselected.
Not trusted is unselected.
- Configure Access.
Allowed is selected.
Prompt for factor is selected.
- Click Save.
- Create Rule 3.
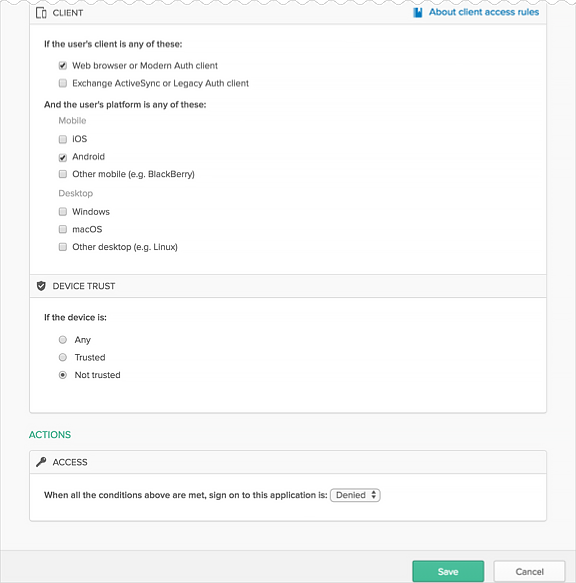
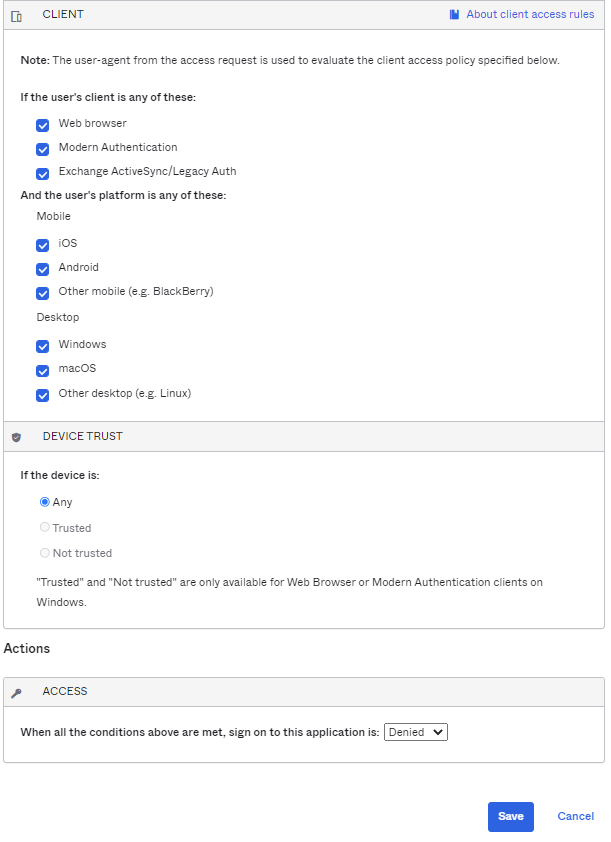
Example Rule 3 – Web browser or Modern Auth; Android; Not Trusted; Deny access
- Enter a descriptive name for the rule.
- Under PEOPLE, select the same People option that you selected in Rule 1. The option must be the same for all the rules you create for this example.
- Under LOCATION, select the same Location option that you selected in Rule 1. The option must be the same for all the rules you create for this example.
- Under CLIENT, configure the following settings:
Web browser selected.
Modern Auth client selected.
Exchange ActiveSync client is is unselected.
Mobile
iOS is unselected.
Android is selected.
Other mobile is unselected.
Desktop
Windows is unselected.
macOS is unselected.
Other desktop is unselected.
- Under DEVICE TRUST, configure the following:
You can select the Trusted and Not trusted options in the Device Trust section only if all of the following options in the Client section are unselected:
- Exchange ActiveSync or Legacy Auth client
- Other mobile (for example, BlackBerry)
- Other desktop (for example, Linux)
Any is unselected.
Trusted is unselected.
Not trusted is selected.
- Configure Access.
Denied is selected.
- Click Save.
Example Rule 4 – Any client type; All platforms; Any Trust; Deny access
- Enter a descriptive name for the rule.
- Under PEOPLE, select the same People option that you selected in Rule 1. The option must be the same for all the rules you create for this example.
- Under LOCATION, select the same Location option that you selected in Rule 1. The option must be the same for all the rules you create for this example.
- Under CLIENT, configure the following settings:
Web browser selected.
Modern Auth client selected.
Exchange ActiveSync client is selected.
Mobile
iOS is selected.
Android is selected.
Other mobile is selected.
Desktop
Windows is selected.
macOS is selected.
Other desktop is selected.
- Under DEVICE TRUST, configure the following:
You can select the Trusted and Not trusted options in the Device Trust section only if all of the following options in the Client section are unselected:
- Exchange ActiveSync or Legacy Auth client
- Other mobile (for example, BlackBerry)
- Other desktop (for example, Linux)
Any is selected.
Trusted is unselected.
Not trusted is unselected.
- Configure Access.
Denied is selected.
- Click Save.
Rule 5: Default sign on rule – Any client, All platforms; Any Trust; Allow access
The Default sign on rule is already created and can't be edited. In this example, the Default rule is never reached because it is effectively negated by Rule 4.
Known issues
- If Intune is your MDM provider, O365 isn't supported when using this Device Trust solution - If Microsoft Intune is your MDM provider and is federated to Okta, applying a Not Trusted --> Deny authentication policy to an Okta-federated O365 app blocks end users with unmanaged Android devices from enrolling their device in Intune. This happens because your O365 authentication policy is applied to Intune as well. Okta is investigating this issue. In the mean time, Okta recommends that you use Microsoft Intune MAM to manage access to O365 apps and this Okta Device Trust solution to manage access to other sensitive apps.
- Android 10 (Q) and later versions aren't supported with this solution - Changes made by Google prevent devices on Android 10 and later versions from communicating their trust posture (Trusted/Not-Trusted) to ISVs such as Okta. Consequently, authentication requests from native apps or Chrome on devices running Android 10 or later versions appear as Not Trusted. In this scenario Okta prompts users to access protected resources through Okta Mobile to ensure that device posture is evaluated correctly.
- Additional prompt may be shown to iPad users not enrolled in this Device Trust solution - End users using Safari to access device trust-secured apps from an unenrolled iPad are prompted to tap a link Tap here to connect. Tapping the link guides the user through the device enrollment flow. The prompt isn't shown if the user is accessing a native app through the Okta Mobile dashboard.
- UX issues possible when authenticating to Outlook - Android device users in orgs with a Device Trust sign-on policy configured for Outlook may see Outlook hang or encounter other UX issues when authenticating to Outlook. The issue is related to a recent change that Microsoft made to the Outlook app affecting its handling of the Okta Sign-In Widget during the federated flow. The resolution for users in all such cases is to force close Outlook and try again. Okta has raised this issue with Microsoft.