Atlassian
Atlassian builds and maintains the Atlassian Cloud app integration in the Okta Integration Network (OIN). It supports Security Assertion Markup Language (SAML), Single Sign-On (SSO), and System for Cross-domain Identity Management (SCIM) provisioning functionality.
You can migrate the following app integrations to Atlassian Cloud:
- Atlassian Confluence Cloud: In alignment with Atlassian's removal of the SOAP API used by the Confluence Cloud app, the provisioning functionality has been deprecated. Switch to Atlassian Cloud to continue to use provisioning.
- Atlassian Jira Cloud: Provisioning functionality for this app integration isn't deprecated. While you can continue to use this integration, consider migrating to the Atlassian Cloud app in the OIN.
- Jira (Atlassian): Provisioning functionality for this app integration isn't deprecated. While you can continue to use this integration, consider migrating to the Atlassian Cloud app in the OIN.
Remember: You may have changed the default names for these apps when configuring them in your org.
The Atlassian Cloud app integration allows you to enable SAML and manage users using SCIM provisioning for the preceding Atlassian Cloud products. It offers enhanced functionality and a better user experience by allowing you to set up SAML at an organization level and push groups and their members to the Atlassian Cloud. Atlassian maintains this app integration, which includes periodic updates.
Note: If you're using a Confluence or Jira server with these app integrations, there's no action required. This migration only applies to cloud products.
Plan the migration
- Budget at least 1–2 weeks for the project, including planning, testing, and rollout.
- Review the following migration documentation to understand the available SSO and SCIM functionality.
- Set up and test the Atlassian Cloud integration available in the OIN.
- Migrate all users to the new Atlassian Cloud integration before the end-of-life date.
For questions about the end of Life of the Atlassian Confluence Cloud and Atlassian Jira Cloud integrations, contact Okta Support. For questions about Atlassian products, the new Atlassian Cloud integration, or migration, contact Atlassian support.
Feature Comparison
| Atlassian Cloud | Atlassian Confluence Cloud | Atlassian Jira Cloud | Jira (Atlassian) | |
|---|---|---|---|---|
| Secure Web Access (SWA) | ● | ● | ● | ● |
| Security Assertion Markup Language (SAML) | ● | |||
| Push user deactivation | ● | |||
| Reactivate users | ● | |||
| Push profile updates | ● | ● | ● | |
| Push new users | ● | ● | ● | |
| Push groups | ● | ● | ● | |
| Import new users | ● | ● | ● | |
| Import profile updates | ● | ● | ● | |
| Push password updates |
Deprecated in alignment with Atlassian's removal of the SOAP API used by the Confluence Cloud app. (For reference, see Confluence Cloud SOAP API Migration Guide.)
Requirements
- To take advantage of the Atlassian Cloud app and use both SAML and SCIM functionality, you have to have an Atlassian Access subscription. For more information, see Atlassian Access.
- The Okta-built Confluence or Jira applications allow you to manage users at a site level. The Atlassian-built Atlassian Cloud application allows you to manage users at an organization level. An Atlassian organization can consist of multiple sites and acts as a centralized location to manage products and users. Before proceeding to the migration steps, make sure that you have added your Jira or Confluence sites to your Atlassian organization. For more information, see Explore an Atlassian organization.
- Test the migration flow with sample users or groups to ensure everything is working properly before you proceed with production data.
- It's not recommended to use individual assignments when assigning users to the Atlassian Cloud application. As mentioned throughout the migration steps, assigning users should be done through group assignment, as product access is granted to the groups. The product access granted to the groups is also granted to the members of those groups. If you use an individual user assignment when pushing users through your Atlassian Cloud application in Okta, that user won't have any product access until you add the user to a group.
- If you're pushing groups through the Atlassian Cloud application that you previously pushed using the Okta-built Jira applications, the groups are automatically linked. Any product access that you granted to those groups should remain the same.
- If you want the users that you pushed through the Jira or Confluence applications to be members of the same groups, you have to assign them to those groups in Okta before you push them through the Atlassian Cloud application. Unlike the Okta-built Jira or Confluence applications, the Atlassian Cloud app doesn't support Group Discovery when pushing new users.
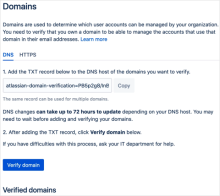
- For the Atlassian Cloud app, user accounts can only be pushed if they use a domain that is verified using your Atlassian organization. At an Atlassian organization level, you need to verify that you own a domain to be able to push and manage accounts using that domain:
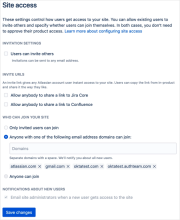
- At the Atlassian site level, users with any domain that you grant access to can be added to the site. You don't have to verify that you own the domain at the Atlassian organization level:
- When you migrate to Atlassian Cloud, if you have users at the site level who are using a domain that you can't verify at an organization level, you can't push those users using the Atlassian Cloud app.
Migration steps
The Atlassian Cloud app is available from the Okta Integration Network (OIN). It adds Lifecycle Management support for the Atlassian identity platform.
To take advantage of these updates, add an instance of Atlassian Cloud in your Okta org. If you previously added any of the Okta-built Jira or Confluence Cloud applications, complete the following steps to migrate from these applications to the Atlassian Cloud application:
-
In the Admin Console, go to .
- Click Browse App Catalog.
- Search the catalog for Atlassian Cloud. Select it and click Add Integration.
- Configure your general settings. Click Next.
- Configure your desired sign-on options. Click Done.
- Optional. Configure Secure Web Authentication (SWA) as the sign-on method.
- Go to the Sign On tab.
- Click Edit.
- Select Secure Web Authentication and choose a password option.
- Ensure that you use the same Application username format as your existing app instance (for example, Okta username).
- Configure the Sign On Policy section to be the same as your existing app instance.
See App sign-on policies.
- Click Save.
If you used SWA for your previous Jira or Confluence Cloud app instance, you need to reenter the credentials for all users assigned to the Atlassian Cloud instance. Users can follow the steps in Reveal the password of an app integration to retrieve their passwords. Ensure that any users that need to retrieve their passwords have done so before you deactivate or delete your previous Jira or Confluence Cloud app instance. Otherwise, you'll need to reset their passwords through Jira or Confluence Cloud.
- Optional. Configure SAML:
- Go to the Sign On tab.
- Click Edit.
- Choose SAML 2.0 as the sign-on method. Click View Setup Instructions and follow the steps to configure SAML for your Atlassian Cloud app.
- Click Save.
- Optional. Configure SCIM. Follow the steps outlined in the Atlassian Cloud SCIM Configuration Guide. Remember that user provisioning through the Atlassian Cloud SCIM app should be done using Group assignment. User product access is assigned through Groups.
Common provisioning scenarios not described in the Atlassian Configuration Guide
Pushing existing groups that were pushed using the Okta-built Jira apps
As mentioned in the Requirements section, pushing groups that were previously pushed using the Okta-built Jira apps to the Atlassian Cloud app should link the groups correctly. Any product access granted to those groups remains the same. No special step is needed to push the same groups.
Pushing groups using a rule
If you have a rule in your Okta-built Jira or Confluence apps to push groups automatically, ensure that you add the same rule in your Atlassian Cloud app instance.
This is important if you import groups from an external source (for example, Active Directory or LDAP) to ensure that any groups created from those sources continue to be pushed automatically.
Using custom mappings when pushing users
The Atlassian Cloud app doesn't support the Second Email and Mobile Phone attributes, which were supported in the Okta-built Jira or Confluence apps. All other attributes are supported. For a full list of the Atlassian Cloud SCIM app default attributes and mappings, see the Atlassian Cloud SCIM Configuration Guide. If you need to add or delete attributes in your SCIM app, update mappings to any of the attributes to match your old Jira or Confluence attribute mappings.
Note: After you push a user at an org level, any attribute mappings set using the Atlassian Cloud app will overwrite any attribute mappings set using the Okta-built Jira or Confluence apps.
-
After you've enabled your desired features, go to the Assignments tab of your new Atlassian Cloud application. Click Assign and start assigning the same users or groups that are assigned to your old Jira or Confluence Cloud applications.
- Make sure you assign all the users to your new Atlassian Cloud instance to avoid any accidental deprovisioning or loss of access for your users.
- If you're enabling provisioning, read the Atlassian Cloud SCIM configuration guide before assigning users to the application. To provision users with the correct product access permissions, it's necessary for users to be assigned through group assignments (these groups should be pushed first before assignment).
-
In the Admin Console, go to .
- Open your original Jira or Confluence Cloud application that existed before you added Atlassian Cloud in step 5.
- Optional. If you previously used Provisioning for your Jira or Confluence Cloud app:
- Go to the Provisioning tab.
- Under Settings , select Integration.
- Click Edit.
- Clear Enable API Integration.
- Click Save:
- You can now deactivate or delete your old Jira or Confluence Cloud application and continue to use the Atlassian Cloud application. Consider hiding your original app for a short time period (1–2 weeks) and have users test with the new application before deactivation. Follow these steps:
- Hide your old Jira or Confluence app.
In the Admin Console, go to .
- Open your original Jira or Confluence app, and then go to the General tab.
- Click Edit.
- Select Do not display application icon to users.
- (Optional) If the app is set up for mobile access, select Do not display application icon in the Okta Mobile app.
- Click Save.
-
Deactivate your old Jira or Confluence Cloud application.
In the Active menu under your application label, choose Deactivate.
-
Delete your old Jira or Confluence Cloud application.
You can delete your original app after you deactivate your original app. To do so, in the Inactive menu under your application label, choose Delete.
Click Delete Application to delete the app.
- Hide your old Jira or Confluence app.


