Workday Real-Time Sync
Workday Real-Time Sync (RTS) allows Okta to receive user creation, update, and termination events from Workday on a real-time basis. User changes in Workday are reflected immediately in Okta and its downstream apps.
RTS is used to trigger an update from Workday to Okta in real-time. Use this for changes where timeliness is critical such as immediate termination of a worker. A business process must be configured in Workday to send the trigger to Okta to start this process. Included in the RTS import are base attributes, non-future, and future effective dated custom attributes.
Okta strongly recommends that you use RTS with scheduled imports that run on a one-to-two day interval. This is because some less-frequently used actions in Workday don't trigger RTS, so scheduled imports are required to reconcile these actions.

Prerequisites
- Workday is set up as the Profile Source. For instructions, see Configuring Provisioning for Workday.
- Create an Okta account for an RTS admin. While you can assign the super admin role to the account, you can also define a custom role and assign the least privilege possible. See Custom admin roles. Define the custom role as follows:
- The custom role must have the following permissions:
- Manage Users (all permissions under User)
- Manage group membership (under Group)
- Manage Applications (all permissions under Application)
- Create and assign a resource set to the role. This resource set must contain both users and apps. See Create a resource set.
- The custom role must have the following permissions:
Features
Workday actions not supported by RTS:
- Updates to the
Second Emailattribute don't trigger RTS. - Updates to the
Manager Usernameattribute don't trigger RTS.
Some of the worker attributes, like the Manager Username, can't be populated in Okta as part of RTS. As a workaround, add the attribute to Workday field overrides.
The following table displays whether a feature requires an update to base attributes to trigger RTS. A list of base attributes follows this table.
|
Features |
Requires base attribute update to trigger RTS |
|---|---|
| Create New user | No |
| Update User Base Attribute | No |
| Terminate User | No |
| Update Users Custom Attribute | Yes |
| Create New Group | Yes |
| Update Group Name & Description | Yes (Not recommended. See Manage Workday Provisioning Groups.) |
| Update Any Group Settings | Yes |
| Add New User To Group | No |
| Update User Base Attribute in Group | Yes |
| Remove User From Group | Yes |
The following table lists the base attributes:
|
Display Name |
Variable Name |
Type |
|---|---|---|
| User Name | userName | String |
| First Name | firstName | String |
| Last Name | lastName | String |
| String | ||
| Second Emailϕ | secondEmail | String |
| Mobile Phone | mobilePhone | String |
| Employee ID | employeeID | String |
| Worker Type | accountType | String |
| Title | businessTitle | String |
| Manager ID | managerId | String |
| Manager Username | managerUserName | String |
| Street Address | streetAddress | String |
| City | city | String |
| State | state | String |
| Postal Code | postalCode | String |
| Country (ISO-3166) | countryCode | String |
| Supervisory Organization | supervisoryOrd | String |
| Business Unit | businessUnit | String |
| Work Phone | workPhone | String |
| Location | location | String |
ϕ Okta doesn't import or set the value of secondEmail. You can use
a custom attribute to retrieve a value for this from Workday. See Workday custom attributes.
RTS Deactivation
- RTS follows the same deactivation rules when querying the user in real-time. See Deactivation.
- Users can be deactivated immediately upon sync if the immediate deactivation reasoning has been set up. See Immediate Deactivation.
- Group name change isn't recommended with RTS. See Manage Workday Provisioning Groups.
Configure RTS in Workday
- Create an Integration System
- Add Integration Attributes to the Integration System
- Add Subscriptions to the Integration System
- Associate the Integration User to the Integration System
- Edit Business Process for adding the Integration System
Create an Integration System
- Sign in to Workday as an administrator.
- Type Create Integration System in the search box on the top-left corner of the page.
- Enter the following information:
- System Name: Name desired for the integration system
- Template: Select New using Template, then select Okta-Worker from the list.
- Click OK.
- Select Enable All Services and make sure that all checkboxes under the Enabled column are selected.
- You may see the following error. You can ignore it because you finish the configuration in the next section.

- After confirming the values, the Integration System page opens.
Add Integration Attributes to the Integration System
- Click Actions next to the Integration System, and then go to :
-
Click the plus (+) sign for the Okta API Endpoint and Okta API Token to add an entry for each attribute.
Okta API Endpoint
In the URL: https://<ENVIRONMENT>/api/v1/app/<Identity Provider ID>/activities/, use these elements:
-
Environment: For example,
acme.okta.com,mycompany.okta.com - Identity Provider ID: From the View Setup Instructions link under the Sign On tab for the Workday app. Use the value generated for Issuer in the setup Instructions.
To obtain the Okta API Token, follow these steps:
Use an account with super admin privileges to generate tokens.
- Create an Okta service account.
- Assign the super admin role to the service account.
- Sign in to Okta as this user.
- From the Admin Dashboard page, go to .
- Click Create Token and then enter a relevant name for it.
- Copy the token and use it in the form.
Add Subscriptions to the Integration System
- Click the ellipsis (three dots) next to the Integration System, then go to .
-
Under Subscribe to specific Transaction Types, select items according to the types of events that are required. (See Table 3 for specifications on the types of transactions.)
-
Click the minus (–) sign below External Endpoints to remove the configuration for External Endpoint.
-
Click Add Launch Integration, and then add the values shown in Table 1.
-
You may see the following alert. You can ignore it as it will be fixed in the next section.

Table 1
|
Field |
Value Types |
Value |
|---|---|---|
| Workers | Determine Value at Runtime | Transaction Targets |
| As of Entry Moment | Determine Value at Runtime | Transaction Entry Moment |
| Effective Data | Determine Value at Runtime | Transaction Entry Moment |
If you receive an error, try inputting Transaction Targets as Workers instead of Transaction Targets.
Associate the Integration User to the Integration System
This Integration System User should be created as described in Create an Integration System User in Workday.
-
Click the ellipsis (three dots) next to the Integration System, then edit the Workday account.
-
Select the Integration System User under Workday Account and add it. This associates the Integration User to the System and completes the setup of the Integration System.
Edit Business Process for adding the Integration System
- This example uses the Hire business process. For the appropriate business process type, see Table 3.
-
Enter
bp: hirein the Workday search field. - Select Hire for tenant. For example: Hire for Acme Inc. Don't select the default business process.
- Go to Edit Definition.
-
Add a step to invoke after the hire process has been completed. Find the letter in the Order column that matches the Yes in the Complete column. (This example demonstrates this with the letter a).
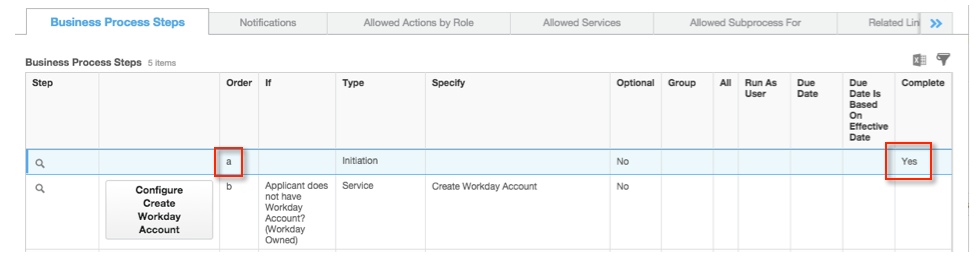
-
Click the plus sign (+) to add a step.
-
Set the Order value to b. You need the Business Process to invoke real time sync after the completion step, which is set to a.
-
Select the type as Integration, then click OK to save. You return to the Business Process landing page.
-
You may see the following error. You can ignore it because it will be fixed in the next section.

-
The Configure Integration System button appears. Click this to start the configuration process.
-
Select the Integration System that was previously created, then click OK.
-
Add the values as shown in Table 2.
Table 2
|
Field |
Value Types |
Value |
|---|---|---|
| Workers | Determine Value at Runtime | Worker |
| As of Entry Moment | Determine Value at Runtime | Date and Time Completed |
| Effective Date | Determine Value at Runtime | Effective Date |
This completes the steps for adding the Integration System event to the Business Process. For the sync between Workday and Okta, see Table 3 for the optimal combination of Business Process and Transaction Type.
Table 3
|
No. |
Type |
Name |
Event |
|---|---|---|---|
| 1 | Business Process | Hire | New hire |
| 2 | Business Process | Termination | Termination |
| 3 | Business Process | Job Change | Job, Supervisory org. Manager |
| 4 | Business Process | Title | Job Title Change |
| 5 | Transaction Type | Account Provisioning - Event Lite Type | Workday ID change |
| 6 | Transaction Type | Contact Change - Contact Information | Phone number, email change |
| 7 | Transaction Type | Edit Workday Account - Edit Workday Account | Username, Employee ID change |
| 8 | Transaction Type | Legal Name Change - Legal Name Change Event | Name change |
| 9 | Transaction Type | Person Address Change - Event Lite Type | Address change (Work Address) |
Maintain termination categories in Workday
There are two ways to edit or view the categories for termination:
- Search for maintain termination categories in the search box and select termination for results.
- Termination IDs through the integration IDs report: search for integration IDs and then select the appropriate values.
|
Immediate termination reason matches? |
Use last day of work? |
Outcome |
|---|---|---|
| Worker is deactivated the day after their termination date | ||
| ● | Worker is deactivated the day after their last day of work | |
| ● | Worker is deactivated during the import performed at the start of their termination date | |
| ● | ● | Worker is deactivated during the import performed at the start of their last day of work |