Configure Okta as an identity provider for Workspace ONE Access
This topic describes how to configure Okta as the identity provider (IdP) to Workspace™ ONE™. You can use this configuration to provide a streamlined device enrollment experience, provide extensible multifactor authentication (MFA) to apps in Workspace ONE, and provide a consistent and familiar sign-in flow for users and admins.
You perform this procedure in Workspace ONE Access, the identity component of Workspace ONE.
Create an IdP in Workspace ONE Access
Create a third-party IdP in the Workspace ONE Access console and find the SAML metadata.
-
Sign in to the Workspace ONE Access console as the system admin.
-
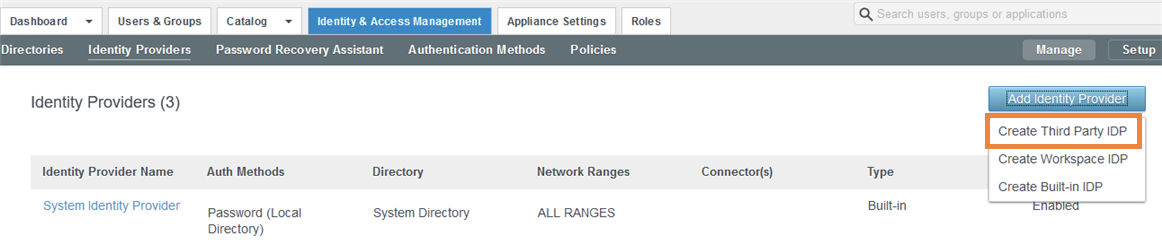
Click the Identity & Access Management tab, then click Identity Providers.
-
Click Add Identity Provider, and then select Create Third Party IDP.
-
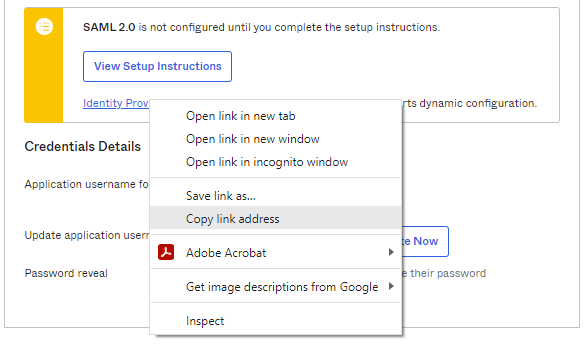
Scroll to the bottom of the page to the SAML Signing Certificate section.
-
Right-click the Service Provider (SP) Metadata link and open it in a new tab.
-
In the SAML metadata file, find the values for the following:
-
entityID: A globally unique name, usually in the form of a URL, that identifies your IdP. For example,
https://tenant.vmwareidentity.com/SAAS/API/1.0/GET/metadata/sp.xml. -
AssertionConsumerService Location for HTTP-POST binding. For example,
https://tenant.vmwareidentity.com/SAAS/auth/saml/response.
You need these values for the next task.
-
Create the SAML app in Okta
-
In the Admin Console, go to .
-
Click Create App Integration.
-
Select SAML 2.0.
-
Click Next.
-
In General settings, enter an app name, for example,
Workspace ONE SAML. -
Click Next.
-
In SAML Settings, configure the following:
-
Single sign on URL: Copy and paste the HTTP-POST AssertionConsumerService Location URL from the previous task. For example,
https://tenant.vmwareidentity.com/SAAS/auth/saml/response. -
Audience URI (SP Entity ID): Copy and paste the entityID from the previous task. For example,
https://tenant.vmwareidentity.com/SAAS/API/1.0/GET/metadata/sp.xml. -
Name ID format: Select Unspecified.
-
Application username: Select Okta username. This maps to the User Principal Name (UPN) in Workspace ONE.
-
-
Click Next.
-
Select I'm an Okta customer adding an internal app.
-
Select This is an internal app that we have created.
-
Click Finish.
-
In the Settings section of the Sign On tab, copy the URL for Identity Provider metadata.
Complete the new IdP in Workspace ONE Access
-
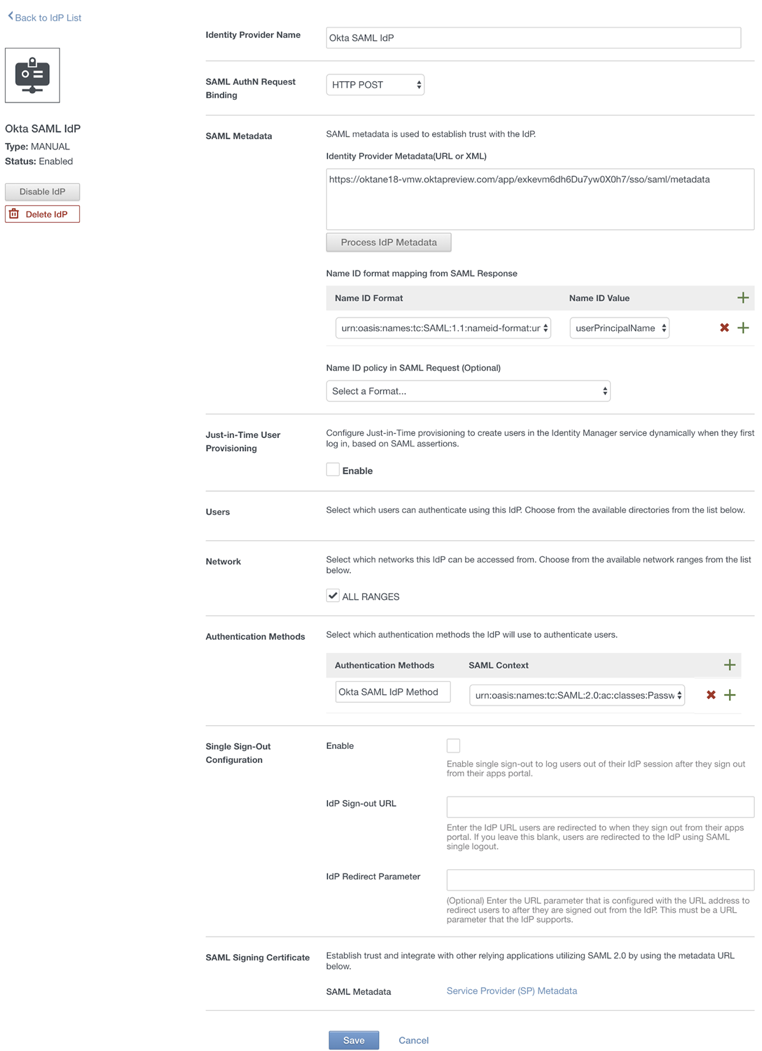
In the new identity provider page, enter the following information:
-
Identity Provider Name: Enter a name for the new identity provider, such as
Okta SAML IdP. -
identityProvider.idpForm.saml: Select
HTTP Post. This field appears after you enter the metadata URL in the SAML Metadata section and click Process IdP Metadata. -
SAML Metadata:
-
In the Identity Provider Metadata text box, enter the metadata URL copied from Okta. For example,
https://yourOktaTenant/app/appId/sso/saml/metadata. -
Click Process IdP Metadata.
-
In the Name ID format mapping from SAML Response section, click the + icon, then select the following values:
Name ID Format:
urn:oasis:names:tc:SAML:1.1:nameid-format:unspecifiedName ID Value:
userPrincipalNameSelect the User Attribute that matches the app value defined in Okta.
-
-
Users: Select the directories that you want to authenticate using this identity provider.
-
Network: Select the networks that can access this identity provider.
-
Authentication Methods:
-
Authentication Methods: Enter a name for the Okta authentication method, such as
Okta Auth Method. -
SAML Context:
urn:oasis:names:tc:SAML:2.0:ac:classes:PasswordProtectedTransport.
-
-
-
Click Add.
Add Okta authentication method to access policies in Workspace ONE Access
After you set up Okta as the IdP to Workspace ONE Access, add the newly created authentication method to access policies in Workspace ONE Access. Update the default access policy and other policies as needed.
Add the Okta authentication method to the default access policy so that Okta is used as the sign-in provider for the Workspace ONE catalog. The default access policy governs sign-in actions to the catalog and any apps that are configured in Workspace ONE Access that don't have another policy definition already.
-
In the Workspace ONE Access console, click the Identity & Access Management tab, and then click Policies.
-
Click Edit Default Access Policy.
-
In the Edit Policy wizard, click Configuration.
-
Click the policy rule for web browsers.
-
Set Okta authentication as the authentication method.
If the user's network range is ALL RANGES, the user is accessing content from Web Browser, and the user belongs to the Empty (all users) group, then perform this action: Authenticate using . . .. The end user may authenticate using: Okta Auth Method.
For Okta Auth Method, select the authentication method you created for the IdP in Complete the new Identity Provider in Workspace ONE Access .
-
Click Save.
-
-
Edit other policies as needed to add the Okta authentication method.
Assign the app to end users in Okta
After you complete the setup, return to the Okta org and assign the newly-created Workspace ONE application to end users. Assign the application to a few end users at first and then test the integration. For details, see Assign app integrations.