
Configure the Cisco ASA gateway
During this task we will define a RADIUS Server Profile, define an Authentication Profile for Okta RADIUS Agent, apply the Okta RADIUS Authentication Profile to a Gateway, and configure the portal to use the Okta RADIUS Authentication Profile.
Steps
- Define an AAA Server Group
- Add AAA Server(s) to your AAA Server Group
- Modify the AnyConnect Connection Profile to use the AAA Server Group
- Modify the AnyConnect Client Profile to extend the timeout
Before you begin
- Ensure that you have the common UDP port and secret key values available.
Define an AAA Server Group
- Sign in to the Cisco ASDM console for the VPN appliance with sufficient privileges
- Navigate to , as shown below.
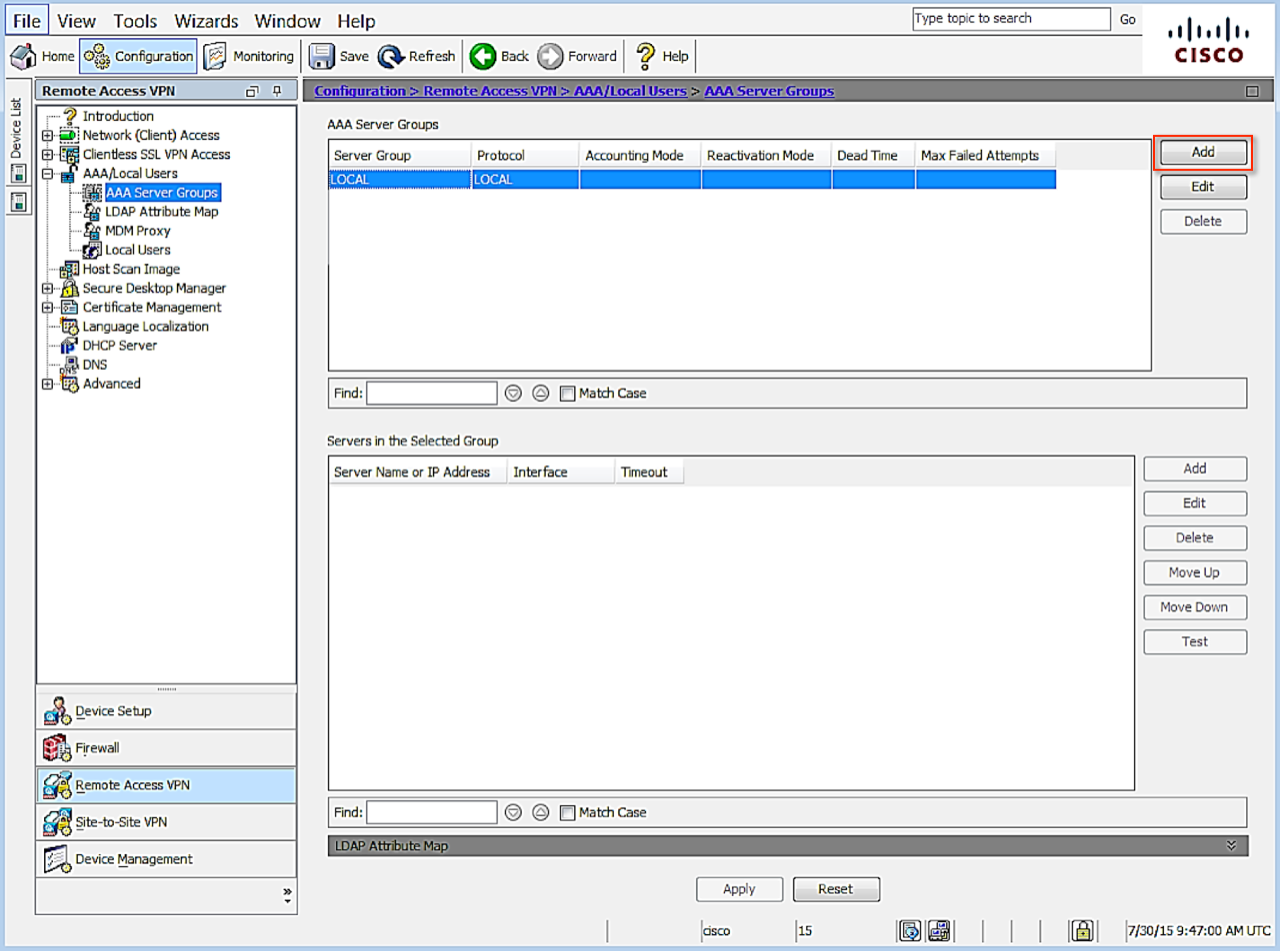
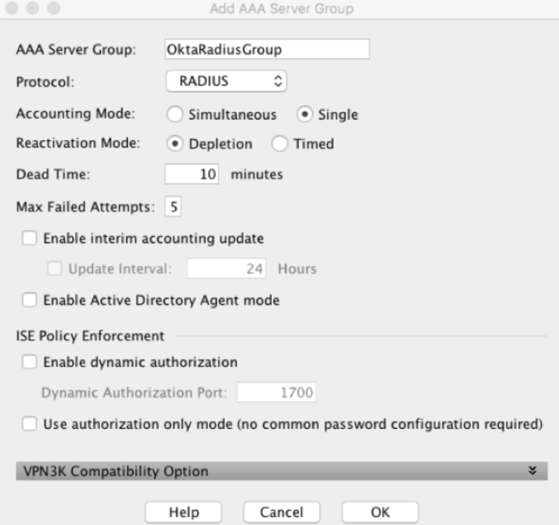
- Click Add to create a new group. The Add AAA Server Group screen opens, as shown below.
-
Leave the default settings except for the following
-
AAA Server Group – specify a name to identify the group for the MFA server
-
Protocol – select RADIUS if necessary
-
Add AAA Server(s) to your AAA Server Group
- Click OK to return to the Cisco ASDM console, shown in step 2, above.
- Cick Remote Access VPN and navigate to . Select the server group you just created.
- Click Add. The screen shown below opens.
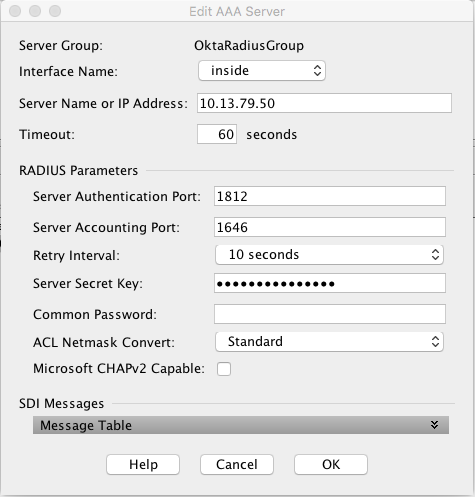
- Leave the default settings except for the following
- Interface Name – select the interface that will handle communication with the MFA Server
- Server Name or IP Address – specify the name or the IP address of the Okta RADIUS Agent
- Timeout (seconds) – 60 seconds
- Server Authentication port – enter the port number you configured above in step 3 when setting up the app in Okta. Port 1812 was used as the example.
- Server Accounting Port – 1646. This value is not used, but must be entered to complete the setup.
- Retry Interval – leave default at 60 seconds
- Server Secret Key – provided secret defined above in step 3 when setting up the app in Okta.
- Common Password – leave blank
- Uncheck Microsoft CHAPv2 Capable. (important)
- When done, click OK.
- Click APPLY to save the configuration.
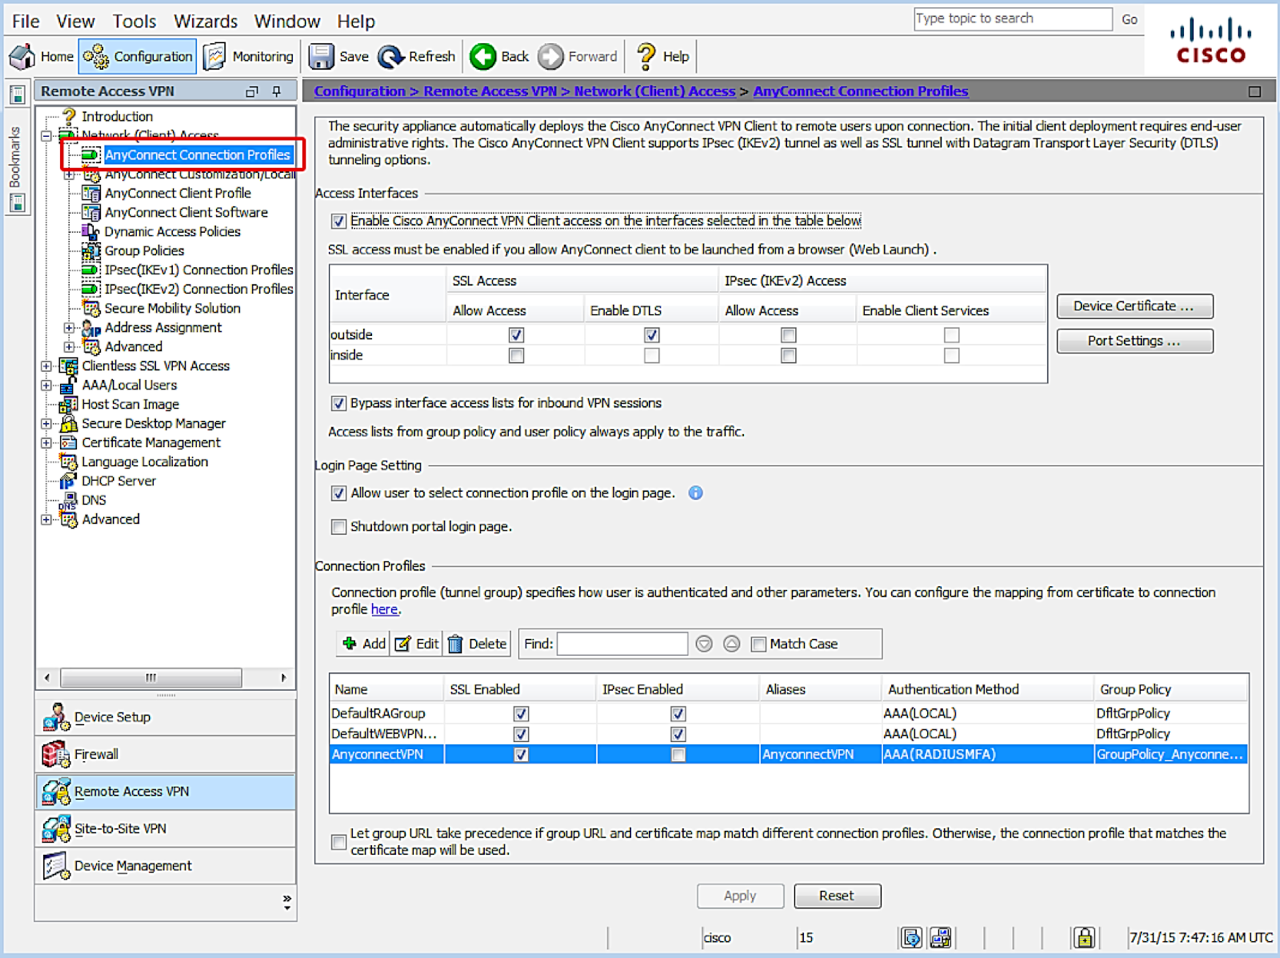
Modify the AnyConnect Connection Profile to use the AAA Server Group
In this step you will also confirm that no conflicting or contrary Authorization/Authentication/Accounting settings exist.
- In to the Cisco ASDM console for the VPN appliance, navigate to , as shown below.
-
Highlight the desired connection profile in the Connection Profiles section and click Edit above the list of profile names. The screen shown below opens.
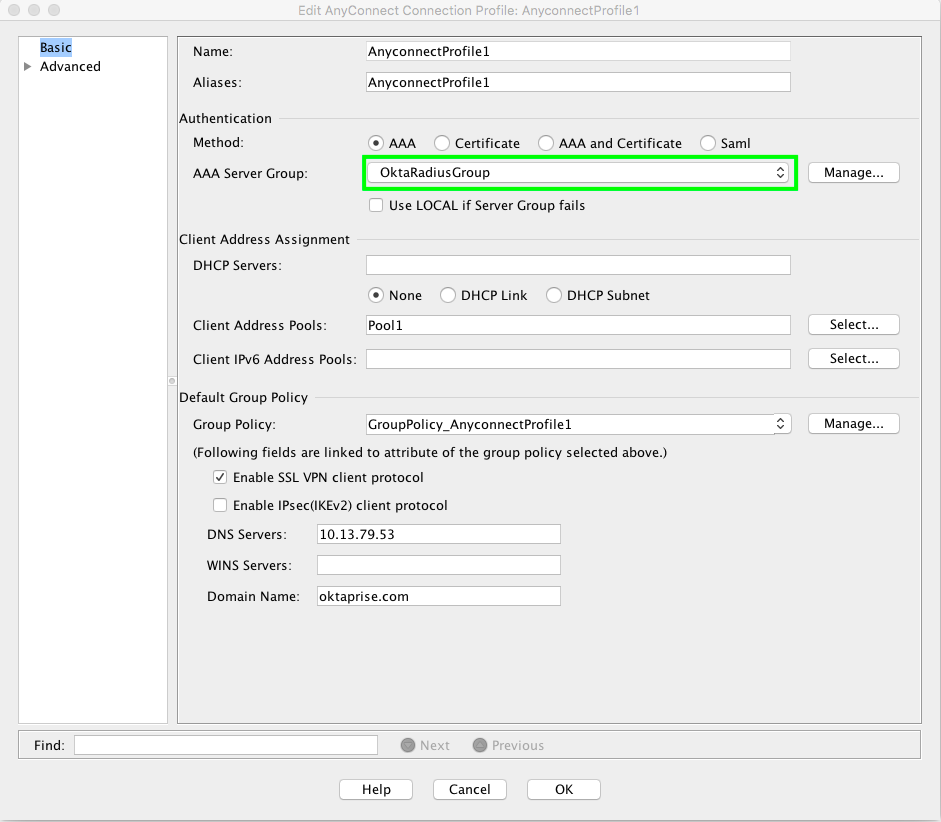
- In the Authentication section, set the Method to "AAA".
- Choose the AAA Server Group you previously created or modified, and click Advanced in the left column. The screen shown below opens.
-
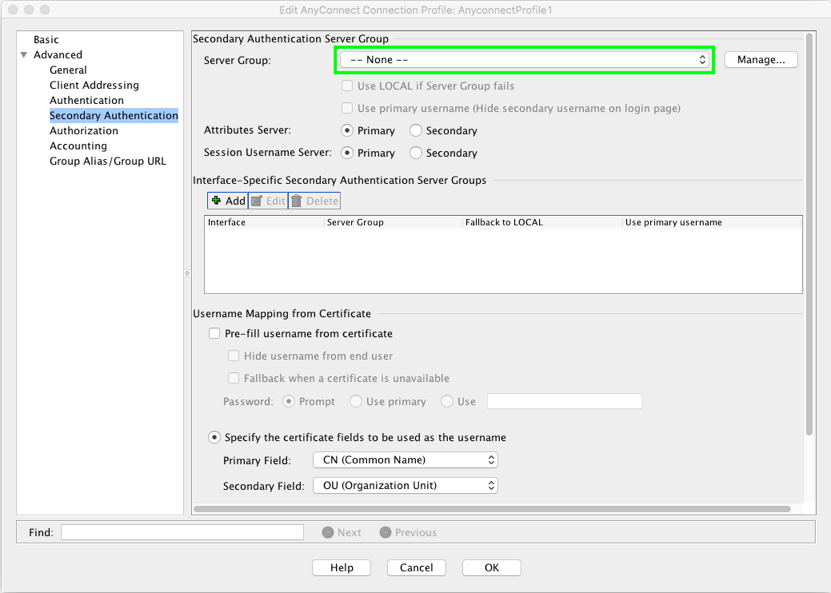
Click Secondary Authentication on the left and confirm that the "Secondary Authentication Server Group" is undefined.
The current configuration is also knows as "multi-step authentication."
An alternative configuration exists that leverages the "Secondary Authentication Server Group" to perform MFA in a different flow. In this configuration "Secondary" authentication is handled by the main AAA Server Group servers using RADIUS Challenge and Response messages.
In that configuration, the Primary AAA Server Group is configured to perform primary authentication (username/password) against one AAA Server Group which could be verified against an Okta RADIUS Server Agent that is only configured to perform Primary Authentication. The Secondary AAA Server Group is configured to perform secondary authentication against a second AAA Server Group which is usually an Okta RADIUS Server with an App that is explicitly configured not to perform Primary Authentication, and is only used to verify a registered factor (push, verify OTP, sms OTP, etc.).
Reasons for using this alternative configuration can include:
- Primary authentication server is providing additional accounting, authorization or connection details that Okta cannot
- Compliance reasons that dictate a non-multistep MFA experience
- Click Authorization on the left and confirm that the Server Group value is set to None, as shown below.
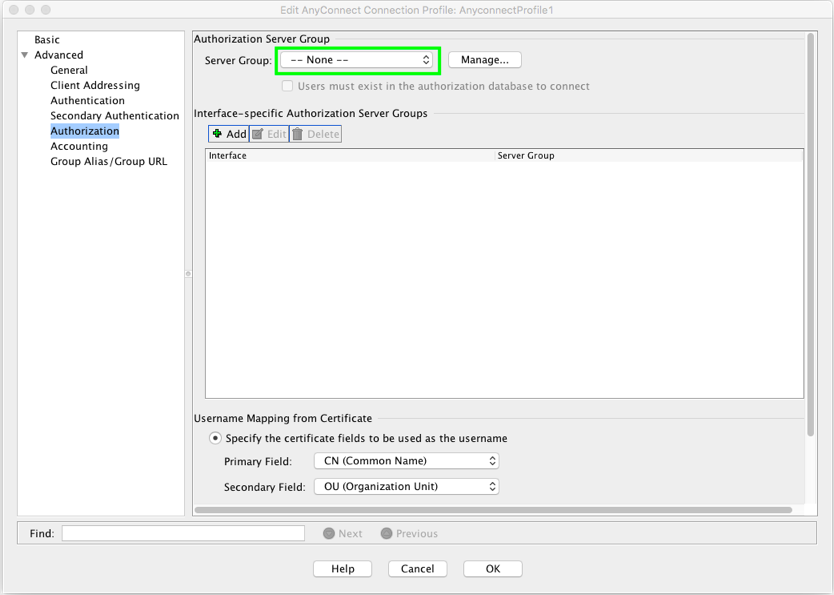
Configurations that leverage an additional and distinct Authorization Server Group can exist and are beyond the scope of this guide. Okta has experienced issues when this setting is pointing to a AAA Server Group populated with Okta RADIUS Server Agents. In those cases, a superfluous access request message is sent to the Okta RADIUS Server.
- Click Accounting on the left and confirm that the Accounting Server Group value is set to None, as shown below.
There might be cases where a unique and meaningful Accounting Server Group is useful. AAA Server Groups with Okta RADIUS Server agents do not support RADIUS Accounting messages.
- Click OK to save the settings.
Modify the AnyConnect Client Profile to extend the timeout
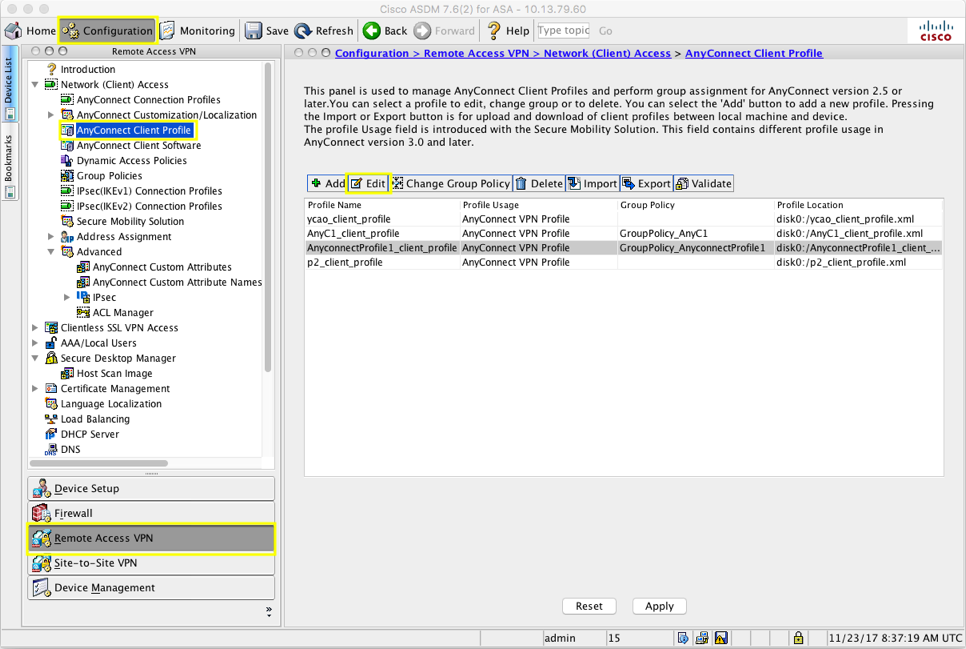
- In the Cisco ASA Admin Console, click the Configuration button, and then click the Remote Access VPN button.
- Navigate to , highlight the desired client profile, and click Edit, as shown below.
- In the screen that opens, select Preferences (Part 2), as shown below.
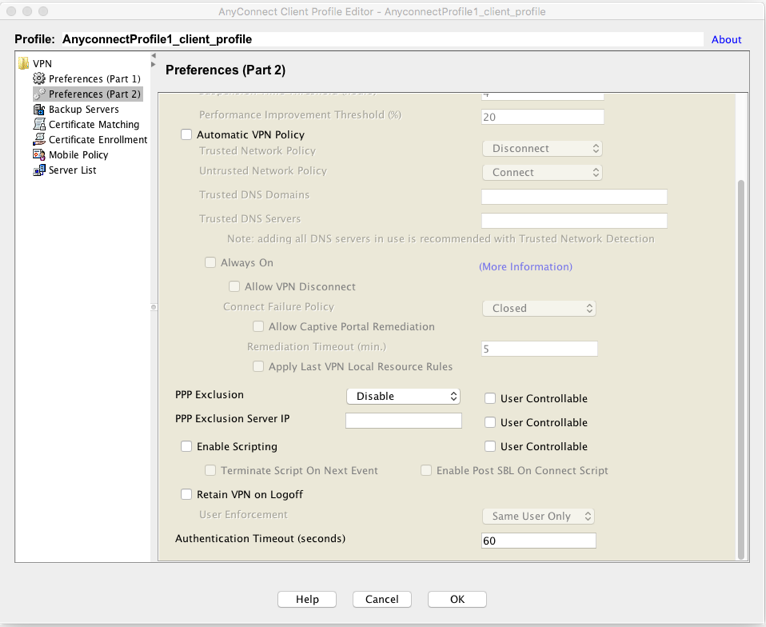
- Scroll down and locate Authentication Timeout (seconds), and set the value to 60.
- Click OK to save the settings.
- Click Commit to save the Okta RADIUS configuration within the Cisco ASA Admin Console.