App sign in issues with Okta FastPass

This page offers some remediation suggestions if you encounter issues when trying to sign in to apps using Okta FastPass.

Should you receive an error message, follow the troubleshooting steps outlined here. After resolving the issue, attempt to sign in to your app again.

If the problem persists, contact your organization's help desk for assistance.

Ensure that your device has the latest version of Okta Verify installed. See Okta Verify release notes.

Generic message

If you receive a Device requirements not set message, your device doesn't meet the security requirements for your org.

Check the Device health page in Okta Verify to see which device conditions might be blocking access to your app.

  1. Open Okta Verify on your device.

  2. Go to the Device health page:

    • On Android, go to Settings (...)Device health.

    • On iOS, go to Settings (...)Device Health.

    • On macOS or Windows, click the gear icon, and then select View device health.

  3. Identify which security checks failed and follow the instructions to fix the issue.

Message What to fix

Outdated operating system version

Update your operating system to the latest version.

No password set

Ensure that your device has a password set on the lock screen.

Biometric authentication is not enabled

Ensure that you can unlock your device with your fingerprint or face recognition.

Disk is not encrypted

Encrypt your device.

Operating system is rooted or jailbroken

Reset your device to remove any unofficial versions of the operating system.

Device has hardware keystore

You may be required to access protected resources from a device that has a built-in hardware-backed keystore.

The only remediation for this error is to use a different device.

After you complete the security remediation steps, if you still can't access your app, contact your organization's help desk for assistance.

Messages in the sign-in window

The remediation steps in the following tables depend on the type of device and the operating system.

If you need more details, refer to the support documentation for your device:

Android

Message Remediation

Update to Android version number

Update your operating system.

  1. On your device, go to Settings.

  2. Scroll down and select System.

  3. Select Software update or System update. Refer to your phone manufacturer's support page for details.

    The steps might vary slightly depending on the make and model of your device and the version of Android you're running. Some devices might have a separate app for checking and downloading updates.

  4. If an update is available, tap Download and install.

    After the installation, your device restarts automatically with the latest version of Android.

Enable lock screen

Enable a lock screen on your device.

  1. On your device, go to Settings.

  2. Scroll down and tap Security or Lock screen and security. Refer to your phone manufacturer's support page for details.

  3. Tap Screen lock or Screen lock type.

  4. Choose the type of lock screen that you want to use, such as Pattern, PIN, or Password.

  5. Follow any prompts required to set up the lock screen. For example, if you chose a pattern lock, you need to draw the pattern that unlocks your device.

  6. Choose how quickly your device locks after it goes to sleep. This can help protect your device if you accidentally leave it unlocked.

Enable lock screen and biometrics

Enable fingerprint or facial recognition on your device.

  1. On your device, go to Settings.

  2. Go to Security or Lock screen and security. Refer to your phone manufacturer's support page for details.

  3. Tap Biometrics or Biometric preferences.

  4. Enable the types of biometric authentication that you want to use, such as Fingerprint or Face unlock.

  5. After you enable biometrics, go back to the Lock screen and security section.

  6. Tap Screen lock or Screen lock type.

  7. Choose the type of lock screen that you want to use, such as Pattern, PIN, or Password.

  8. Go to Biometrics or Biometric preferences and enable the type of biometrics you want to use on your lock screen.

    After you set up the lock screen, you can use biometric authentication to unlock your device.

Encrypt your device

Encrypt your Android device.

  1. On your device, go to Settings.

  2. Go to Security or Lock screen and security.

  3. Tap Encrypt phone or Encrypt tablet.

  4. If you have configured a lock screen, Android prompts you to enter your Pattern, PIN, or Password.

  5. Read the information about encryption and tap Encrypt phone or Encrypt tablet to proceed.

    The encryption process may take an hour or more depending on the amount of data stored on your device.

    After the encryption process is complete, Android prompts you to enter your lock screen password, PIN, or pattern to access your device.

iOS

Message Remediation

Update to iOS version number

Update your operating system.

  1. Make sure that your device is connected to a network and has enough battery life or is plugged in.

  2. On your device, go to SettingsGeneralSoftware Update.

  3. If an update is available, tap Download and Install.

  4. After the download is complete, tap Install Now.

    During the update process, your device might restart and show you a progress bar on the screen. When the update is complete, your device restarts and shows you the sign-in page.

Set a passcode for the lock screen

Set a passcode for the lock screen of your iOS device.

  1. On your device, go to Settings.

  2. Scroll down and tap Touch ID & Passcode or Face ID & Passcode, depending on your device model.

  3. Enter your current passcode or use Face ID or Touch ID to authenticate.

  4. Tap Turn Passcode On or Change Passcode if you already have one set up.

  5. Choose a 6-digit passcode, or tap Passcode Options to choose a custom alphanumeric code or a 4-digit code.

  6. Reenter your passcode to confirm it.

Set passcode for lock screen and enable Touch ID or Face ID

Enable Face ID or Touch ID on your iOS device.

  1. On your device, go to Settings.

  2. Scroll down and tap Touch ID & Passcode or Face ID & Passcode, depending on your device model.

  3. Enter your current passcode, or use Face ID or Touch ID to authenticate.

  4. To enable Face ID, tap Enroll Face. To enable Touch ID, tap Add a Fingerprint.

  5. Follow the instructions to scan your face or fingerprint. You may need to reposition your face or finger a few times until the device has a good scan.

  6. When the scan is complete, tap Continue.

  7. When your device prompts you, enable Face ID or Touch ID to unlock your device.

macOS

Message Remediation

Update to macOS version number

Update your operating system.

  1. Make sure that your device is connected to a network and has enough battery life or is plugged in.

  2. From the Apple menu, click System SettingsGeneralSoftware Update.

  3. If an update is available, click Upgrade Now.

Set a password for the lock screen

Enable a lock screen password for your macOS device.

  1. From the Apple menu, click System Settings.

  2. In the Settings app, click Lock Screen.

  3. Click the Require password after screen saver beings or display is turned off dropdown menu and select a time interval from the list.

  4. If you need to set or change your password, go to System SettingsUsers & Groups.

  5. Select your user account, and then choose the option to change your password.

Turn on FileVault

Enable FileVault on your macOS device.

  1. Follow the Apple documentation to turn on FileVault for your macOS version.

  2. Click Turn On FileVault to encrypt the content of your computer to prevent unauthorized access.

  3. Apple prompts you to create a recovery key. Follow the instructions to create and verify your recovery key.

  4. Choose whether to store your recovery key with Apple or to keep it locally.

  5. If you have multiple user accounts on your device, Apple prompts you to choose which accounts are allowed to unlock the disk.

  6. Restart your Mac when prompted.

    The encryption process begins after your computer restarts. This may take some time depending on the size of your disk and the speed of your computer. After the encryption process is complete, you can sign in as usual.

Windows

Message Remediation

Update to Windows version number

Update your operating system.

Windows 10

  1. From the Start menu, click SettingsUpdate & SecurityWindows Update.

    Windows automatically checks for updates and downloads any available updates.

  2. After the download is complete, click Restart now to install the updates. Your computer restarts and the installation process begins.

  3. Follow any instructions to complete the installation process. Your computer restarts after the installation process is complete.

Windows 11

  1. From the Start menu, click SettingsWindows Update.

    Windows automatically checks for updates and downloads any available updates.

  2. If there are updates available, click Download and install.

  3. Follow any on-screen instructions to complete the installation process. Your computer may restart several times during the installation process.

Enable Windows Hello for the lock screen

Enable Windows Hello on your device.

  1. From the Start menu, click SettingsAccountsSign-in options.

  2. Under Windows Hello, click Set up if you haven't already set up Windows Hello.

    If you have already set up Windows Hello, click Improve recognition.

  3. Follow the instructions to improve recognition. This may involve positioning your face in front of the camera or placing your finger on the scanner multiple times.

  4. When the recognition process is complete, click Done.

Encrypt all internal disks with BitLocker

Encrypt the drives on your device.

  1. In the search box in the Windows task bar, type Manage BitLocker and select it from the list of results.

  2. In the BitLocker Drive Encryption window, find the drive you want to encrypt and click Turn on BitLocker.

  3. Choose how you want to unlock the drive, either with a password or with a smart card. If you choose a password, make sure it's a strong and memorable one.

  4. Choose where you want to store your recovery key. You can save it to your Microsoft account, as a local file, or on a USB drive. If you choose to save it to a file or USB drive, make sure to keep it in a safe place.

  5. Choose whether to encrypt the entire drive or just the used space. Encrypting the entire drive provides better security, but takes longer.

  6. Click Start Encrypting to begin the encryption process.

  7. Wait for the encryption process to complete. This may take some time, depending on the size of your drive and the encryption method you chose.

  8. When the encryption process is complete, your drive is locked and you must enter your password or insert your smart card to unlock it.

Local network access permission

Google Chrome has introduced a restriction on the browser's ability to make requests to the user's local network. The browser opens a Local Network Access permission prompt to allow or block a connection to any device on your local network. This change impacts Okta FastPass sign-in attempts using a Chrome or Chromium-based browser.
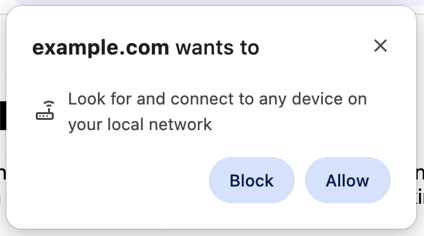
Prompt to allow connection to any device on your local network.

Select Allow.

Okta only connects to a server on the same device. It doesn't look for or connect to other devices on your local network.

Remediation for blocked permission on Chrome

If you already blocked the prompt, follow these steps to change the settings in your Chrome browser:

  1. In the address bar, click the Page Actions menu icon next to the URL.

  2. Turn on the Local network access toggle to allow the connection.

If you don't see the Local network access setting in your Page Actions menu, go to your Chrome browser settings:

  1. Enter chrome://settings/privacy in the Chrome address bar.

  2. Go to Site settings. Click the site for the Okta-protected app you want to access.

    You may need to click View permissions and data stored across sites if the site isn't listed in the Recent Activity section.

  3. Change the Local network access setting to Allow.

  4. Reload the page.

See New permission prompt for Local Network Access.

Remediation for blocked permission on Microsoft Edge

For Chromium-based browsers, such as Microsoft Edge, you can manage the permissions in your browser settings.

  1. Open Microsoft Edge and go to Settings and moreSettings.

  2. Select Privacy, search, and servicesSite permissionsAll permissions.

  3. Scroll down and select Local network access.

  4. Turn on the Ask before accessing (recommended) toggle.

See Control a website's access to the local network in Microsoft Edge.

Related topics

Check the health of your Android device

Check the health of your iOS device

Check the health of a macOS device

Check the health of a Windows device