Google Workspace
Learn how to configure provisioning for Google Workspace in your Okta org.
Recommended setup
- Configure SAML between Okta and Google.
- Enable provisioning and enable all available provisioning options.
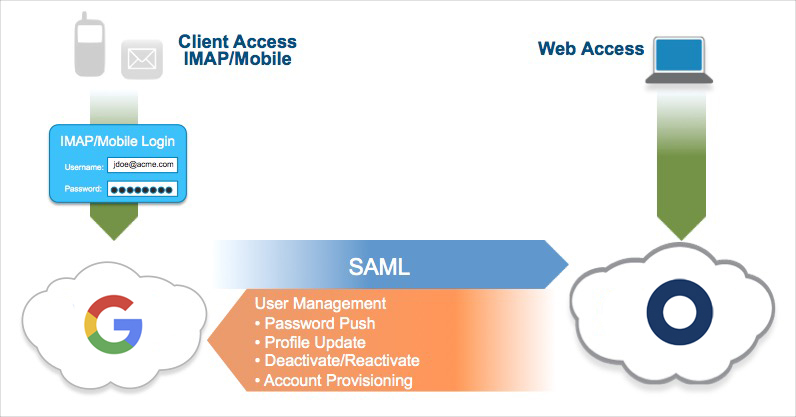
- Enable password push. This synchronizes a user's Okta password with their Google Workspace password. A password is still necessary for clients (for example, POP3/IMAP email clients).
These recommendations also apply to scenarios with Active Directory (AD) integration.
AD integration offers the following benefits to users:
- Seamless Desktop Single Sign-On (SSO) when signing in from behind the firewall
- Ability to access Google Workspace through Okta using SAML and AD credentials from outside the firewall
- Email clients that require a username and password now use a user's AD password. This is accomplished through AD password synchronization, meaning one less password to remember.
Recommended rollout
- Use SAML for SSO, if possible. It enables centralized access management since all web-based sessions use Okta as the identity provider.
- Start by testing SAML with a small group of users. You can use a network mask in Google to limit the SAML-enabled users to a small group (for example, several IT staff). This allows an advance team to test the configuration and the user experience.
- Notify your users that they must modify their account settings to enable the use of Google Personal and Google Workspace in the same browser session. For example, when using Chrome, a user might create one profile for work to use Google Workspace, and use a separate profile to perform personal tasks.
- Some apps from Google Marketplace may not be tightly integrated with Google Workspace in terms of SSO. Notify Okta Support about any issues.
- Passwords in Google Workspace are recommended. Enable the password synchronization feature for Google Workspace. Configure the Change Password URL in the Google Workspace SSO profile to return users to Okta. Then, when password synchronization is enabled and a user tries to change their password from Google Workspace, they're returned to Okta.
-
Google Workspace users assigned to the super administrator role can bypass SSO and log in directly to
https://admin.google.com. See Super administrators. - When you enable provisioning and choose the admin credentials for the integration, consider using a system account. If you choose an end user account, ensure that password reset is handled correctly and that the Okta API settings are updated accordingly.
- If Google Workspace users are created primarily in Google Workspace with an existing process outside of Okta, don't enable account creation in Okta. User import (through API or CSV) can map existing Google Workspace accounts with Okta users. This action should be ongoing to bootstrap new users.
- Enable user deactivation/reactivation. This ensures that users are automatically deactivated in Google Workspace if they're deactivated in Okta or in AD.
Configure SSO with 1-click
Early Access release. See Enable self-service features.
-
In the Admin Console, go to .
- Click Browse App Catalog.
- Search the catalog for
Google Workspace. Select it in the search results and click Add Integration. - Complete the fields on the General Settings page and click Next. Ensure that you've already created your organization's Google Apps domain before you enter it in the Your Google Apps company domain field.
- Select SAML 2.0.
- Click 1-click setup to configure SSO with Google Workspace with automatic configuration. (If you want to configure SSO manually, click View Setup Instructions instead and follow those instructions.)
- Enter the required information for each step of the 1-click setup. Be sure to closely review the information on the OAuth consent page, and then click Allow.
- After completing the 1-click setup, sign in to your Google Workspace Admin Console.
- Turn on SSO for your organizational unit. Follow the steps in Decide which users should use SSO in Google Workspace Admin Help.
- In Okta, assign users to the app. See Assign users to the Google Workspace app.
Configure data access in Google Workspace
- Sign in to your Google Workspace admin console.
- Go to .
- Click MANAGE GOOGLE SERVICES. Okta can access any service whose Access level is Unrestricted. If a service that Okta needs to access is marked as Restricted, you must grant the Okta app Trusted app status in the following steps.
- Click API Controls to return to the API controls page.
- Click MANAGE THIRD-PARTY APP ACCESS.
- Click Okta.
- Expand Access to Google data.
- Select either Limited or Trusted access. Choose Limited to only allow Okta to request access to unrestricted Google data. Choose Trusted to classify Okta as a trusted app and allow it to request access to all Google data. Choosing Limited is the most secure option.
- Click Save.
Disclaimer statement
Okta's use of information received from Google's APIs will adhere to Google API Services User Data Policy, including the Limited Use requirements.
For information about Okta's privacy practices, see Okta Privacy Policy.
Provisioning features
| Push Groups | Groups and their members can be pushed to remote systems. For more information, see About Group Push and Group Push operations. |
| Import New Users | New users created in Google Workspace are downloaded and converted into AppUser objects to match against existing Okta users. This feature is implicit when provisioning is configured, meaning that the username and password are set up and verified. The import feature allows Okta to map active Google accounts to an Okta user. This is usual for the initial app assignment bootstrap. For file-based account mapping you can also use a comma-separated values (CSV) file (similar to API import). |
| Schema Discovery | Import more user attributes from Google Workspace. |
| Profile Sourcing | New users created through Okta are also created in Google Workspace. |
| Push New Users | New users created through Okta are also created in Google Workspace. Specifically, account creation allows Okta to create accounts in Google Workspace. Google Workspace doesn't reuse usernames that were deleted within the past week for new accounts. Google displays an introduction to Google Workspace when a new user signs in. |
| Push Empty Values for Custom Fields | Selecting this option allows pushing empty values to non-required custom fields. |
| Push Password Updates | Changes to the user's password are automatically synchronized to the application. Specifically, this feature allows Okta to synchronize the password entered by the Okta user to sign in to Okta, and then to Google Workspace. If a user isn't associated with an AD account or Okta-delegated authentication to AD isn't enabled, the user signs in to Okta with their Okta password. That value is pushed to Google Workspace. Suppose that a user is tied to an AD user and Okta-delegated authentication to AD is enabled. Then the AD password is pushed to Google Workspace when the user signs in to their Okta org (for example, Even with SAML enabled, there are use cases where a password is needed in Google Workspace. Other mail and calendar clients (desktop or mobile) use a separate authentication mechanism and require a Google Workspace username and password for setup. Synchronizing the password with Okta means one less password to be managed by the end user. Note: Okta password policy should match Google's requirements for provisioning to work. |
| Push Profile Updates | Updates made to the user's profile through Okta are pushed to the third-party application. Specifically, any profile changes detected in Okta, like first name and family name, are pushed to Google Workspace. Some attributes, such as department and title, are only used for push profile and aren't used for import user. Those attributes only work if they were initially updated from Okta. |
| Push User Deactivation/Reactivate Users | Deactivating the user through Okta removes the user from the organization and all teams in the third-party application. Reactivating the user through Okta also reactivates the user in the third-party application. Specifically, Okta deactivates a user's Google Workspace account when the user is deactivated in Okta. While Google Workspace allows an account to be deleted in the app, the deletion is a destructive operation that removes all emails, documents, pages, and other content that the user created. For most enterprises, this isn't a desired outcome. Okta sets the user to the inactive state, which allows administrators to perform a cleanup before deciding on whether a hard deletion is necessary. |
Configure Google Workspace provisioning
-
In the Admin Console, go to .
- Open your Google Workspace app instance.
- Go to the Provisioning tab and click Configure API Integration.
- Select Enable API integration, and then click Authenticate with Google Workspace.
- Select the account to use for authentication, or enter the username and password for your Google Workspace admin account and click Next.
- Review the list of permissions Google grants Okta to perform in your Google Workspace tenant. Click Allow to grant the permissions to Okta..
- On the Provisioning tab, click Save.
- On the Provisioning to App page, click Edit. Select your desired provisioning features, and then click Save.
Configure Password Push Updates
-
In the Admin Console, go to .
- Open your Google Workspace app instance.
- Go to the Provisioning tab and click To App under Settings.
- Click Edit in the Provisioning to App section.
- Select Enable for Sync Password.
- Select Sync Okta Password as the password type.
- Click Save.
Configure Profile and Lifecycle sourcing
- Under Settings, click To Okta . Scroll to the Profile & Lifecycle Sourcing section, and then click Edit.
- Select Allow Google Workspace to source Okta users.
- You choose what action Okta takes against a matching Okta user when they're deactivated in Google Workspace.
The available options for when a user is deactivated in the app are as follows:
- Do nothing: Google Workspace is unassigned from the Okta user.
- Deactivate: The Okta user is deactivated and is no longer able to sign in or access Okta. If later reactivated in Google Workspace, the Okta user is sent through the reactivation process in Okta. The user must complete the initial Okta user setup procedure.
- Suspend: The Okta user is suspended and is no longer be able to sign in or access Okta. If later reactivated in Google Workspace, the user is reactivated in Okta and no further steps are needed. The Okta user can sign in to Okta.
- Click Save.
Assign users to the Google Workspace app
-
In the Admin Console, go to .
- Open your Google Workspace app instance.
- Go to the Assignments tab and click .
- In the Assign Google Workspace to People dialog, select a user, and then click Assign.
- Complete the fields as required for your org. You can select which organizational unit to push. Set the deactivation and license options for the user. See Managing Google Workspace Users.
- Click Save and Go Back. Repeat steps 4–6 to assign Google Workspace to more users.
- Click Done.
Google Workspace schema discovery
By default, the following base attributes are imported from Google Workspace:
- FIRST_NAME
- LAST_NAME
- SECOND_EMAIL
- MOBILE_PHONE
Google Workspace also supports User Schema Discovery, so you can add extra attributes to the user's profile.
Enhanced schema discovery
With enhanced schema discovery you can use custom user schemas that are defined in Google Workspace. Okta imports all custom user schemas to provide you with the ability to manage these attributes. On import, Okta brings in these custom attributes from your users just like normal attributes, and also pushes them to Google Workspace on create and update operations.
Okta also supports importing multi-valued custom attributes from Google Workspace. They're represented as dynamic arrays in Okta. There's a limitation for boolean multi-value properties, as these aren't currently supported within Universal Directory and are ignored during schema import. Multi-valued boolean properties aren't visible in the Profile Editor.
If you're unable to use schema discovery, reauthenticate using OAuth.
Add schema attributes
-
In the Admin Console, go to .
- Select the Apps section in the navigation bar. Find your Google Workspace app instance in the list (you can use the search box to filter the list). Select your instance by clicking its name.
- Check the list of attributes. If you decide you need more, click Add Attribute. A list of extended attributes appears.
- Select the attributes that you want to add, and then click Save.
- You can now import and push these user attribute values to or from Google Workspace.