Map Microsoft Entra ID attributes to Okta attributes
To use Microsoft Entra ID or user authentication, you need to map Microsoft Entra ID user attributes to Okta attributes.
Before you begin
-
Decide which claims you want to map to these required attributes in Okta:
login,email,firstName, andlastName.CAUTION:- If you're using a UPN for both the
loginandemailattributes, you must map it to both attributes. - Creating a new user through Just-In-Time (JIT) provisioning may fail if any of the required attributes are empty or incorrectly mapped.
- If you're using a UPN for both the
Set the correct claim values for the Okta app in Microsoft Entra ID. See the Microsoft Doc: User attributes and claims.
Start this procedure
This procedure involves the following tasks:
Disable attribute mappings from Microsoft Entra ID to Okta
-
In the Admin Console, go to .
- In the Search field, the name you assigned to Microsoft Entra ID when you added it as an identity provider (IdP).
- Click Profile next to the directory.
- In the Profile Editor, configure the user mappings:
- Click Mappings and select Configure User mappings.
- Select the Application Name to Okta User tab.
- In the second dropdown menu for each attribute, select Do not map for all of the attributes except the login attribute.
- Click Save Mappings and Apply updates now.
- Repeat step 4 for any additional custom user mappings that exist for your org.
Add custom Microsoft Entra ID attributes in Okta
- Under FILTERS in the Profile Editor for your Microsoft Entra ID IdP, select Custom.
- Delete these attributes: First Name, Last Name, and Email. Note:
You delete these attributes because their Variable Name and External Name fields aren't editable. In the next step, you'll add custom attributes, where you can edit these fields.
- Click the Add Attribute button. The Add Attribute window opens.
-
To create the Email attribute, complete these fields:
Field Value Display name Email or any other name you want to assign to this email. Variable name emailThis name is used to refer to this attribute in profile mappings and expressions.
External name The claim you want to map to this attribute. For example, http://schemas.xmlsoap.org/ws/2005/05/identity/claims/emailaddress - Click Save and Add Another to save this attribute and add another.
-
Repeat steps 4–5 to add these attributes: First Name, Last Name, and UPN (optional). Use the following values:
For First Name:
Field Value Display name First Name or any other name you want to assign to the first name. Variable name firstNameThis name is used to refer to this attribute in profile mappings and expressions.
External name The claim you want to map to this attribute. For example, http://schemas.xmlsoap.org/ws/2005/05/identity/claims/givennameFor Last Name:
Field Value Display name Last Name or any other name you want to assign. Variable name lastNameThis name is used to refer to this attribute in profile mappings and expressions.
External name The claim you want to map to this attribute. For example, http://schemas.xmlsoap.org/ws/2005/05/identity/claims/surnameFor UPN (optional):
Field Value Display name UPN or any other name you want to assign to the UPN. Variable name upnThis name is used to refer to this attribute in profile mappings and expressions.
External name The claim you want to map to this attribute. For example, http://schemas.xmlsoap.org/ws/2005/05/identity/claims/nameidentifier
Map Microsoft Entra ID attributes to Okta
- Click Mappings and select Configure User mappings.
- Select the AAD Application Name to Okta User tab.
- Map the custom Azure AD attributes you created to the Okta User Profile as shown in the following table:
Azure AD attribute Okta attribute emailorupnorsubjectNameIdChoose the correct attribute depending on what the user uses while authenticating into Okta.
loginemailorupnorsubjectNameIdChoose the correct attribute depending on what the user's primary email is or will be.
emailfirstNamefirstNamelastNamelastNameupnOptional.
name identifier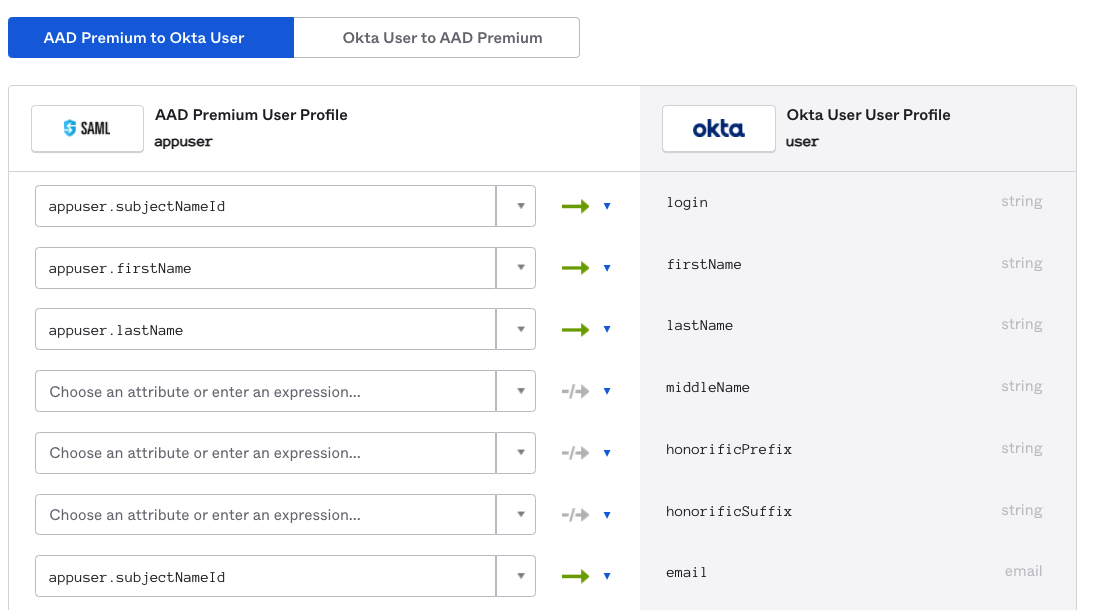
- Click Save Mappings and Apply updates now.
Next steps