Configure WS-Federation for Office 365
There are two sign-on methods for Microsoft Office 365 available in Okta: Secure Web Authentication (SWA) and WS-Federation (WS-Fed), which is the more secure and preferred method.
- SWA relies on a username and a password for security credentials that can be selected by the end user or assigned by the administrator
- WS-Federation is a specification that defines mechanisms to transfer identity information using encrypted SOAP messages. It adds a level of security. WS-Federation doesn't require a separate password for Office 365. Therefore, Okta doesn't need to sync user passwords when WS-Federation is used.
Okta removes the domain federation in the following cases:
- If you switch from WS-Federation to SWA
- If you delete the app instance
Okta doesn't recommend deleting the app. For manual federation, when the app is removed, the domain won't be automatically de-federated. Manual de-federation using PowerShell is required. However, with automatic federation, if the app is removed, the domain is de-federated automatically.
Automatically set up WS-Federation
First-time setup
If you're configuring WS-Federation for the first time, follow these steps to authenticate and select domains.
-
In the Admin Console, go to .
-
Locate and select the Microsoft Office 365 app.
-
In the General Settings tab, complete the required fields and click Next to go to the Sign-On Options tab.
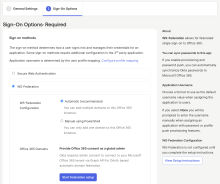
- In the Sign on methods section, select .
- Optional. Click View Setup Instructions. The procedure to configure Office 365 WS-Federation opens in a new window.
- Optional. Refer to the Prepare your domain for federated authentication section of the procedure to ensure that you have correctly prepared your domains for federation.
- Back on the Sign-On Options tab, click Start federation setup. You're redirected to the Microsoft account sign-in page.
- Sign in to Microsoft as a global administrator for your Microsoft tenant.
- Read and accept the requested permissions.
- Click Federate domains.
- In the dialog that appears, select the domains that you want to federate from the dropdown list.
- Click .
- Click Done.
Edit an existing configuration
If you've previously configured WS-Federation, follow these steps to make changes.
-
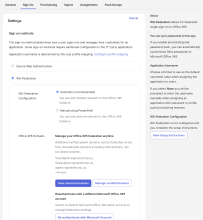
Go to . Ensure that is selected in the Sign on Methods.
- To view federated parent and child domains in read-only mode, click View selected domains.
- To add or remove domains, click Manage verified domains.
- To re-authenticate with a different Microsoft Office 365 account, click Re-authenticate with Microsoft Account.
- Click Save.
Manually set up WS-Federation
- Go to .
- In Sign on methods, select . Click Continue with Manual to confirm your selection.
If you switch from automatic to manual configuration, Okta removes all currently federated domains for this Office 365 instance. You must use PowerShell to manually re-federate your domains to restore SSO access. Manual configuration supports only one federated domain per Office 365 instance.
- Click View Setup Instructions for the PowerShell command that's customized for your domain.
- Copy this command to use in PowerShell.


