Notification services
Notification services enable you to send push notifications to custom-built apps that use the Devices SDK. The Devices SDK allows you to configure your branded push service and embed push notifications and biometric verification directly into your organization's mobile app. Your users don't have to leave your app to perform verification in another app when they attempt to sign in to your service. You can configure notifications using the following push provider services:
Before you begin
Deploying custom push verification functionality is a multistep process. First you perform several tasks in the Devices SDK. Then you can configure notification services and the Custom Authenticator. See Custom Authenticator integration guide - Android or Custom Authenticator integration guide - iOS for prerequisites and instructions.
Add a notification service
Add a notification service for each push service that you want to integrate with Okta. There's no limit to the number of notification services that you can add, but each notification service name must be unique.
-
In the Admin Console, go to .
-
Click Notification services.
-
Click Add notification service, and then select the required notification provider.
-
Enter the required information, depending on the notification provider you selected in step 3:
For Apple Push Notification service (APNs):
-
Name: Enter a unique name for the Apple Push Notification service.
-
Key ID: Enter the 10-character Key ID that you obtained from your Apple developer account.
-
Team ID: Enter the 10-character Team ID that you used to develop your company's app. Obtain this value from your Apple developer account.
-
Token signing key: Browse for, and then select the token signing key (*.p8 file) you received from Apple. To learn how to obtain an Encryption Key and Key ID from Apple, see the Apple documentation.
See Apple Developer Documentation for more information.
For Firebase Cloud Messaging (FCM):
-
Name: Enter a unique name for the Firebase Cloud Messaging service.
-
Service account JSON: Enter your service account key in JSON format.
You can use the Google Cloud Console, Google Cloud CLI, or one of the client libraries to create your service account key. See Creating and managing service account keys.
-
-
Click Add.
View push notification events
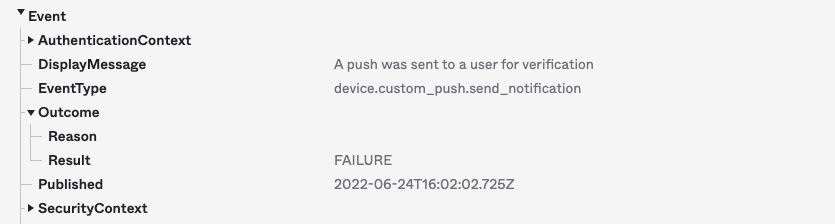
After you add a notification service, you can check the System Log for successful and failed push notifications sent to users. For example, you can view custom push notifications sent to a specific provider the name or that had a specific outcome by querying events recorded in the System Log.
-
In the Admin Console, go to .
-
Click Notification services.
-
Locate the notification service for which you want to view events.
-
Click the Actions menu, and then choose Events.
The search field is automatically populated to look for events with
eventType eq "device.custom_push.send_notification"and with the push provider identifier associated with your selected notification service provider.If you want to change the query, click Advanced Filters. For example, if you only want to view failed push notifications for a specific provider, follow these steps:
-
Click Advanced Filters.
-
Click Add Filter.
-
Select
outcome, and then selectoutcome.result. -
Select
FAILURE. -
Click Apply Filter.
-
-
Select events of interest.
-
Click to view more details about the push notification service provider and the event.

Edit a notification service
After you add a notification service, you can modify its properties. For example, you can change the name you use to identify the service or replace the account key.
-
In the Admin Console, go to .
-
Click Notification services.
-
Locate the notification service that you want to edit.
-
Click the Actions menu, and then choose Edit.
-
Edit the notification service.
-
Click Save.
Delete a notification service
Before you delete a notification service, update custom authenticator policies that are associated with it. Deleting a notification service might prevent users from accessing applications that rely on push notifications.
-
In the Admin Console, go to .
-
Click Notification services.
-
Locate the notification service that you want to delete.
-
Click the Actions menu, and then choose Delete.