Configure Okta as a CA with delegated SCEP challenge for Windows with Microsoft Intune
Configuring a Certificate Authority (CA) allows you to issue client certificates to your targeted Windows devices.
|
Purpose |
Management attestation certificate |
|
Platform |
Windows |
|
MDM |
Microsoft Intune |
|
SCEP URL |
Delegated |
Before you begin
-
You must have certificates that are deployed for digital signature, but not for other purposes (for example, encryption)
-
Okta Admin Console
-
Microsoft Intune
-
Microsoft Azure
Okta as a CA doesn't support renewal requests. Instead, redistribute the profile before the certificate expires to replace the expired certificate.
Configure all MDM SCEP policies to allow for profile redistribution.
Procedure
-
Register the AAD app credentials for Okta in Microsoft Azure
-
Configure management attestation and generate a SCEP URL in Okta
Register the AAD app credentials for Okta in Microsoft Azure
-
In Microsoft Azure, click App registrations.
-
Click + New registration.
-
On the Register an application page, enter the following:
-
Name: Enter a meaningful name for the app.
-
Supported account types: Select the appropriate supported account type.
The following procedure uses Accounts in this organizational directory only ([Your_Tenant_Name] only - Single tenant).
-
Redirect URI (optional): Either leave this field blank, or select Web and then enter a redirect URI.
-
Click Register.
-
-
On the app page under Essentials, copy the Application (client) ID.

This value is required in the Okta Admin Console in the following task.
-
Add a client secret:
-
In the left pane, click Certificates & secrets.
-
Under Client secrets, click + New client secret.
-
In the Add a client secret section, enter the following:
-
Description: Optional. Enter a description for the client secret.
-
Expires: Select an expiration time period.
-
-
Click Add.
The secret appears under Client secrets.
-
In the Client secrets tab, copy the Value.

-
-
Set the scep_challenge_provider permissions:
-
In the left pane, click API permissions.
-
Click + Add a permission.
-
On the Request API permissions page, scroll down and click Intune.
-
Under What type of permissions does your application require?, click Application permissions.
-
In the Select permissions search field, enter
scep. Select the scep_challenge_provider checkbox.
-
Click Add permissions.
-
In the Configured permissions section, click Grant admin consent for [Your_Tenant_Name].
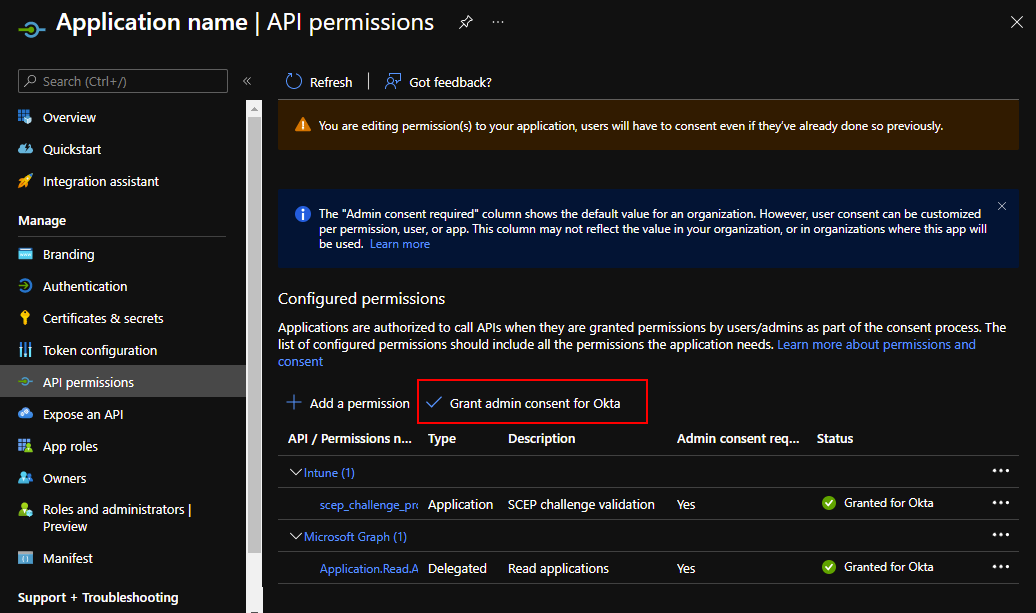
-
Click Yes in the message that appears.
-
-
Set the Microsoft Graph permissions:
-
Click + Add a permission.
-
In the Request API permissions section, click Microsoft Graph.
-
Under What type of permissions does your application require? click Application permissions.
-
In the Select permissions search field, enter
application. Expand the Application list and select Application.Read.All. -
Click Add permissions.
-
In the Configured permissions section, click Grant admin consent for [Your_Tenant_Name].

-
Click Yes in the message that appears.
-
Configure management attestation and generate a SCEP URL in Okta
-
In the Admin Console, go to .
-
Select the Endpoint management tab.
-
Click Add platform.
-
Select Desktop (Windows and macOS only).
-
Click Next.
-
Configure the following:
-
Certificate authority: Select Use Okta as certificate authority.
-
SCEP URL challenge type: Select Dynamic SCEP URL, and then select Microsoft Intune (delegated SCEP).
-
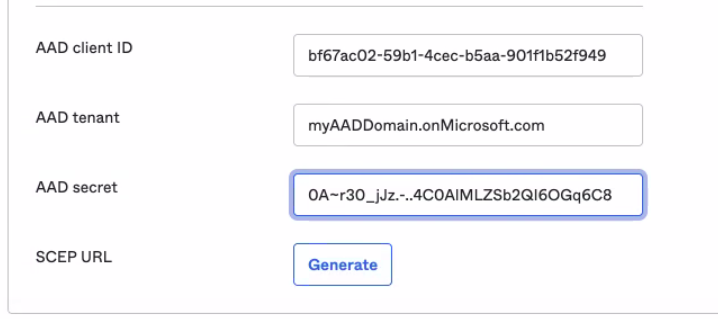
Enter the Azure Active Directory app credentials from Microsoft Azure:
-
AAD client ID: Enter the value that you copied from the previous task.
-
AAD tenant: Enter the primary domain of your AAD tenant, for example,
myAADDomain.onMicrosoft.com. -
AAD secret: Enter the secret value that you copied from the previous task.
-
-
-
Click Generate.
-
Copy and save the generated SCEP URL.
This URL is needed when you create a SCEP profile in Microsoft Intune.
Download the x509 certificate from Okta
-
In the Admin Console, go to .
-
Click the Certificate authority tab.
-
In the Actions column for your Okta CA, click the Download x509 certificate icon.
-
Rename the downloaded file so that it includes a
.cerextension.You need the certificate (CER) file when you create a trusted certificate profile in Microsoft Intune.
Create a trusted certificate profile in Microsoft Intune
-
In the Microsoft Intune admin center, go to Devices.
-
Click Configuration profiles.
-
Click + Create profile.
-
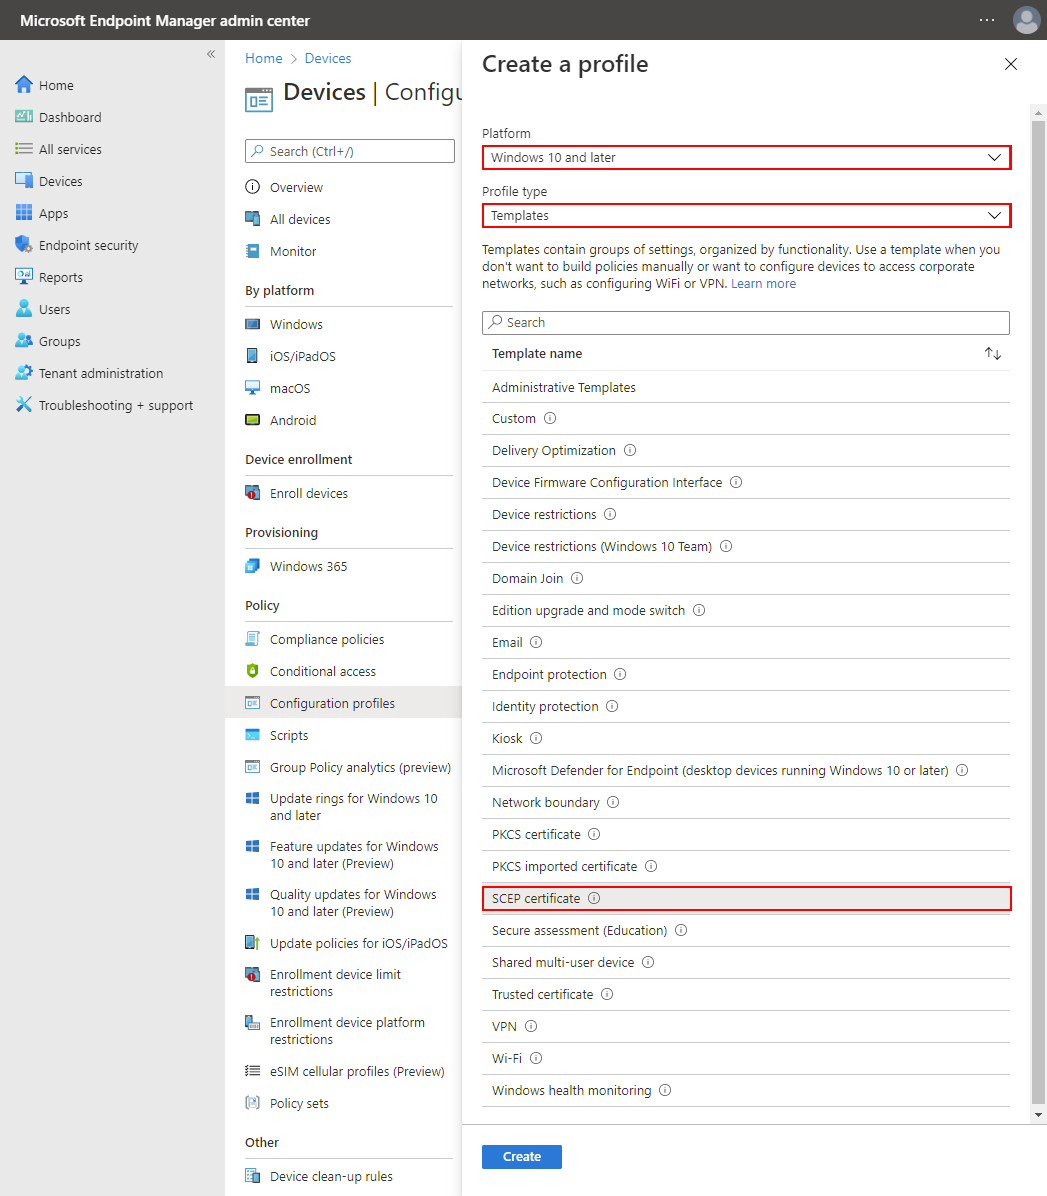
On the Create a profile page:
-
Platform: Select Windows 10 and later.
-
Profile type: Select Templates.
-
In the Template name section, click Trusted certificate.
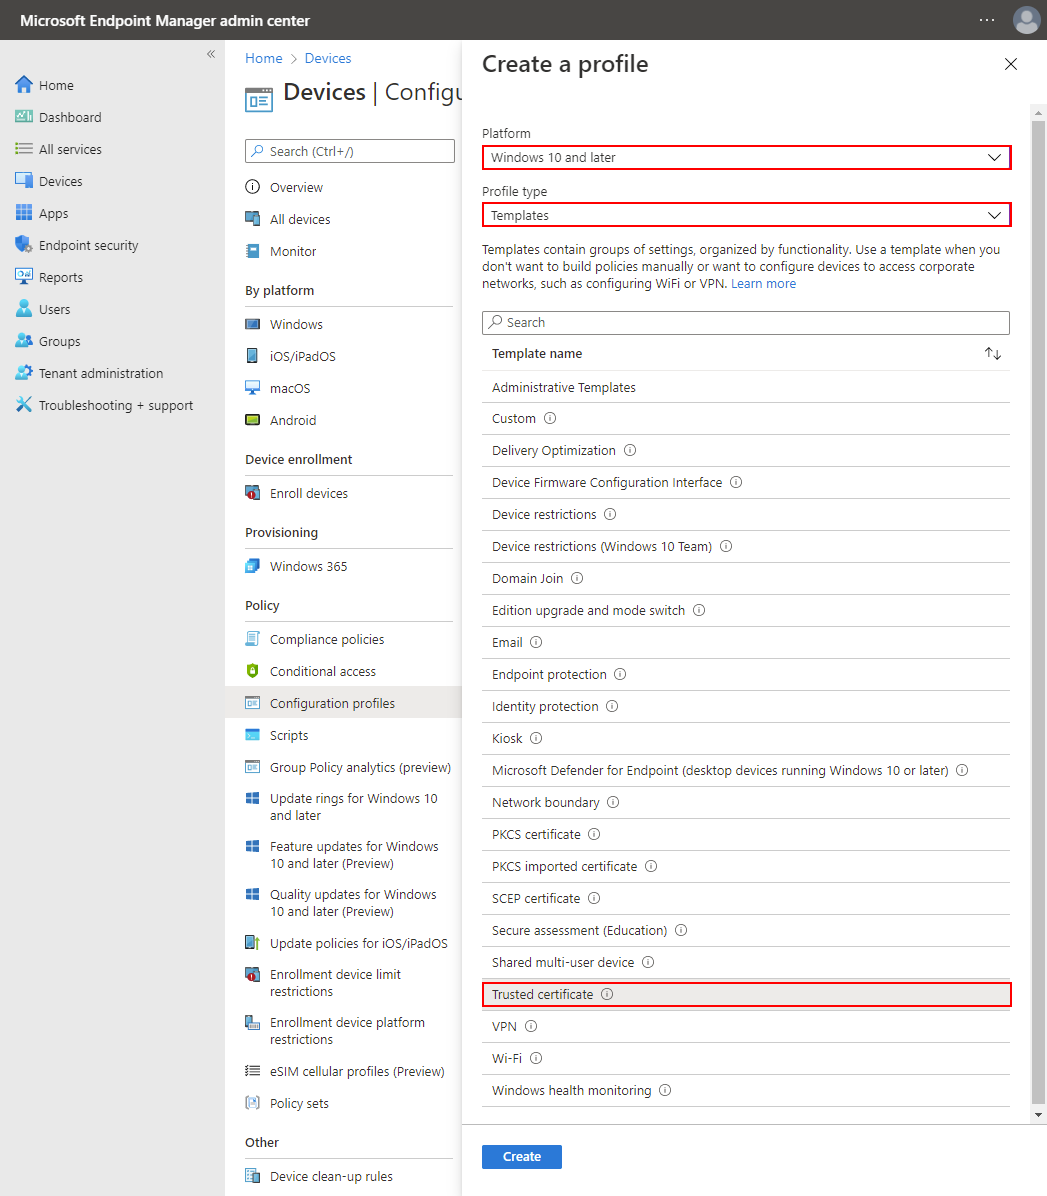
-
Click Create.
-
-
On the Basics tab of the Trusted certificate page, complete the following fields:
-
Name: Enter a name for the certificate.
-
Description: Optional. Enter a description for the certificate.
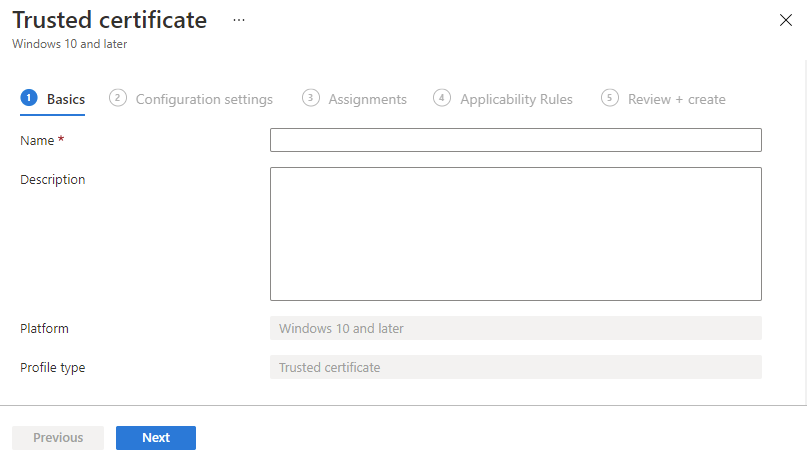
-
Click Next.
-
-
On the Configuration settings tab of the Trusted certificate page, select the following:
-
Certificate file: Select the x509 certificate (CER) file that you downloaded from Okta.
-
Destination store: Select Computer certificate store - Intermediate.
-
Click Next.
-
-
On the Assignments tab of the Trusted certificate page, select the following:
-
Included groups: Assign the trusted certificate profile to one or more user groups. The user groups must be the same as the groups where you're going to assign the SCEP profile.
Note:Make sure the user groups specified in both profiles are the same.
-
Click Next.
-
-
On the Applicability rules tab of the Trusted certificate page:
-
Configure any required rules.
-
Click Next.
-
-
On the Review + create tab of the Trusted certificate page, review the configuration and then click Create.
Create a SCEP profile in Microsoft Intune
-
In the Microsoft Intune admin center, go to Devices.
-
Click Configuration profiles.
-
Click + Create profile.
-
On the Create a profile page, select the following:
-
Platform: Select Windows 10 or later.
-
Profile type: Select Templates.
-
Template name: Select SCEP certificate.
-
Click Create.
-
-
On the Basics tab of the SCEP certificate page, complete the following fields:
-
Name: Enter a name for the certificate.
-
Description: Optional. Enter a description for the certificate.

-
Click Next.
-
-
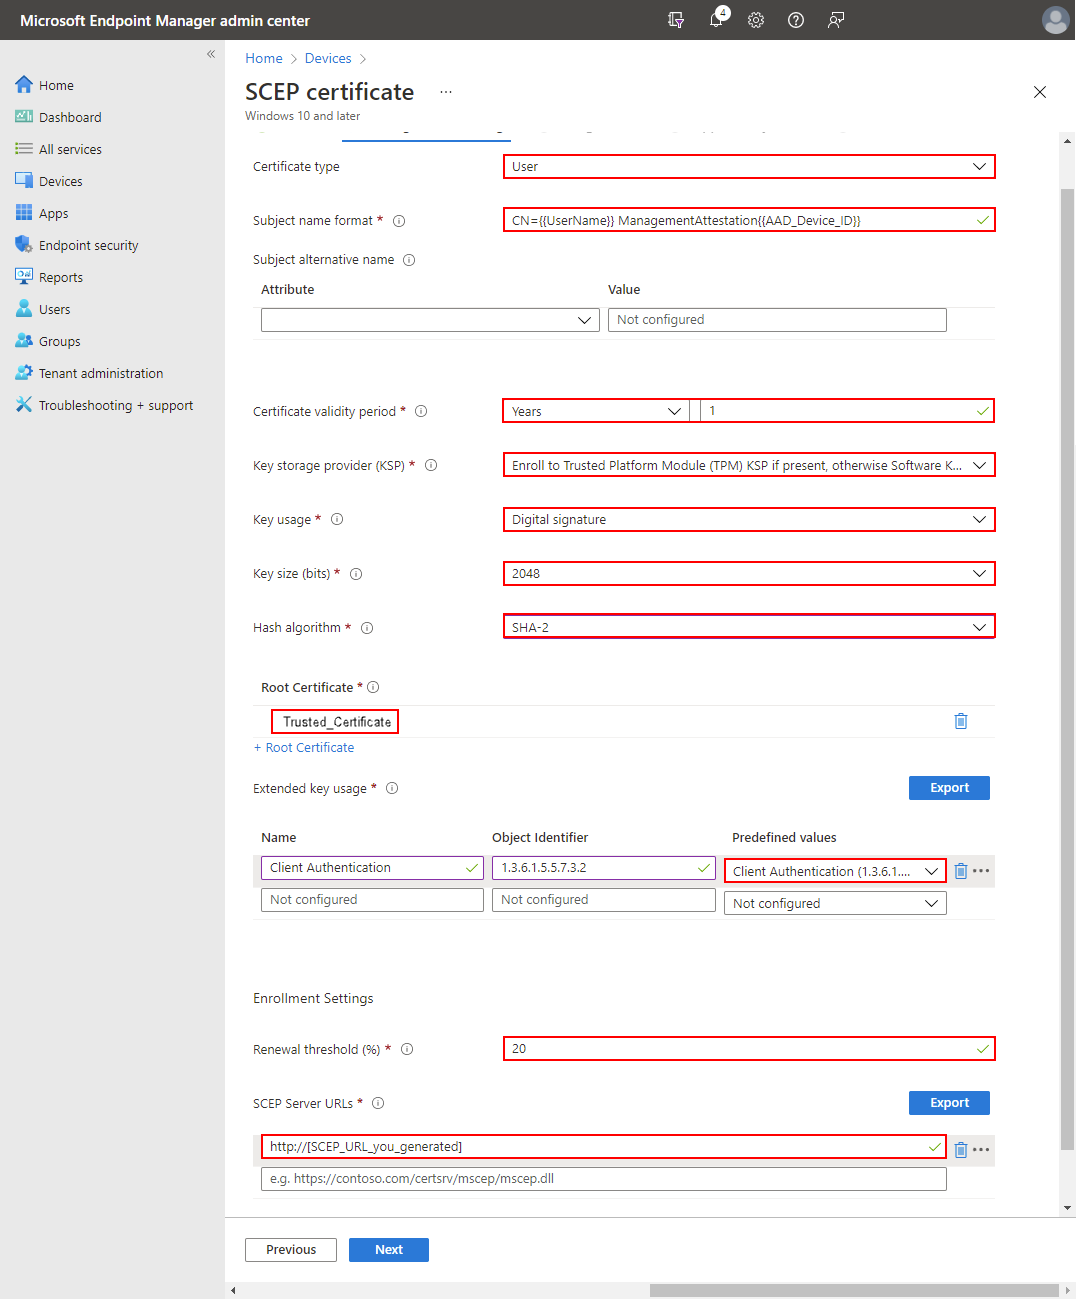
On the Configuration settings tab of the SCEP certificate page, complete the following fields:
-
Certificate type: Select a certificate type, depending on how you plan to use the profile.
-
User: Select User when configuring Okta as a CA.
-
Device: Use Device when setting up a SCEP certificate for Device Access.
-
-
Subject name format: Enter a subject name for the certificate. For example,
CN={{UserPrincipalName}},G={{GivenName}},SN={{SurName}}.Note:Okta has no specific format requirements for this field. You can use this field to indicate the certificate's purpose as a device management signal for Okta or use profile variables provided by Microsoft Intune.
For a list of supported variables, see Use SCEP certificate profiles with Microsoft Intune.
-
Certificate validity period: Set to
1year. -
Key storage provider (KSP): Select Enroll to Trusted Platform Module (TPM) KSP if present, otherwise Software KSP.
-
Key usage: Select Digital signature.
-
Key length: Select 2048.
-
Hash algorithm: Select SHA-2.
-
Click + Root Certificate.
-
On the Root Certificate page, select the trusted certificate that you created in the previous task.
-
Click OK.
-
Under Extended key usage, set Predefined values to Client Authentication.
-
Renewal threshold: Set this percentage to
20. This means that the MDM will renew the certificate on the device when the certificate is 80% expired. -
SCEP Server URLs: Enter the SCEP URL that you generated in Okta.
-
Click Next.
-
-
On the Assignments tab of the SCEP certificate page, assign the certificate to the same user groups to which you assigned the trusted certificate profile. Click Next.
Note:Make sure the user groups specified in both profiles are the same.
-
On the Applicability Rules tab of the SCEP certificate page, configure any required rules, and click Next.
-
On the Review + create tab of the SCEP certificate page, review the configuration and then click Create.
Verify the certificate installation on your Windows devices
On a Windows computer, verify that the client certificate was installed:
-
Click Start, and then type
cert. -
Click Manage user certificates.
-
Under Certificates - Current User, click .
-
Make sure that the client certificate exists.
Verify the Certificate Authority (CA):
-
In Certificates - Local Computer, select .
-
In the Issued To column, find Organization Intermediate Authority.
-
Make sure that the Issued By column specifies Organization Root Authority for Organization Intermediate Authority.
If you don't find the certificate, check the Windows event log:
-
On the Windows computer, click Start, type Event, and then click Event Viewer.
-
Look in .
-
In the General tab, find the following:
-
SCEP: Certificate installed successfully.
-
SCEP: Certificate request generated successfully
-
Next steps