Import with custom reports
This functionality has been deprecated. Existing custom report configurations aren't affected, but this option isn't available for new app instances. Instead, import custom attributes using Workday field overrides.
Legacy tenants can use a custom report endpoint to import custom attributes. Create a custom Workday report that contains a list of attributes. Okta imports these attributes, and Universal Directory (UD) maps them to the user profile and to downstream app user profiles.
Importing custom attributes using a custom report adds to the complexity of imports. This is because the connector must work with two separate endpoints and merge data from both to form a complete profile for a user. Workday discourages the use of custom reports, especially for large amounts of data.
Create a custom report in Workday
- Sign in to Workday.
- Search for and select the
Create Custom Reporttask. - Complete the following fields:
- Enter a Report Name.
- Choose Advanced as the Report Type.
- Select Enable As Web Service.
- Select your Data Source.
- Click OK.
- Add desired attributes to the custom report.
- If you want to change the imported attribute's name, change it in the Column Heading Override XML Alias column.
-
Add the
Workday IDattribute to the custom report. Change its Column Heading Override XML Alias value toWorkday_ID. Okta can't import custom attributes without the Workday ID. -
Click OK to create the custom report.
- Click the ellipsis beside the report name and go to .
- Get the following URLs by right-clicking the link and selecting Copy URL:
- XSD (under Simple XML)
- JSON (under JSON)
- Share the custom report with your integration user.
- Search for
Edit Custom Report. - Find and select your custom report. Click OK.
- Go to the Share tab. Select Share with specific authorized groups and users.
- Select your integration user.
- Click OK.
- Search for
Optimize the import time required for a custom report
The combination of large numbers of users with large numbers of custom attributes, especially calculated fields, can result in long import times into Okta - up to several hours. It can also result in a long lag upon saving the provisioning settings, as Okta imports the custom report to validate that it's formatted correctly.
You can estimate how long the import might take without setting up the full integration in Okta. Do this by accessing your Workday Custom Report JSON URL either by opening the report link in a web browser or using a tool such as Postman. Enter your Workday admin credentials when prompted.
If the import takes more than two hours to run, the Okta service times out the open connection. When this occurs, contact Okta Support and ask them to increase the connection timeout period.
Use paginated custom reports
In rare situations, setting up a paginated custom report may be helpful. Pagination means that Okta makes a per-user call to pull the custom report for a given user, instead of making a single call for all users.
Pagination makes a separate per-user call, which allows imports to be performed when it's not possible to extend the connection timeout limit to accommodate an import that takes longer than that period. However, the overall import time does increase significantly.
A paginated custom report can reduce the lag time after saving the provisioning settings because the validation only needs to check the custom report for one user. However, this is only useful if the settings aren't frequently changed as it increases import time.
In most cases, using non-paginated reports is the best choice.
Create a Paginated Workday Custom Report
This isn't applicable if the Workday instance has fewer than 5000 users.
Imports using custom reports can time out when the Workday instance has more than 5000 users. The solution is to create a paginated custom report, which allows Okta to import chunks of Worker data without timing out. To use this option, follow these steps:
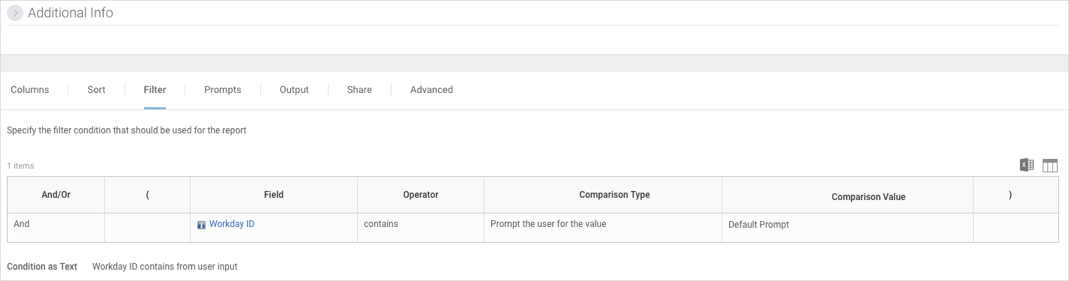
- On the Filter tab, set up your filter:
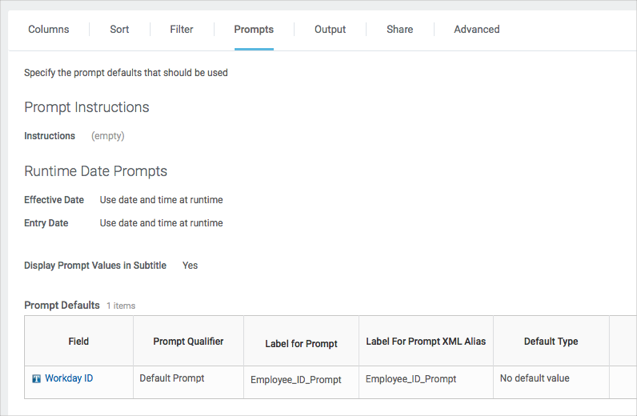
- On the Prompts tab, specify the default values for the prompt:
- Click OK.
- Find the Workday ID of the integration user (recommended) or the admin who owns the report. If the report owner other than the integration user, it must be shared with the integration user.
- View the generated URLs by clicking .
- In the Employee_ID_Prompt field, enter the Workday ID found in step 4.
Note:
Don't deprovision or remove an active admin. If this happens, you must regenerate the URLs by entering another admin's Workday ID.
- Obtain the newly paginated URLs by right-clicking on the following links and selecting Copy URL:
- XSD (under Simple XML)
- JSON (under JSON)
- Generate the reports as before, adding the new URLs.
- In Okta, open your Workday app integration, and then select the Provisioning tab.
- Optional. Paste the XSD URL into Custom Report Simple XML XSD URL (optional). Okta uses the XSD URL to get the custom report's schema.
- Paste the URL into Custom Report JSON URL (optional). Okta uses the JSON URL to get the custom report's data.
Okta can now import any attribute from Workday using the custom report web services endpoint. Incorporate custom attributes in Okta by extending the Workday app user profile, the Okta app user profile, and optionally the AD user profile with the new attributes. You may also need to map attributes between profiles and apply transformations. See Work with Universal Directory user types.
Related topics