Workday
Okta can import users and groups from Workday through its standard API.
Imports from Workday
Imports from Workday to Okta include users and groups. Okta only imports Workday Provisioning Groups. Workday Security Groups aren't imported.
Okta users are created from imported Workday users. Workday doesn't manage users after they've been imported into Okta. Any updates made to the user in Workday don't affect the associated Okta user.
Okta groups are created from imported Workday Provisioning Groups, which you can then use to assign apps.
Import types
Okta supports three types of imports:
You can perform imports from Workday to Okta manually. You can also choose to run incremental and full imports on a weekly or hourly basis. Go to the Provisioning tab of your Workday instance in Okta. Click Edit in the General area of the To Okta section, and set your desired import frequencies from the Incremental Import Schedule and Full Import Schedule dropdown lists.
Full imports
Full imports bring in all workers and all base and custom attributes. While these imports are time-consuming, you need to run them to perform reconciliation between the two systems. You can also use full imports to bring in attributes that other import types don't support. A full import includes base attributes, non-future, and future effective dated custom attributes. It also includes any changes that incremental or Real Time Sync imports omitted. It's a common practice to run these imports on a weekly basis.
Incremental imports
Incremental imports bring data for workers that Workday identifies as updated since the last incremental import. This includes any workers whose base or custom attribute values changed in Workday. Changes to effective dated custom attributes alone don't trigger an incremental import. Included in the incremental import are base attributes, non-future, and future effective dated custom attributes. Set the frequency of incremental imports to an interval that supports regular business processes. Typically, this would be at least once per day and can be scheduled as frequently as once an hour. See Incremental Imports.
Real Time Sync imports
Real Time Sync (RTS) is used to trigger an update from Workday to Okta in real time. Use this for changes where timeliness is critical, such as immediate termination of a worker. Configure a business process in Workday to send the trigger to Okta to start this process. Included in the RTS import are base attributes, non-future, and future effective dated custom attributes. See Workday Real Time Sync.
The optimal configuration of these import types ensures optimal data accuracy and timeliness of data moving from Workday to Okta. When you configure imports, consider the features and limitations of each import type.
Okta supports two typical scenarios: import from Workday and Workday-driven IT provisioning.
Workday-driven IT provisioning
Okta integrates with Workday to drive IT provisioning. When a Workday user is imported into Okta, Workday continues to manage them. Updates and terminations made in Workday are reflected in Okta and downstream apps. This arrangement enables Workday to manage employee and contractor access to apps. Workday-driven IT provisioning is a superset of the functionality provided by imports from Workday. Therefore, the instructions for configuring Workday-driven IT provisioning are also relevant to import from Workday scenarios.
-
Okta imports only users who have the First Day Of Work and Hire Date attributes populated in Workday.
-
If you're using Active Directory and you have Profile Push enabled, see Configure Active Directory provisioning settings.
-
Okta only supports Home and Work phone types. If your Workday instance uses unsupported phone types, you may encounter issues during imports.
With Workday-driven IT provisioning, Okta supports the following worker lifecycle events:
-
New hire
- A new Worker is hired in Workday
- Okta imports the new Worker and creates an Okta user profile
- Okta creates accounts in downstream apps (includes Active Directory (AD))
-
Updates
- A Workday user's attribute is changed in Workday
- Okta imports the attribute change
- Okta updates the attribute in downstream apps (includes AD)
-
Termination
- A Worker is terminated in Workday
- Okta imports the status change
- Okta deactivates the Okta user and accounts in downstream apps (includes AD)
-
Rehire
- A terminated Worker is rehired in Workday
- Okta imports and links the rehired Worker with the reactivated Okta user
Prerequisites
Before you configure provisioning in Okta, ensure that these requirements are met:
- Add a Workday app instance and configure SSO
- Create an integration system user in Workday
- Grant permissions to an integration system user
Add a Workday app instance and configure SSO
You need to add a Workday app instance in Okta and configure it and your Workday instance for SSO. See Add existing app integrations and How to Configure SAML 2.0 for Workday.
Create an integration system user in Workday
Okta accesses the Workday APIs with a special type of Workday user known as an integration system user. To create one, enter create integration system user in the search box, and then click Create Integration System User in the search results. Follow the directions to create a username and password.
Select Do Not Allow UI Sessions to not allow signing in to Workday with the integration system password.
This is the only account used to make API calls to Workday.
Grant permissions to an integration system user
Grant the integration system user the necessary permissions to access the web services needed for the Okta Workday integration through Workday Security Groups.
- Sign in to your Workday account as an admin. If you already created a security group, skip to step 9. Otherwise, continue to the next step.
- Enter
create security groupin the search box, and then click Create Security Group in the search results. - Select Integration System Security Group (Constrained) or Integration System Security Group (Unconstrained) from the Type of Tenanted Security Group dropdown list.
- Enter a name for the group, and then click OK.
- Add your integration system user to the list under Integration System Users.
Note:
To edit this group in the future, enter its name in the search box.
- If you're using a constrained security group, select which organizations should be applied to it.
- Choose whether to apply access rights to only the current organization or the current organization and all its subordinates.
- Click OK, and then click Done.
- Enter
view security groupin the search box, and then click the View Security Group report in the search results. - Search for and select your security group, and then click OK.
- From the Actions (...) menu, choose .
- Add the following permissions to Domain Security Policy permitting Put access:
-
External Account Provisioning -
Person Data: Work Contact Information -
Worker Data: Public Worker Reports
-
- Add the following permissions to Domain Security Policy permitting Get access:
-
External Account Provisioning -
Person Data: Work Contact Information -
Worker Data: Public Worker Reports -
Worker Data: Current Staffing Information -
Worker Data: All Positions -
Worker Data: Business Title on Worker Profile -
Manage: Location(If unavailable, useWorker Data: Manage Locationsinstead.)
-
- If you're creating a constrained security group, add the following permission to Domain Security Policy permitting Get access:
Worker Data: Workers -
Click OK to update the domain permissions for your security group, and then click Done.
Note:Verify with Workday to ensure that all required permissions are configured for the security group.
- If you're creating a constrained security group, all users should be removed from
Worker Data: Workers. - Workday might alert you to activate the security policy changes. If you don't activate the changes, the integration user account isn't granted the necessary permissions. Do the following to activate the changes:
- Search for
Activate Pending Security Policy Changes, and then click the resulting task. - Enter a comment (required), and then click OK.
- Verify the changes that you're activating.
- Search for
Procedures
- Configure Workday provisioning
- Enable Workday provisioning features in Okta
- Manage Workday Provisioning Groups
- Map Attributes
- Custom expressions
- Workday custom attributes
- Workday Field Override Service
Configure Workday provisioning
In Okta, enable the API integration between Okta and Workday, and configure your integration.
-
In the Admin Console, go to .
- Enter the name of your Workday integration in the Search field. Select it from the list.
- Click the Provisioning tab.
- Click Configure API Integration.
- Select Enable API integration.
- Enter your API Username. The format is
[integration system username]@[tenant]. For example:
wd_integration@oktademo. Find the tenant name in your Workday URL. - Enter your API Password. This is the password for the integration system user.
- Enter your WebServices Endpoint. Complete the following steps to get this value from your Workday instance:
- In Workday, search for
public web services. - Select the Public Web Services report.
- From the list of web services, open the dropdown menu of any service, and then select . This opens the WSDL in a separate window.
- Search the WSDL page for
soapbind:addressto find the web services endpoint for the service that you chose. - To configure your instance in Okta, you need the URL up to the tenant name. For example, if the value in the WSDL window
is https://implcc.workday.com/ccx/service/okta_pt1/Human_Resources/v19, then copyhttps://impl-cc.workday.com/ccx/service/okta_pt1and paste it into WebServices Endpoint.
- In Workday, search for
- Optional. Enter your Integration System Id. See Workday Custom Attributes.
- Optional. Enter a Department Field. This value determines which worker attribute to use for the department attribute of the user in Okta. The value is
Business Unitby default. - Optional. Enter a Pre-Start Interval. This value determines how many days before a worker's hire date to import and activate the user in Okta. See Pre-Start Interval.
- Optional. Select Sync Personal Phones to allow Okta to use personal phone numbers from Workday if work phone numbers are otherwise unavailable.
- Optional. Select Only Import Workers with Workday Accounts to import only workers who have Workday accounts and filter out any workers who don't. When you select this option, your next import includes only valid Workday workers.
- Optional. Enter an expression that defines Immediate Termination Reasons. If you use the Real Time Sync feature, use this to match the Termination_Subcategory_ID for each termination reason, as identified in the Workday Integration IDs. This entry must be a Regex expression. See Workday Real Time Sync.
- Optional. Select Deactivate on Last Day of Work to deactivate users on their last day of work instead of their termination date. User deactivation occurs the day after the user's Last Day of Work.
- Optional. Select Timezone aware terminations to base a user's deactivation on the current time in their time zone or location. See Time Zone Aware Deactivation.
- Optional. Select Import Groups to import Workday Provisioning Groups into Okta. This option is selected by default.
- Click Test API Credentials to test your API credentials. If you receive an error, verify and retry your credentials.
-
Click Save.
Enable Workday provisioning features in Okta
From your Workday app integration in Okta, select the To Okta section, enable Workday as a profile source, and set up import rules:
Scheduled imports
When provisioning is enabled, user import provisioning is automatically enabled. Edit the settings for this feature as required.
For the Workday-driven IT provisioning scenario, Okta recommends setting up scheduled import and automatic confirmation so that worker lifecycle events in Workday are periodically propagated to Okta without manual intervention. The number of workers in Workday can slow the import, so don't schedule them too frequently.
The Workday integration supports incremental imports as part of scheduled imports. For details, see Incremental Imports.
A recommended best practice is to first import your users manually. See Import users from an app. After doing this, schedule your imports based on the results of your manual import. If the import takes too long, adjust the schedule.
Workday as a profile source
In the Workday-driven IT provisioning scenario, you can enable Workday as a profile source so that Workday manages the Okta users.
In Okta, perform the following steps to enable Workday as a profile source:
- Go to the Provisioning tab of your Workday instance and select To Okta under Settings.
- Click Edit for the Profile & Lifecycle Sourcing section.
- Select Allow Workday to source Okta users.
- Click Save.
- In the Admin Console, go to .
- Use the arrows to Workday as the highest priority profile source. It must be above the directory that users are created in. For example, if your org creates users in an Active Directory (AD) instance, Workday must be higher priority than AD.
Pre-Start Interval
Pre-Start Interval is an optional field for early provisioning of Workday users. It allows you to onboard a user account into Okta before the official Worker/Employee Date (the employee's actual start date). The interval shows how many days before a Workday user's Worker/Employee Date Okta evaluates the user for early import. If the feature is enabled, Okta evaluates the Workday PreHire Date. If it falls within the set interval, Okta imports the user.
View the Pre-Start Interval by going to the Provisioning tab of your Workday instance and selecting Integration under Settings. To change its value, click Edit in the Integration section, enter a value and then click Save.
Consider the following example. If you set the pre-start interval in Okta to seven days, and the PreHire Date of a Workday account is set to seven days before the Worker/Employee Date, Okta imports the account. In this same scenario, if the PreHire Date is greater than the seven day interval configured in Okta, Okta doesn't consider it for import until the beginning of the window defined by the pre-start interval.
Note the following points:
- When the Pre-Start Interval is non-zero, future-dated Workday user updates are imported ahead of time by the number of days specified. For example, suppose you have a Workday provisioning group membership change scheduled with an effective date of two days in the future. If the Pre-Start Interval value is set to three, this change is reflected in Okta immediately after the next import.
- The Pre-Start Interval is ignored for termination date and attribute values imported through Custom Reports. You may need to set a Pre-Start Interval for new hires, but don't want other updates to occur ahead of time. To accomplish this, create and import attributes from Custom Reports into Okta instead of using the base Workday profile attributes in Okta. You can also use group membership rules based on the Custom Report attributes for group assignment in Okta.
- You must have Profile Sourcing enabled to use the Pre-Start Interval option.
- Set the interval to the time that you need for onboarding.
- The interval defines when a user is eligible to be imported ahead of their actual start date. It doesn't define when to import the user.
Manage Workday Provisioning Groups
With Workday Provisioning Groups, you can import workers into Okta in an organized way. Like Active Directory Security Groups, you can see imported Workday Provisioning Groups under . Use these groups like any other Okta group: for app assignments and multifactor authentication (MFA) policy assignments. You can also use the groups to drive provisioning into Active Directory and other applications. Create provisioning groups manually inside Workday. After you create them, the groups and associated memberships become part of the import into Okta.
- Grant Provisioning Group Admin privileges to a Workday Administrator
- Assign Workday Workers to Provisioning Groups
- Provision Users to Active Directory with Provisioning Groups
- Change Provisioning Groups
- Considerations
Grant Provisioning Group Admin privileges to a Workday Administrator
Before a Workday admin can manage Provisioning Groups, ensure that they have the correct privileges. If you search for provisioning groups and don't see options to create, delete, or edit Provisioning Groups, then the admin doesn't have the required privileges.
To add Provisioning Group access, follow these steps:
- Sign in to your Workday account as an admin.
- Enter
domain securityin the Search bar and select Domain Security Policies for Functional Area. - Enter
System, and then click OK. - In the left pane, scroll down and expand the Security Administration folder. Then click Provisioning Group Administration.
- Next to Provisioning Group Administration in the right pane, click the ellipsis to reveal a dropdown and select Domain Security Policy.
- If the second item is Enable, the policy is disabled. To enable it, click Enable and confirm your selection.
- If the second item is Disable, the policy is enabled. Move to the next step.
- Under the Report/Task Permissions list, ensure that the admin is a member of one of the Security Groups with view and modify permissions. If not, click the dropdown menu next to Domain Security Policy. Select and then add the correct Security Group to the list. Ensure that both view and modify permissions are configured.
Assign Workday Workers to Provisioning Groups
Workday workers can be manually assigned to provisioning groups within Workday; however, provisioning groups are most effective when configured to have automated assignments based on conditional rules as defined in a business process within Workday. Because it involves modifying a business process inside Workday, a Workday HR administrator should perform this step. Contact Workday Support for more details.
Provision Users to Active Directory with Provisioning Groups
Okta can automate the creation, update, and deactivation of users from Workday to Active Directory (AD). Okta drives provisioning through Workday provisioning groups. In short, a Workday provisioning group is tied to one (or more) AD organization unit (OU) within Okta. When a user is created in Workday and assigned to a properly configured provisioning group, Okta imports that user from Workday and creates a user in AD under the corresponding OU.
Users can also be deactivated based on the time zone of their location, see Time Zone Aware Deactivation for more details.
To provision users to AD with provisioning groups:
- Sign in to Okta.
- Find the desired Workday provisioning group under .
- Click the group.
- Click Manage Directories.
- Select the AD domains to associate with the Workday provisioning group.
- Select the AD OU within which you wish to provision accounts.
- Click Done.
- In the Okta AD Settings tab, enable Provision new Active Directory accounts from Okta.
Change Provisioning Groups
Adding an existing Worker to a different provisioning group in Workday results in a membership change in the associated group in Okta. However, the OU location of the associated AD user does not change. This is because Okta only adds AD users to a particular OU during AD user creation, updates do not apply.
Considerations
Group addition: Newly created Workday groups are synchronized into Okta only in the following scenarios:
- Full Import: This brings in any new Workday Provisioning groups and creates them in Okta.
- Incremental Import: This brings in any new Workday Provisioning groups and creates them in Okta
- RTS: The creation of a Workday Provisioning group alone doesn't trigger an RTS event to create the group in Okta. However, after the Workday Provisioning groups have been created in Workday, any other RTS event that is triggered will also include the group information and create the new groups in Okta.
Group removal: Groups deleted from Workday are removed from Okta only during a full import:
- Full Import: This removes any group from Okta that is linked to a Workday group that no longer exists.
- Incremental imports and RTS do NOT remove deleted Workday groups from Okta.
Group name changes: The following behaviors occur in Okta when a group name is changed from within Workday.
- Any RTS event picks up the Workday group name change, and writes the new name into Okta as a new and separate group within Okta.
- With RTS, when a member of the group is updated, they're removed from the original group in Okta and added to the new group. The user loses any app assignments that they had from the original group.
- Any new user who's added to the Workday Provisioning group (with the new name), causes the group to be written to Okta. No apps are assign to or removed from this user. This is because the group (with the new name) in Okta has no apps assigned to it.
- If an incremental import runs, the results are the same as the preceding RTS scenarios. The group (with the old name) isn't removed. Users who were updated since the last import was performed are moved from the original group to the group with the new name. This results in app unassignment or deprovisioning.
- If a full import runs, the group (with the old name) is removed. Any members of the group are unassigned or deprovisioned from any associated apps. The group (with the new name) is imported, and associated users are added to it. No apps are associated with the new group.
If you have to rename a group in Workday, create a different group that uses the new name instead.
Workday Group name changes can result in unwanted behavior downstream in Okta. To work around this issue, create a group with the desired name in Workday and assign users to it. Wait for an import or an RTS job to create the group in Okta.
After the newly created group is brought into Okta, configure it to be the same as the group that you wanted to rename. Verify that the user memberships, group rules, and app assignments are the same for both groups. This lets you safely remove the old group (with the original name) from Workday and update Okta by running a full import.
Since all users, rules, and application assignments have been duplicated to the new group, no one should lose access to any applications or assignments.
Map Attributes
Map Attributes from Workday to an Okta User Profile
As shown in the Universal Directory (UD) Profile Editor, the base profile that Okta imports from Workday consists of 20 attributes. Some of the attribute mappings from the Workday user to the Okta user exist by default, but others need to be created manually.
When Workday is configured to write to AD (and UD is enabled), the Okta admin must manually map some attributes. This includes mappings between the Workday app user profile and the Okta user profile, and the Okta user profile and the AD user profile. These mappings allow attributes to flow from Workday to Okta and then to AD.
The following table contains the recommended mappings for typical use cases.
|
Workday |
Okta |
|---|---|
appuser.accountType
|
userType
|
appuser.businessTitle
|
title
|
appuser.businessUnit
|
department
|
appuser.city
|
city
|
appuser.countryCode
|
countryCode
|
appuser.email
|
email
|
appuser.employeeID
|
employeeNumber
|
appuser.firstName
|
firstNameǂ |
appuser.lastName
|
lastNameǂ |
appuser.location
|
locale
|
appuser.managerId
|
managerId
|
appuser.managerUserName
|
manager
|
appuser.mobilePhone
|
mobilePhone
|
appuser.postalCode
|
zipCode
|
appuser.secondEmail
|
secondEmailϕ |
appuser.state
|
state
|
appuser.streetAddress
|
streetAddress
|
appuser.supervisoryOrg
|
organization
|
appuser.workPhone
|
primaryPhone
|
ǂ The values for appuser.firstName and appuser.lastName are retrieved from the user's preferred name in Workday. If a preferred name is unavailable, the user's legal name data is used. If neither the preferred nor the legal name available, then the value is set to FirstName or LastName, as appropriate for the field.
ϕ Okta doesn't import or set the value of secondEmail. You can use
a custom attribute to retrieve a value for this from Workday. See Workday custom
attributes.
Map attributes to an AD user profile
Workday-as-a-Source typically involves creating AD users. Some of the attribute mappings from Okta user to AD user exist by default, but others need to be created manually. The following table contains the recommended mappings for typical use cases.
|
Okta |
Active Directory |
|---|---|
user.email
|
email
|
user.firstName
|
firstName
|
user.lastName
|
lastName
|
hasWorkdayUser() ? (findWorkdayUser().managerUserName + "@" + target_app.namingContext) : null
|
managerUpn
|
substringBefore(user.login, "@")
|
samAccountName
|
user.streetAddress
|
streetAddress
|
user.middleName
|
middleName
|
hasWorkdayUser() ? findWorkdayUser().employeeID : user.employeeNumber
|
employeeID
|
hasWorkdayUser() ? findWorkdayUser().supervisoryOrg : user.department
|
department
|
user.honorificPrefix
|
honorificPrefix
|
user.state
|
state
|
user.countryCode
|
countryCode
|
user.preferredLanguage
|
preferredLanguage
|
user.city
|
city
|
hasWorkdayUser() ? findWorkdayUser().businessTitle : user.title
|
title
|
user.zipCode
|
postalCode
|
user.division
|
division
|
user.mobilePhone
|
mobilePhone
|
hasWorkdayUser() ? findWorkdayUser().businessUnit : user.costCenter
|
departmentNumber
|
hasWorkdayUser() ? findWorkdayUser().location : null
|
deliveryOffice
|
user.primaryPhone
|
telephoneNumber
|
hasWorkdayUser() ? findWorkdayUser().employeeID : user.employeeNumber
|
employeeNumber
|
user.honorificSuffix
|
honorificSuffix
|
Custom expressions
UD supports the use of custom expressions in profile mappings to transform attributes as shown in the preceding table.
Consider the custom expression for the Manager (UPN) attribute, which is important for linking managers in AD:
hasWorkdayUser()?(findWorkdayUser().managerUserName + "@" + target_app.namingContext):nullThe expression checks whether a Workday profile exists for this Okta user. If so, it finds the managerUserName attribute of the Workday profile that was imported into Okta and appends @[AD domain] to populate the Manager (UPN) attribute.
Okta uses the Manager (UPN) attribute to find the manager of the Okta user in AD, and then links the two AD users together. This custom expression can be modified to suit special AD environments.
Two other situations can result in more custom expressions appearing in the Provision to AD profile mappings. The first is when UD is enabled for a preexisting Workday-as-a-Source deployment. The second is when the Workday integration is added to Okta before AD. In both cases, the Workday attributes of Business Title, Location, Supervisory Organization, Business Unit, and Employee ID are mapped to their corresponding AD attributes directly through custom expressions.
Workday custom attributes
Custom attributes can be imported by using Field Overrides. Importing custom attributes from Workday to Okta requires a Field Override Integration System, which is described in Workday Field Override Service.
In older instances, a custom report endpoint could be used to import attributes. This functionality has been deprecated. Existing custom report configurations aren't affected, but new app instances must use field overrides. If you have an instance that uses custom reports to import attributes from Workday, see Import with custom reports.
Okta doesn't store any API payloads (such as XML and JSON) that it receives.
Workday Field Override Service
Workday's Field Override Service is a method to pull custom attribute information from Workday.
Using the Field Override Service simplifies the import process and improves performance over past methods, such as using custom reports.
Configuration
To use Field Overrides, Workday administrators must create a Field Override Integration System within Workday. Then they need to add the desired custom attributes to the system and configure Okta to use the Field Overrides when fetching worker data.
Create a Field Override Integration by completing the following steps:
- Sign in to your Workday account as an admin, search for
Integration Systemin the search bar, and then click Create Integration System. - Enter the following:
- System Name: Enter a name for your system integration.
- Comment: Optionally add a comment.
- Template: Select Core Connector: Worker from the New using template dropdown menu.
- Click OK.
- From the list of results, select Core Connector: Worker, and then click OK.
- On the Configure Integration Services page, scroll down to the Custom Integration Services section, and click + (plus).
- Click Create.
- Select Create Integration Field Override Service from the list of services.
- Enter a Name for the Field Override Service, and select
Workeras the Business Object.Note:Property types are based on the property name. Every field is treated as a string unless you specify its type using a prefix. See Field Override property types for more information about property types and naming conventions.
- Click OK to finish creating your integration system.
- Click OK to return to the View Integration System page.
- Configure the field mappings for your system. Go to .
- Select your Integration Service from the list on the left, and configure the mappings for your fields. Search for any desired fields and ensure that the property types match.
- When you're done mapping the properties, click OK and then click Done.
- Search for your integration system in Workday, then go to .
- Copy and save the value of Integration_System_ID. You need this value to set up and update your provisioning settings.
Field Override property types
With field overrides, there's no way to get attribute types from the setup of the integration system. This means that all custom properties are treated as strings. You may want Okta to treat a custom property as another type (for example, Boolean or number). To do so, you need to add a prefix to the property name when you configure its mapping in the integration system. Okta detects this prefix, transforms it to a property type, and then removes the prefix (that is, the prefix doesn't appear in the Okta Profile Editor).
To make Okta honor types from a field override, you need to name the property with the property type and property name separated by a colon as follows:
<property_type>:<property_name>
For example, to force the homePhoneNumber to be treated as a string, set the Field Override name to string:homePhoneNumber.
The supported types are: string, boolean, integer, number, and decimal.
The following table demonstrates how the property names are transformed.
| Workday Field Override name | Okta property type | Okta transformed property name | Comment |
|---|---|---|---|
string:my_awesome_string_property
|
string |
my_awesome_string_property
|
Okta imports this property as a string. Okta creates a custom property in the Profile Editor named my_awesome_string_property of type string. |
boolean:boolean_property
|
boolean |
boolean_property
|
Okta imports this property as boolean. Okta creates a custom property in the Profile Editor named boolean_property of type boolean. |
string_by_default
|
string |
string_by_default
|
Okta imports this property as a string since there's no type specified, which means it's a string by default. Okta creates a custom property in Profile Editor with the name string_by_default and type string. |
not_a_type:property_name
|
string |
property_name
|
By default, Okta imports this property as a string since the type doesn't match any known type. Okta creates a custom property in the Profile Editor named property_name of type string. |
integer:integer_property
|
integer |
integer_property
|
Okta imports this property as an integer. Okta creates a custom property in the Profile Editor named integer_property of type integer. |
decimal:decimal_property
|
decimal |
decimal_property
|
Okta imports this property as a decimal. Okta creates a custom property in the Profile Editor named decimal_property of type decimal. |
number:number_property
|
number |
number_property
|
Okta imports this property as a number. Okta creates a custom property in the Profile Editor named number_property of type number. |
Configure Workday to use field overrides in Okta
-
In the Admin Console, go to .
- Search for and select your Workday app instance.
- Go to .
- Click Edit in the Integration section. Paste the Integration_System_ID value that you copied earlier into Integration System Id. Click Save.
- In the Admin Console, go to .
-
Find and select your Workday app instance.
-
Click Add Attribute. Check if the new properties from your Integration System appear in the list of attributes. If they're missing, click Refresh Attribute List and select the attributes that you want to add. Click Save.
-
Click Mappings in the Profile Editor and map the attributes.
Known limitations
- Okta doesn't display Arabic characters imported from Workday correctly.
- Removing a custom attribute in Workday, then importing into Okta, doesn't erase the custom attribute value that was previously imported.
- Suppose that you receive the following error message during profile updates (phone device values) to Workday:

This means that your Workday tenant is configured with custom Phone_Device_Type_Id values. Reset them to use the Workday-configured factory default values as follows:
Name Value MOBILE Mobile FAX Fax TELEPHONE Telephone PAGER Pager
Features
Contractor to Full-Time Employee Conversion
- To use Workday Contractor to Full-Time Employee conversion support, you must modify your Workday tenant setup to configure Universal ID for workers. After being configured, Universal ID only applies to newly created workers of the tenant. You can apply Universal ID to existing workers by manually updating their Workday profiles using Workday's API. Without a Universal ID, Okta can't detect that a contractor has been converted to full-time. This can lead to duplicate workers.
- Mapping Universal ID from Workday to Okta is optional and isn't required for this feature to work.
Universal ID
In Workday, Contractor and Full-Time workers are separate entities that have unique Workday IDs. You can link these IDs in Workday by setting the same secondary ID for both. This secondary ID is the Universal ID.
If your Workday Provisioning integration is configured with a pre-hire interval, but Universal ID isn't configured, Okta pulls in both the Contractor worker and the future Full-Time user (pre-hire). This results in Okta creating a duplicate entry in the Import tab. This happens because the two workers in Workday have different Workday IDs, which means that Okta can't detect that they're the same user.
After you configure Universal ID in Workday, the Okta Contractor to Full-Time conversion feature helps prevent the creation of duplicate workers. The feature detects if any incoming pre-hire workers have the same Universal ID as currently active and existing workers. Pre-hires that match an existing worker are filtered out to avoid duplicate entries being created.
When the Contractor worker is deactivated and the import from Workday is running, the Full-Time user with the matching Universal ID is selected as the Contractor is no longer available. After a conversion, the Okta user is deactivated and then reactivated. In Okta, this effectively terminates the Contractor worker and hires a Full-Time worker.
To configure your Workday app integration to automatically perform these conversions, complete the following steps:
-
In the Admin Console, go to .
- Search for and select your Workday app instance.
- Go to .
- Click Edit in the User Creation & Matching section.
- Select Auto-confirm exact matches for Confirm matched users.
- Select Auto-confirm new users for Confirm new users.
- Click Save.
- Click Edit in the Profile & Lifecycle Sourcing section.
- Optional. Select Reactivate suspended Okta users for When a user is reactivated in the app. Your setup determines whether you should select this option.
- Select Reactivate deactivated Okta users for When a user is reactivated in the app.
- Click Save.
There might be a gap between Contractor user deactivation and Full-Time user reactivation. This often occurs due to the timezone difference between Workday's termination and hire dates for a user and the time zone in which the Workday tenant operates. Currently, Okta supports only Time Zone-Aware terminations, but doesn't consider the time zone when importing new hires.
This functionality supports cases where a Contractor worker is terminated, but the hire date of the Full-Time user isn't the same day. For example, suppose that a Contractor is being converted to a Full-Time position, and they're taking a week off before starting their new position. The Full-Time worker isn't imported until their actual start date.
Use your Workday Community account to access the following articles to learn how to configure Universal ID for your Workday tenant:
Deactivation
Okta performs a deactivation query during imports. This checks whether any workers have been terminated in the last 24 hours or will be terminated during the next 24 hours. Workers that fall into this category are deactivated based on the first of the following conditions that they match:
-
Immediate Deactivation: If the termination reason of the worker matches one of the configured immediate termination reasons within Okta, the worker is deactivated immediately.
- Time Zone Aware Deactivation: If the termination reasons aren't matched, then the termination/last day worked date of the worker are compared to the current time. Okta relies on the timezone provided by Workday within the termination date when determining if the deactivation time has passed. Typically Workday returns the termination date as midnight PST. If the current time is after that date, then the worker is deactivated.
-
Workers with a future termination date and a matching immediate termination reason are terminated one day early. Consider if the termination date is 2022/10/22, the current date is 2022/10/21, and the immediate termination reason matches. In this example, the user is terminated as part of the import on 2022/10/21, which is one day before their termination date.
-
Workers still only terminate at midnight UTC unless Time Zone Aware Deactivation is enabled.
See Time Zone Aware Deactivation for a workaround.
Immediate deactivation reasons
Okta normally waits until the end of the day to process a terminated Worker in Workday. This process might include unassigning them from the Workday app or deactivating them. Okta can also process a termination immediately after receiving an event from Workday. This occurs when the termination reasons for the Worker match those specified in Immediate Termination Reasons and the termination date is the current date.
Configure Immediate Deactivation Reasons
-
In Okta, select the Provisioning tab for the Workday app.
-
Enter some immediate termination reasons with the required termination subcategory, as described in Workday. You can list the termination subcategories in Workday by searching for
Integration IDs, and then searching for and selecting the Termination Subcategory business object. A termination reason is the combination of its termination subcategory and its corresponding ID (for example,Terminate_Employee_Involuntary_RIF). When you define these immediate deactivation reasons, you can also use regular expressions (regex) to specify them.You can use the OR (
|) operator to list multiple deactivation reasons. The following regex defines multiple possible immediate deactivation reasons. Here, all deactivated workers with any of the following termination reasons are immediately unassigned from the Workday app and deactivated in Okta:Terminate_Employee_Voluntary_DissatisfiedPay| Terminate_Employee_Involuntary_Harassment| Terminate_EmployeeImmediateTerm_ImmediateTerm| Terminate_Employee_Voluntary_CommuteUse
^.*<TerminationReason>$to match termination reasons that end with the specified expression. For example, the following expression matches any reasons that end withDissatisfiedPay:^.*DissatisfiedPay$Use
^<TerminationReason>.*to match termination reasons that start with the specified expression. For example, the following expression matches any reasons that begin withTerminate_Employee_Voluntary:^Terminate_Employee_Voluntary.*You use a combination of these methods, as demonstrated by the following example:
^.*DissatisfiedPay$|^.*Involuntary_Harassment$|
^.*ImmediateTerm$|^Terminate_Employee_Voluntary.*
Be careful when creating these expressions and make sure they're strictly applied to the correct workers and not anyone else.
Notes:
-
There can be no default value for this text box.
-
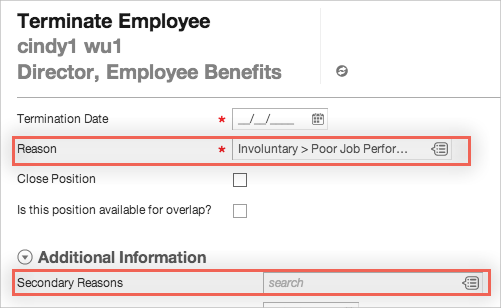
Select termination reasons in Workday under Reason and Secondary Reasons:
The following chart illustrates various outcomes based on termination variables:
|
Immediate termination reason matches? |
Use last day of work? |
Outcome |
|---|---|---|
| Worker is deactivated the day after their termination date | ||
| ● | Worker is deactivated the day after their last day of work | |
| ● | Worker is deactivated during the import performed at the start of their termination date | |
| ● | ● | Worker is deactivated during the import performed at the start of their last day of work |
Timezone aware terminations
The date of a worker's termination may not align with a standard time of day to deactivate their account. The Workday integration supports deactivating a worker based on their time zone as defined in Workday.
Enable this feature by selecting Timezone aware terminations on the Provisioning tab. Your security group must have permission to manage locations. See Grant permissions to an integration system user.
There's no support for worker reactivation based on time zone.
The Termination Date or Last Day of Work for a worker determines their scheduled termination. Okta detects the location of the worker and processes their scheduled termination, based on the associated time zone of that location. This worker is deactivated on the next scheduled import after midnight in the time zone of that worker.
When the worker has set a preferred time zone in Workday, it takes precedence over their detected location's time zone. The order of precedence for determining a worker's time zone is as follows:
- Preferred time zone of the worker
- Time zone of the worker's location
- Pacific Standard Time (PST)
For example, Cathy is based in Sydney, Australia, whose time zone in Workday is GMT+10.
Cathy's termination date is July 4. Suppose that Timezone aware terminations isn't enabled. Cathy's termination is processed on the next import after midnight UTC. This is because all deactivations are fixed on the UTC time zone (GMT+0). Alternatively, suppose that Timezone aware terminations is enabled. Cathy is deactivated in Okta on the next import after midnight in Sydney time (GMT+10). Effectively, Cathy is deactivated 10 hours before she would have been deactivated in the past.