
Step 3: Configure Routing Rules, Device Trust, and Client Access Policies in Okta for iOS and Android Devices
This is an Early Access feature. To enable it, in the Okta Admin Console, go to , and then turn on Workspace1 Device Trust for your mobile platform(s).
Prerequisites
Step 1: Configure Workspace ONE Access as an Identity Provider in Okta
Step 2: Configure Okta application source in Workspace ONE Access
The Okta Device Trust feature simplifies the administration of conditional access policies for iOS and Android devices in the Okta and Workspace™ ONE™ integration. Device Trust and access policies for apps are configured only in the Okta Admin console.
When iOS or Android Device Trust is configured in Okta, users are redirected to Workspace ONE Access for authentication using the Mobile SSO (iOS) or Mobile SSO (Android) authentication method. Workspace ONE Access returns device posture information to Okta in the SAML response.
The access policies you configure in Okta then determine whether the device must be trusted in order to access the application. If the device is untrusted, a device enrollment page is displayed.
For the purposes of this integration, you must perform the following tasks to configure the Device Trust feature in the Okta Admin console:
- Configure Okta identity provider routing rules for iOS and Android devices.
- Enable the global Device Trust setting in Okta.
- Configure app sign-on policy rules in Okta.
- Configure Default Access Policy in Workspace ONE Access.
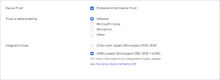
Verify that the Device SSO Response, Enable Force Authn Request, and Enable Authentication Failure Notification properties in the Okta application source configuration in Workspace ONE Access are set to Yes. These properties are a requirement for the device trust solution for iOS and Android devices. For more information, see Step 2: Configure Okta application source in Workspace ONE Access.
Configure Identity Provider Routing rules in Okta for mobile devices
Configure Okta IdP routing rules for iOS and Android specifically for this Okta and Workspace ONE integration. When configured, these routing rules work with application sign-on policies to redirect authentication requests from iOS and/or Android devices to Workspace ONE.
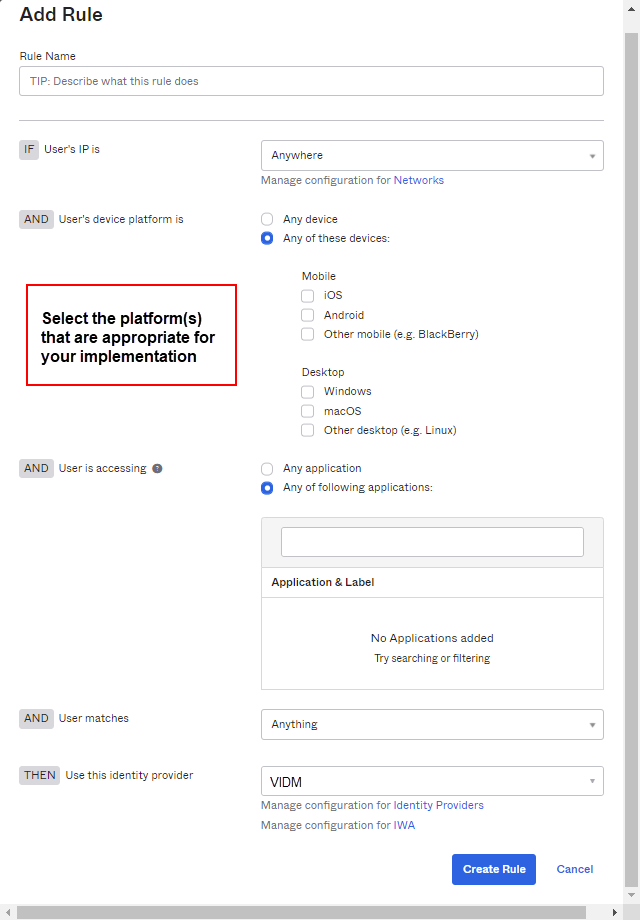
- In the Okta Admin Console, go to .
- Click the Routing Rules tab.
- Click Add Routing Rule.
- Configure the following:
Setting Action Rule Name Enter a name for the rule you are creating. IF User's IP is If appropriate for your implementation, you can specify network zones to which the routing does or does not apply. To specify a zone here, at least one network zone must be defined already in Okta. For more information, see Network zones. AND User's device platform is Select Any of these devices and then select iOS or Android, or both, depending on your implementation.
AND User is accessing Select Any of the following applications and then enter the application(s) to which you want the routing rule to apply.
AND User matches Select the appropriate action:
- Anything. Specifies any user. This is the default.
- Regex on login. Allows you to enter any valid regular expression based on the user login to use for matching. This is useful when specifying the domain, or if a user attribute is not sufficient for matching. For details, see Identity Provider routing rules.
- Domain list on login. Specify a list of the domains to match; for example, example.com. Do not add the @ symbol to the domain name. You can add multiple domains. Note that it is not necessary to escape any characters.
- User attribute. Select an attribute name in the left list, a type of comparison in the Starts with list, and then enter a value that you want to match in text field on the right.
THEN Use this identity provider Select the Identity Provider you created in Okta for Workspace ONE Access as detailed in Step 1: Configure Workspace ONE Access as an Identity Provider in Okta. - Click Create Rule.
Enable Device Trust settings in Okta
This section describes how to enable Device Trust specifically for this Okta and Workspace ONE integration. When configured, these settings work together with the IDP Routing Rules to redirect authentication requests from iOS and/or Android devices and target applications to Workspace ONE. Other authentication requests are processed through the default routing rule.
Don't disable the Device Trust setting on the page if you have also configured an app sign-on policy that allows trusted devices (). Otherwise, your Device Trust configuration will be in an inconsistent state.
To disable Device Trust for your org, first remove any app sign on policies that contain a Device Trust setting, then disable Device Trust in .
-
In the Admin Console, go to .
- In the iOS Device Trust or Android Device Trust section, click Edit.
- Select Enable [iOS or Android] Device Trust.
- In Trust is established by, select Workspace ONE.
- In Integration type, select SAML-based (Workspace ONE UEM+vIDM).
- Click Next.
- In Device Identity provider, select the Identity Provider you created in Okta for Workspace ONE Access as detailed in Configure Identity Provider Routing rules in Okta for mobile devices.
- (Optional) In the Mobile device management provider field, Workspace ONE is pre-populated by default. You can modify this if necessary. The MDM provider you enter here is displayed to end users during device enrollment.
- In the Enrollment link field, enter a web address where end users with unmanaged devices will be redirected. For example, you may want to send these users to a page with enrollment instructions, or the Workspace ONE enrollment page.
- Click Save.

Configure App Sign On Policy rules in Okta
- Only App, Org, and Super admins can configure app Sign On policies.
-
Don't disable the Device Trust setting on the page if you have also configured an app sign-on policy that allows trusted devices (). Otherwise, your Device Trust configuration will be in an inconsistent state.
To disable Device Trust for your org, first remove any app sign on policies that contain a Device Trust setting, then disable Device Trust in .
- If you ask Okta to disable this Device Trust solution for your org (which is separate from the Device Trust setting that you enabled in Enable Device Trust settings in Okta, make sure to first change the Device Trust setting in the app sign on policy rules to Any (Applications > app > Sign On). If you do not make this change and then later have Okta re-enable Device Trust capability for your org, the Device Trust setting in app sign on policy rules will take effect immediately, which you may not have expected.
About app sign-on policy rules
By default, all Client options in the App Sign On Rule dialog box are pre-selected. To configure more granular access to the app, create rules that reflect:
- Who users are, or the groups to which they belong
- Whether they are on or off network, or within a defined network zone
- The type of client running on their device (Office 365 apps only)
- The platform of their mobile or desktop device
- Whether or not their devices are Trusted
Taking an allow-list approach to sign-on policy rules
- Create one or more Allow rules to support the scenarios that will allow access to the app, then assign those rules the highest priority.
- Create a Deny catch-all rule that will apply to users who don't match the permissive scenarios you created in Step 1. Assign the Deny catch-all rule the lowest priority, just above the default rule. In the allow-list approach described here, the default rule is never reached because it is effectively negated by the Deny catch-all rule.
For important security information about creating app sign-on policy rules, see App sign-on policies.
Procedure
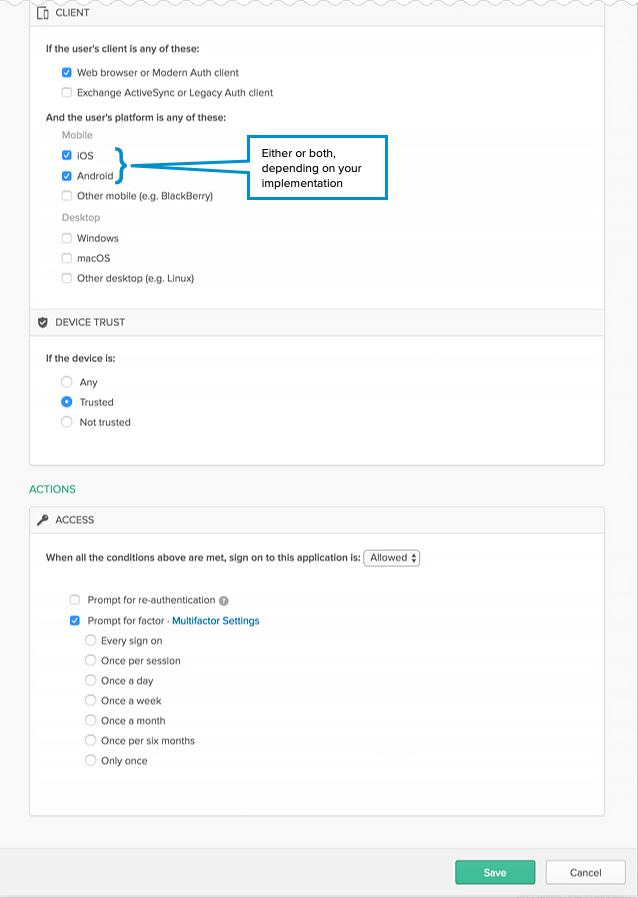
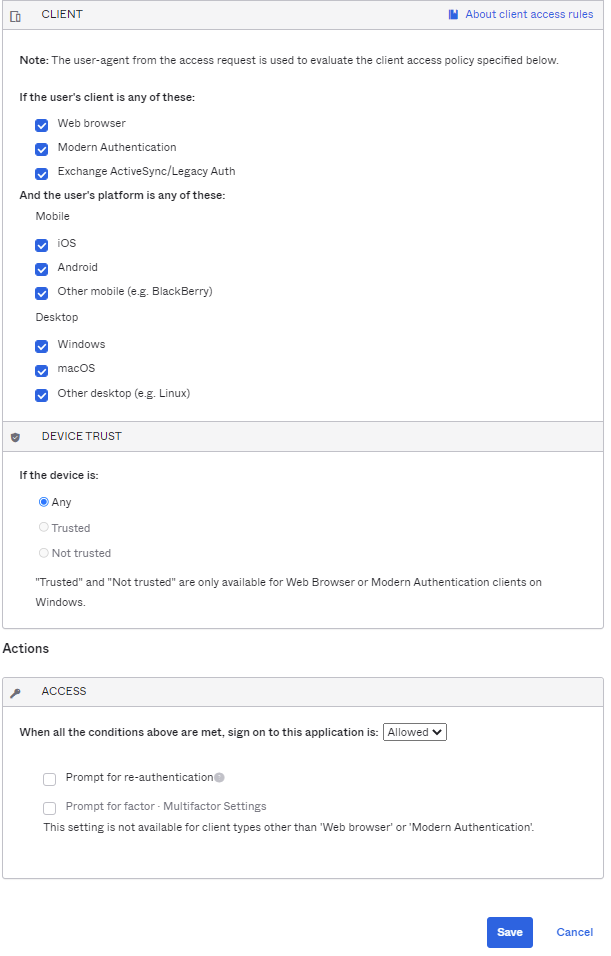
Note: The allowlist example below shows Device Trust rules for managing access to Office 365. For other apps, note that the section If the user's client is any of these is not present.
-
In the Admin Console, go to .
- Click the SAML or WS-Fed-enabled app that you want to protect with Device Trust.
- Click the Sign On tab.
- Scroll down to the Sign On Policy, and then click Add Rule.
- Configure one or more rules using the following example allowlist as a guide.
Example Allowlist
Users with untrusted devices are guided through Workspace ONE enrollment or redirected to the destination of the Enrollment link configured in this step.
Example Rule 1: Web browser; Modern Auth; iOS and/or Android; Trusted; Allow access + MFA
- Enter a descriptive name for the rule.
- Under PEOPLE, specify whether to apply the rule to individuals only or to individuals and groups. The option you select must be the same for all the rules you create for this example.
- Under LOCATION, specify the user location to which the rule will apply. The option you select must be the same for all the rules you create for this example.
- Under CLIENT, configure the following settings:
- Web browser: Selected
- Modern Auth client: Selected
- Exchange ActiveSync client: Unselected
- Mobile
- iOS: Selected.
- Android Selected
- Other mobile: Unselected
- Desktop
- Windows: Unselected
- macOS: Unselected
- Other desktop: Unselected
- Under DEVICE TRUST, configure the following:
You can select the Trusted and Not trusted options in the Device Trust section only if all of the following options in the Client section are unselected:
- Exchange ActiveSync or Legacy Auth client
- Other mobile (for example, BlackBerry)
- Other desktop (for example, Linux)
- Any: Unselected
- Trusted: Unselected
- Not trusted: Unselected
- Configure Access:
- Allowed: Selected
- Prompt for factor: Selected
- Click Save.
- Create Rule 2.
Example Rule 2: Web browser; Modern Auth; All platforms except iOS and/or Android; Any Trust; Allow access + MFA

- Enter a descriptive name for the rule.
- Under PEOPLE, select the same People option that you selected in Rule 1. The option you select must be the same for all the rules you create for this example.
- Under LOCATION, select the same Location option that you selected in Rule 1. The option you select must be the same for all the rules you create for this example.
- Under CLIENT, configure the following settings:
- Web browser: Selected
- Modern Auth client: Selected
- Exchange ActiveSync client: Unselected
- Mobile
- iOS: Unselected
- Android Selected
- Other mobile Selected
- Desktop
- Windows: Selected
- macOS: Selected
- Other desktop: Selected
- Under DEVICE TRUST, configure the following:
You can select the Trusted and Not trusted options in the Device Trust section only if all of the following options in the Client section are unselected:
- Exchange ActiveSync or Legacy Auth client
- Other mobile (for example, BlackBerry)
- Other desktop (for example, Linux)
- Any: Selected
- Trusted: Unselected
- Not trustedUnselected
- Configure Access.
- Allowed is selected.
- Prompt for factor is selected.
- Click Save.
- Create Rule 3.
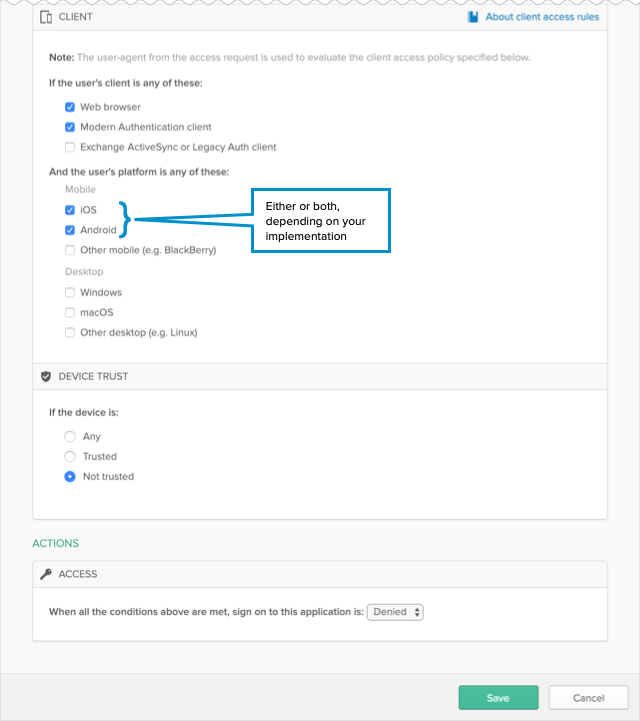
Example Rule 3: Web browser; Modern Auth; iOS and/or Android; Not Trusted; Deny access
- Enter a descriptive name for the rule.
- Under PEOPLE, select the same People option that you selected in Rule 1. The option you select must be the same for all the rules you create for this example.
- Under LOCATION, select the same Location option that you selected in Rule 1. The option you select must be the same for all the rules you create for this example.
- Under CLIENT, configure the following settings:
- Web browser: Selected
- Modern Auth client: Selected
- Exchange ActiveSync client: Unselected
- Mobile
- iOS: Selected
- Android: Selected
- Other mobile: Unselected
- Desktop
- Windows: Unselected
- macOS: Unselected
- Other desktop: Unselected
- Under DEVICE TRUST, configure the following:
You can select the Trusted and Not trusted options in the Device Trust section only if all of the following options in the Client section are unselected:
- Exchange ActiveSync or Legacy Auth client
- Other mobile (for example, BlackBerry)
- Other desktop (for example, Linux)
- Any: Unselected
- Trusted: Unselected.
- Not trusted: Selected.
- Configure Access.
Denied is selected.
- Click Save.
Example Rule 4: Default sign on rule – Any client, All platforms; Any Trust; Allow access
The Default sign on rule is already created and cannot be edited. In this example, the Default rule is never reached because it is effectively negated by Rule 3.
Configure Default Access Policy in Workspace ONE Access
Update the default access policy in Workspace ONE Access to include policy rules for iOS and Android devices. The default access policy governs the behavior of the Workspace ONE catalog. Configuring mobile SSO policy rules is mandatory as it is part of passing device trust information to apps.
Create policy rules for iOS and Android with Mobile SSO as the authentication method and with Okta authentication as the fallback method. Also configure the rules for Workspace ONE app and Hub app, and Web browser. Make sure that the policy rules are in the correct order.
- Log in to the Workspace ONE Access console as the System administrator.
- Click the Identity & Access Management tab, then click the Policies tab.
- Click Edit Default Access Policy.
- In the Edit Policy wizard, click Configuration.
- Click Add Policy Rule and create a policy rule for iOS devices.
- Set Mobile SSO (iOS) as the first authentication method and Okta authentication as the fallback authentication method.
If a user's network range is ALL RANGES and the user is accessing content from iOS, then perform the action Authenticate using and the user may authenticate with Mobile SSO (iOS).
If the preceding method fails or is not applicable, then users authenticate with Okta Auth Method.
Note: For Okta Auth Method, select the authentication method you created for the Okta IdP in Complete creating a new Identity Provider in Workspace ONE Access. - Click Save.
- Set Mobile SSO (iOS) as the first authentication method and Okta authentication as the fallback authentication method.
- Click Add Policy Rule and create a similar policy rule for Android devices.
- Set Mobile SSO (Android) as the first authentication method and Okta authentication as the fallback authentication method.
If a user's network range is ALL RANGES and the user is accessing content from Android, then perform the action Authenticate using with Mobile SSO (Android).
If the preceding method fails or is not applicable, then users authenticate with Okta Auth Method.
- Click Save.
- Set Mobile SSO (Android) as the first authentication method and Okta authentication as the fallback authentication method.
- Configure the policy rule for Workspace ONE app and Hub app.
- Click the policy rule for Workspace ONE app and Hub app to edit it.
- Configure the rule.
If a user's network range is ALL RANGES and the user is accessing content from Workspace ONE app or Hub app, then perform this action: Authenticate using
with Mobile SSO (for iOS).
If the preceding method fails or is not applicable, then users authenticate with Mobile SSO (for Android).
If the preceding method fails or is not applicable, then use Okta Auth Method.
- Arrange the policy rules in the following order, listed from top to bottom:
- Workspace ONE app or Hub app iOS or Android
- iOS or Android
- Web browser
Example of how to configure settings for Native Android apps
To provide the best user experience for users on Android devices, you can configure certain settings for the Android mobile SSO flow.
Native Android apps require the Workspace ONE Tunnel to be downloaded and installed on end users' devices. As a best practice for a Workspace ONE and Oktaintegration environment, configure the Auto deployment setting for each native Android app so that the app and tunnel are automatically deployed on users' devices after they enroll. Also enable Managed Access for the apps.
You configure these settings in the Workspace ONE console.
- In Workspace ONE UEM, go to the page.
- Click the app name.
- Click Assign.
- Click Add Assignment to add a new assignment or select the assignment to edit and click Edit.
- Configure the assignment according to your needs and include the following selections as a best practice:
- App Delivery Method: AUTO
- Managed Access: ENABLED
- App Tunneling: ENABLED
When you enable App Tunneling, you also need to select the VPN configuration profile to use for the app.
Example:
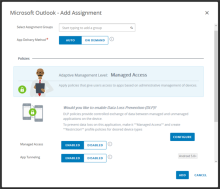
- Save the assignment.

After users enroll their devices, the app appears in the catalog. The app icon indicates that the tunnel is included. When users install the app, both the app and the tunnel are installed.