Authorization
Authorize this connector by creating a connection to your Okta account. You can reuse this connection the next time that you build a flow with this connector.
-
If you want to create a connection for the current Okta org, see Create a connection from the current Okta org.
-
If you want to create a connection to a different Okta org, see Authorize an account from another Okta org.
For additional information, see Guidance for Okta connector.
Create a connection from the current Okta org
Before you begin
-
You must be assigned to the Okta Workflows OAuth app.
-
The necessary scopes must be granted in the Okta Workflows OAuth app. See Grant or revoke scopes and Scopes for Okta connector cards.
-
You must have super admin credentials.
Note:In addition to the initial authorization of the connector, reauthenticating this connection requires an account with either Okta super admin, Workflows Administrator, or Connection Manager privileges.
-
You also need the following information for authorizing your Okta account:
-
Domain: The domain of your Okta org, without the
https://prefix or the-adminportion of the URL. For example, if your Okta Admin Console URL ishttps://yourcompany.okta.com, then your domain isyourcompany.okta.com. -
Client ID and Client Secret: The client ID and client secret from your Okta Workflows OAuth app.
You can retrieve these values through the Okta Workflows OAuth application:
-
In the Admin Console, go to .
-
Open the Okta Workflows OAuth application.
-
Click the Sign On tab and copy the Client ID and Client secret values in your Okta connection details.
-
-
Authorize a connection
-
In the Okta Workflows Console , go to Connections.
-
Click New Connection to see a list of all available connectors.
-
Select the Okta connector.
-
In the New Connection window, enter a Connection Nickname. This is the display name that appears in your connections list.
-
Enter Domain, Client ID, and Client Secret values.
-
Click the Permissions tab and choose either Use default scopes or Customize scopes (advanced).
-
Use default scopes: This option includes the scopes necessary to run any of the Okta connector cards.
-
Customize scopes (advanced): Choose this option if you want to customize the scopes for this connection. You can also Manually add scopes that aren't in the default scope list. The connection creation fails if you attempt to add an invalid scope, for example, a scope that doesn't exist.
To grant scopes: Before you create the connection, grant those scopes in the Okta Workflows OAuth app and select the scopes here in the Permissions tab.
To revoke scopes: Before you create the connection, revoke those scopes from the OAuth app or clear the selected scopes in the Permissions tab.
If you don't grant the scopes in the OAuth app, you can create or reauthorize the connection, but it won't include those ungranted scopes.
Note:Attempting to execute a card without the required scopes results in an Insufficient Scope error.
-
-
Click Create.
The new connection appears in the Connections list.
Reauthorize a connection
For an existing connection, you must reauthorize the connection to pick up any scope changes.
Reauthorizing any existing connection without changing scopes simply inherits the scopes of the previous authorization.
Authorize an account from another Okta org
To create a connection for an Okta org different from your current org, follow these steps:
-
Create an OpenID Connect web app in the target Okta org.
-
Configure the OpenID Connect web app.
-
Authorize an account from the target Okta org.
If you want to create a connection for the current Okta org, see Create a connection from the current Okta org.
Create an OIDC web app in the target Okta org
-
In the Admin Console, go to .
-
Click Create App Integration.
-
In the Create a new app integration window, select OIDC - OpenID Connect for the Sign-on Method, and set the Application type to Web application.
-
Click Next.
-
On the New Web App Integration page, enter your Application name. This is the display name shown for your app.
-
Enter the Sign-in redirect URIs for the app. Enter the URI for the location where the app resides, not the target org. For example, to connect to an Okta preview org from a production org, use
https://oauth.workflows.okta.com/oauth/okta/cb.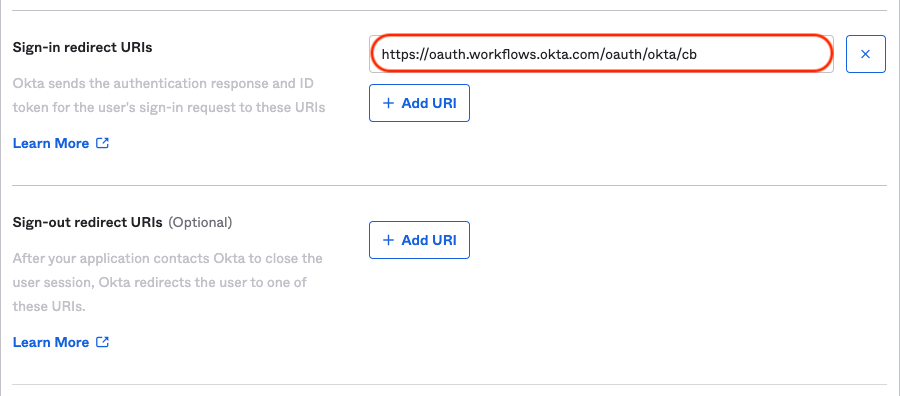
-
Click Save.
The app is created and appears on the Applications page.
Configure the OIDC web app
-
In the Admin Console, go to .
-
Select your newly created application.
-
On the General tab, click Edit.
-
In the Allowed Grant Types list, select Refresh Token.
-
Click Save.
-
Select the Assignments tab, and then click Edit.
-
Assign the app to the appropriate users. You can assign it to individual people or to groups.
Note:The user must have continuous super admin privileges.
-
Save your assignments.
-
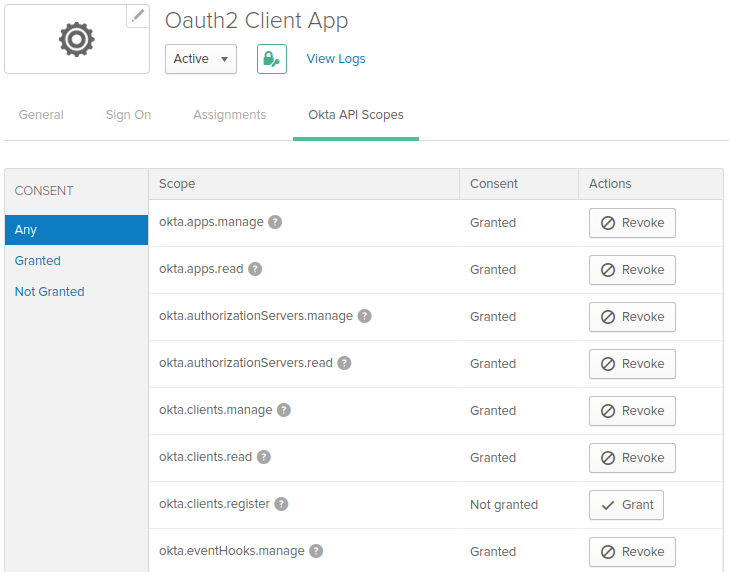
On the Okta API Scopes tab, grant consent for the scopes required for your use cases. See List of default scopes.
-
Click Save.
The app is now configured and an assigned user can create a connection for this org.
Authorize an account from the target Okta org
Before you begin
-
You must be assigned to the OpenID Connect web app created in the previous procedures.
-
The necessary scopes must be granted in the Okta Workflows OAuth app. See Grant or revoke scopes.
-
You must have super admin credentials.
Note:In addition to the initial authorization of the connector, reauthenticating this connection requires an account with either Okta super admin, Workflows Administrator, or Connection Manager privileges.
-
You also need the following information for authorizing your Okta account:
-
Domain: The domain of your Okta org, without the
https://prefix or the-adminportion of the URL. For example, if your Okta Admin Console URL ishttps://yourcompany.okta.com, then your domain isyourcompany.okta.com. -
Client ID and Client Secret: These are the client ID and client secret values found in your OpenID Connect app. To find these values:
-
In the Admin Console, go to .
-
Open the Your OpenID Connect web app application.
-
Click the Sign On tab and copy the Client ID and Client secret values in your connection details.
-
-
Procedure
-
In the Okta Workflows Console , go to Connections.
-
Click New Connection to see a list of all available connectors.
-
Select the Okta connector.
-
In the New Connection window, enter the Connection Nickname. This is the display name that appears in your connections list.
-
Enter Domain, Client ID, and Client Secret values.
-
Click the Permissions tab and choose either Use default scopes or Customize scopes (advanced).
-
Use default scopes: This option includes the scopes necessary to run any of the Okta connector cards.
-
Customize scopes (advanced): Choose this option if you want to customize the scopes for this connection. You can also Manually add scopes that aren't in the default scope list. The connection creation fails if you attempt to add an invalid scope, for example, a scope that doesn't exist.
To grant scopes: Before you create the connection, grant those scopes in the Okta Workflows OAuth app and select the scopes here in the Permissions tab.
To revoke scopes: Before you create the connection, revoke those scopes from the OAuth app or clear the selected scopes in the Permissions tab.
If you don't grant the scopes in the OAuth app, you can create or reauthorize the connection, but it won't include those ungranted scopes.
Note:Attempting to execute a card without the required scopes results in an Insufficient Scope error.
-
-
Click Create.
The new connection appears in the Connections list.
Reauthorize a connection
For an existing connection, you must reauthorize the connection to pick up any scope changes.
Reauthorizing any existing connection without changing scopes simply inherits the scopes of the previous authorization.