Configure Single Sign-On for Office 365
You can enable users to sign on to Office 365 using one of the following methods:
- Secure Web Authentication (SWA)
- WS-Federation - automatic
- WS-Federation - manual
SWA is a single sign-on (SSO) method developed by Okta. It stores the end user credentials using strong encryption combined with a customer-specific private key. When the end user clicks the app, Okta securely signs them in using the encrypted credentials. See SWA app integrations.
WS-Federation defines mechanisms to transfer identity information using encrypted SOAP messages. It doesn't require a separate password for Office 365. See WS-Fed app integrations.
Before you begin
- Complete Add Office 365 to Okta.
-
Bring users into Okta: You can import users from a directory such as Active Directory (AD) or an app such as Salesforce. Currently, Okta doesn't support imports that take longer than two hours to complete. Contact Support if you have this type of import. You can also create users directly in Okta. See the following for more information:
- Disable the Microsoft MFA for the Office 365 admin account that you're using for WS-Federation. If the MFA is enabled, it can break provisioning and SSO setups in Okta.
- If you're integrating an Azure Active Directory tenant that has the Web Sign-in option Enabled in the Microsoft Endpoint Manager admin center, ensure that its configuration settings allow your Okta org URL. See the Microsoft documentation for Policy CSP - Authentication.
Start this task
-
You can use one of the following methods to configure SSO for Office 365:
- After you've configured the SSO, you need to Test SSO configuration.
Configure SSO with Secure Web Authentication
You can enable users to sign in to Office 365 using either SWA or WS-Federation. When possible, Okta recommends WS-Federation because it's more secure than SWA.
- Go to .
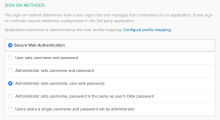
- In Sign on Methods, select Secure Web Authentication.
- Select the appropriate option for username and password setup. See Secure Web Authentication.
- Map username format as explained in section Test provisioning.
- Click Save.
Configure SSO with WS-Federation
There are two ways of configuring WS-Federation: automatic and manually. You can allow Okta to automatically configure WS-Federation or you can manually configure it using the customized PowerShell script provided by Okta. Okta recommends configuring WS-Federation automatically because back-end procedures are managed by Okta.
Configure SSO using WS-Federation - automatic method
First-time setup
If you're configuring WS-Federation for the first time, follow these steps to authenticate and select domains.
-
In the Admin Console, go to .
-
Locate and select the Microsoft Office 365 app.
-
In the General Settings tab, complete the required fields and click Next to go to the Sign-On Options tab.
- In the Sign on methods section, select .
- Optional. Click View Setup Instructions. The procedure to configure Office 365 WS-Federation opens in a new window.
- Optional. Refer to the Prepare your domain for federated authentication section of the procedure to ensure that you have correctly prepared your domains for federation.
- Back on the Sign-On Options tab, click Start federation setup. You're redirected to the Microsoft account sign-in page.
- Sign in to Microsoft as a global administrator for your Microsoft tenant.
- Read and accept the requested permissions.
- Click Federate domains.
- In the dialog that appears, select the domains that you want to federate from the dropdown list.
- Click .
- Click Done.
Edit an existing configuration
If you've previously configured WS-Federation, follow these steps to make changes.
-
Go to . Ensure that is selected in the Sign on Methods.
- To view federated parent and child domains in read-only mode, click View selected domains.
- To add or remove domains, click Manage verified domains.
- To re-authenticate with a different Microsoft Office 365 account, click Re-authenticate with Microsoft Account.
- Click Save.
Ensure your administrator credentials for the Office 365 aren't in the domain you're federating to avoid being locked out.
Being locked out of the Office 365 domain means that you can't verify your identity in the Microsoft 365 Apps admin center. This is because you need to verify your identity through Okta, where you're recognized as a user, not an admin. Make sure that you're using administrative credentials for an account that belongs to your default Office 365 domain. The default tenant domain is yourtenant.onmicrosoft.com.
Configure SSO with WS-Federation - manual method
If you enabled the MS Graph federation feature, the PowerShell commands are different.
- Go to .
- In Sign on methods, select . Click Continue with Manual to confirm your selection.
If you switch from automatic to manual configuration, Okta removes all currently federated domains for this Office 365 instance. You must use PowerShell to manually re-federate your domains to restore SSO access. Manual configuration supports only one federated domain per Office 365 instance.
- Click View Setup Instructions for the PowerShell command that's customized for your domain.
- Copy this command to use in PowerShell.
In PowerShell:
- Enter Connect-MgGraph -Scopes Directory.AccessAsUser.All.
- Enter your Office 365 Global Administrator username and password.
- Enter the copied customized PowerShell command.
- Ensure that the federation is successful by entering this command:Get-MgDomainFederationConfiguration -DomainId yourdomain.name
Test SSO configuration
- Sign in to Okta as a test user.
- Open Office 365 from the End-User Dashboard.
- Ensure that the user is successfully logged in to the Office 365 account.


