Build an httpHelper flow
For each action card that you build in Connector Builder, the httpHelper flow manages authentication and any HTTP requests.
This supports the principle of software development to reduce pattern repetition.
Creating the httpHelper flow involves several tasks:
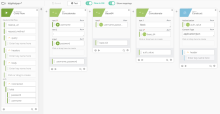
Here's an example of what a complete httpHelper flow looks like in Okta Workflows:
Before you begin
To build this common flow, first you need to:
-
Create the connector. See Create a connector
-
Build authentication. See Authentication.
Start this task
Create the httpHelper flow
-
Create a flow under the Flows tab by clicking + New Flow.
-
Click Add event and select Helper Flow.
-
Click Save in the toolbar and name the flow httpHelper.
-
Add a description to the flow so other builders on your team know the purpose of the flow. For example: This flow manages all authentication and http requests for the connector.
-
Check the box Save all data that passes through the flow, and click Save.
-
Add the following input names and data types to the Helper Flow card. Click the area that reads Click or drag to create, add the input name, and press the return key. Then select the type from the dropdown list that appears on the field itself.
-
relative_url, Text
-
request_method, Text
-
query, Object
-
headers, Object
-
body, Object
-
The next task builds out a series of cards to construct the proper objects for the HTTP call. Which option you choose depends on the authentication type you need to use.
Option 1: Build OAuth authentication
-
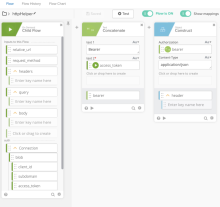
Add a Text Concatenate function card to combine Bearer with your access token.
-
In the text 1 field, enter Bearer . Include the space character, as that is part of the concatenation string.
-
Drag the access_token field from the Helper Flow card into the text 2 field on the Concatenate card.
-
Name the output field bearer by clicking the field's dropdown list and clicking customize. Renaming these fields is a best practice and not a requirement.
-
Add an Object Construct function card after the Concatenate card.
-
Click the area that reads Click or drop here to create and add the label Authorization.
-
Drag the bearer output field from the Concatenate card to this field.
After you do this, you can add any additional headers shared between all HTTP requests. For example, Content-Type, application/json.
-
Rename the output field header by clicking the field's dropdown list and clicking customize.
Option 2: Build basic authentication
-
Add a Text Concatenate function card to combine your username and password with a separating colon.
-
Drag the username field from the Helper Flow card to the text 1 input on the Concatenate card.
-
Manually enter a colon character : into the text 2 field on the Concatenate card.
-
Drag the password field from the Helper Flow card to the area labeled Click or drop here to create on the Concatenate card.
-
Rename the output field of the Concatenate card to username_password or another useful name.
-
Add a Text Base64 function card. Drag the username_password field from the Concatenate card into the text input of the Base64 card.
-
Rename the output field of the Base64 card to base_64 by clicking the field's dropdown list and clicking customize.
-
Add another Text Concatenate function card to the flow.
-
In the text 1 field, type Basic , including the space character.
-
Drag the base_64 output from the Base64 card into the text 2 field of the second Concatenate card.
-
Rename the output field of the second Concatenate card to auth_value.
-
Add an Object Construct after the second Concatenate card.
-
Click the Click or drop here to create area and add a label named Authorization.
-
Drag the auth_value output field from the second Concatenate card to this field.
After you do this, you can add any additional headers shared between all HTTP requests to your service. For example, Content-Type, application/json.
-
Rename this output field header by clicking the field's dropdown list and clicking customize.
Option 3: Build custom (API key) authentication
-
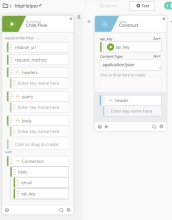
Add an Object Construct to the new flow.
-
Click the area that reads Click or drop here to create and add the name of the key to include in your header. For example, api_key.
-
Drag the api_key field from the Helper Flow card to this field.
After you do this, you can add any additional headers shared between all HTTP requests. For example, Content-Type, application/json.
Option 4: Multiple authentications
-
Add a Branching Lookup function card to look up your auth selection keys.
-
Drag the Selected Auth field from the Helper Flow card to the Value field of the Branching Lookup card.
-
Copy and paste the value of each auth selection key into the When Value is field and type a result.
-
Type No Auth in the Otherwise Result is field.
-
Add an If/ElseIf function card.
-
Create an equal to condition for each auth selection key.
-
Drag the Result output from the Branching Lookup function card to the value a field of each condition. Set value b to the corresponding value of the Then Result is field.
-
Follow the steps in options 1 through 3 and add the applicable authentication to each condition.
See Build multiple authentications.
Finish the httpHelper flow
-
Add an Object Merge function card to your flow.
-
Drag the header output from the Construct function card into the object 1 field of the Merge card.
-
Drag the headers output from the Helper Flow card into the object 2 field of the Merge card. This allows you to pass any necessary endpoint-specific headers.
-
Rename the output field on the Merge card to merged_header.
-
Add a Text Concatenate card to your flow.
-
In the text 1 field, enter the base URL for the flow, without including a specific endpoint. For example, https://api.spotify.com/v1.
-
Drag the relative_url field from the Helper Flow card into the text 2 field.
-
Rename the output field on this card to full_url.
-
Add a Raw Request action card from the API Connector.
-
Drag the full_url output field from the Concatenate card into the URL input of the Raw Request card.
-
Drag the request_method output field from the Helper Flow card into the Method input of the Raw Request card.
-
Drag the query output field from the Helper Flow card into the Query input of the Raw Request card.
-
Drag the merged_header field from the Merge card into the Headers input of the Raw Request card.
-
Drag the body field from the Helper Flow card into the Body input of the Raw Request card.
-
To add these three fields to the Flow Control Return card, click the area that reads Click or drop here to create:
-
status_code, Number
-
headers, Object
-
body, Object
-
-
Drag the corresponding outputs from the Raw Request card into these newly created fields.
-
Save and test your flow by manually adding a relative URL, a request method, and any other request data to the test dialog.


