Build a polling monitor event flow
Polling monitor events are designed to automatically run at regular intervals, querying an API for records that have changed since the last run. Here's how they work:
-
Initialization and execution: When activated, the polling monitor event calls the API to fetch a collection of records and sets a cursor (typically a time stamp) to mark the current point in time. On subsequent runs, the cursor is used to modify the API call so that it returns only records changed after the last run.
-
Cursor functionality: The cursor is a persistent piece of metadata that helps filter data between iterations. For example, if each record includes a
createdAttime stamp, the cursor ensures that only records with a time stamp later than the last recorded cursor value are processed. After each iteration, the cursor updates to the new time of execution. -
Use cases: Polling monitor events are useful for remote service APIs that don't support real-time webhooks. They allow for regular checks on events like user creation by querying for records within a specified time range (using parameters such as
startAtandendAt). -
Practical applications: In Okta Workflows, these events enable you to create event cards for connectors that trigger on new events, such as the creation, updating, or deletion of records.
Note:A cursor has a 10 KB size limit. Using cursors to store large amounts of data may cause errors that require your users to reactivate their flow and reset the cursor.
Overall, polling monitor events provide a systematic approach to handling new and changed records by using scheduled API calls and a persistent cursor to ensure that only recent changes are processed.
Before you begin
-
You must be a super admin with access to Okta Workflows.
-
If you haven't already created a connector, follow these steps to create one:
-
From the Okta Workflows Console, open the link for the Connector Builder console.
-
In Connector Builder, click the
 icon to create a connector. Give your new connector a unique name and a useful description.
-
-
Ensure that the connector has the basic foundation and authentication elements provided through the tasks in the Get started quickly with the basics section.
Procedure
-
On the Flows tab of your new connector, create a flow by clicking + New Flow.
-
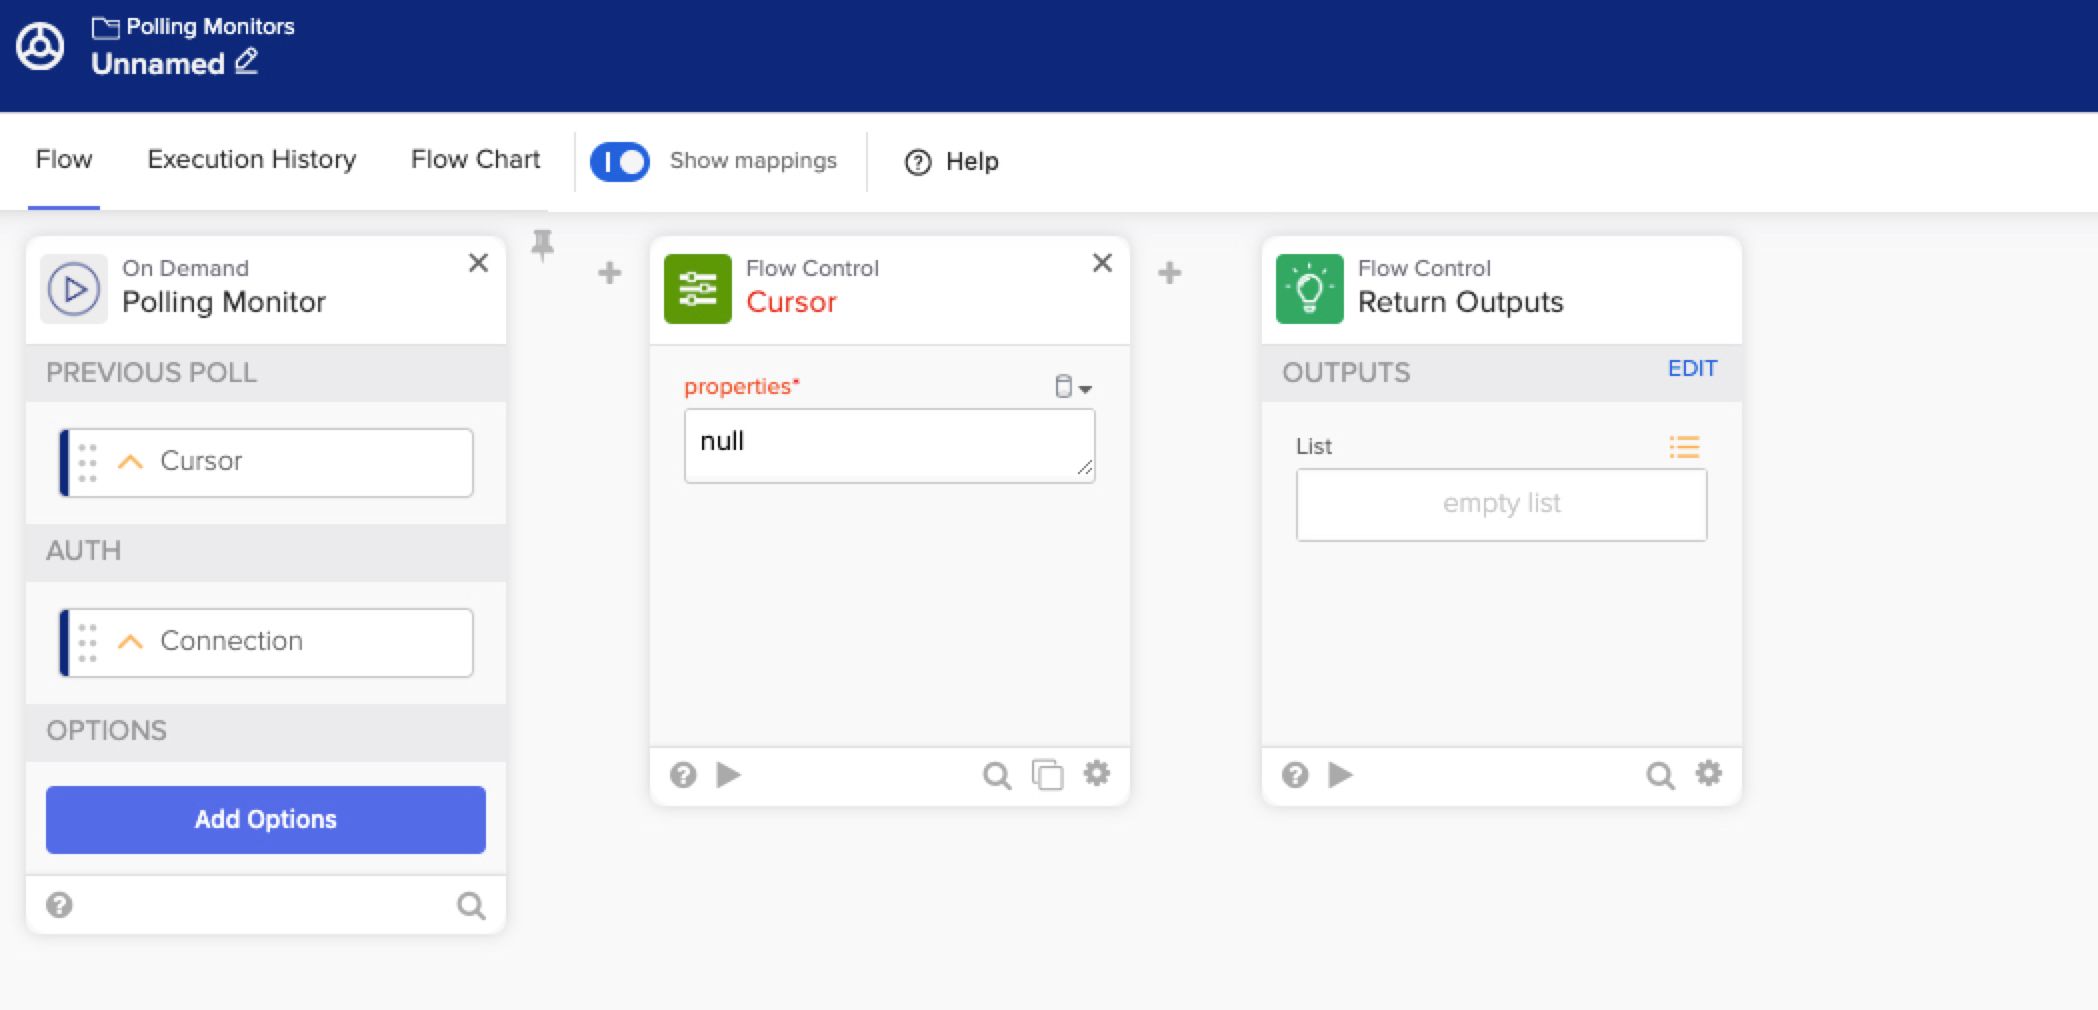
Click Add event. From the Events choices, select Polling Monitor.
The Cursor and Return Outputs flow control function cards are automatically added to your flow. See the initial state in the example.
-
Click Add Options to declare any options for the Polling Monitor card.
-
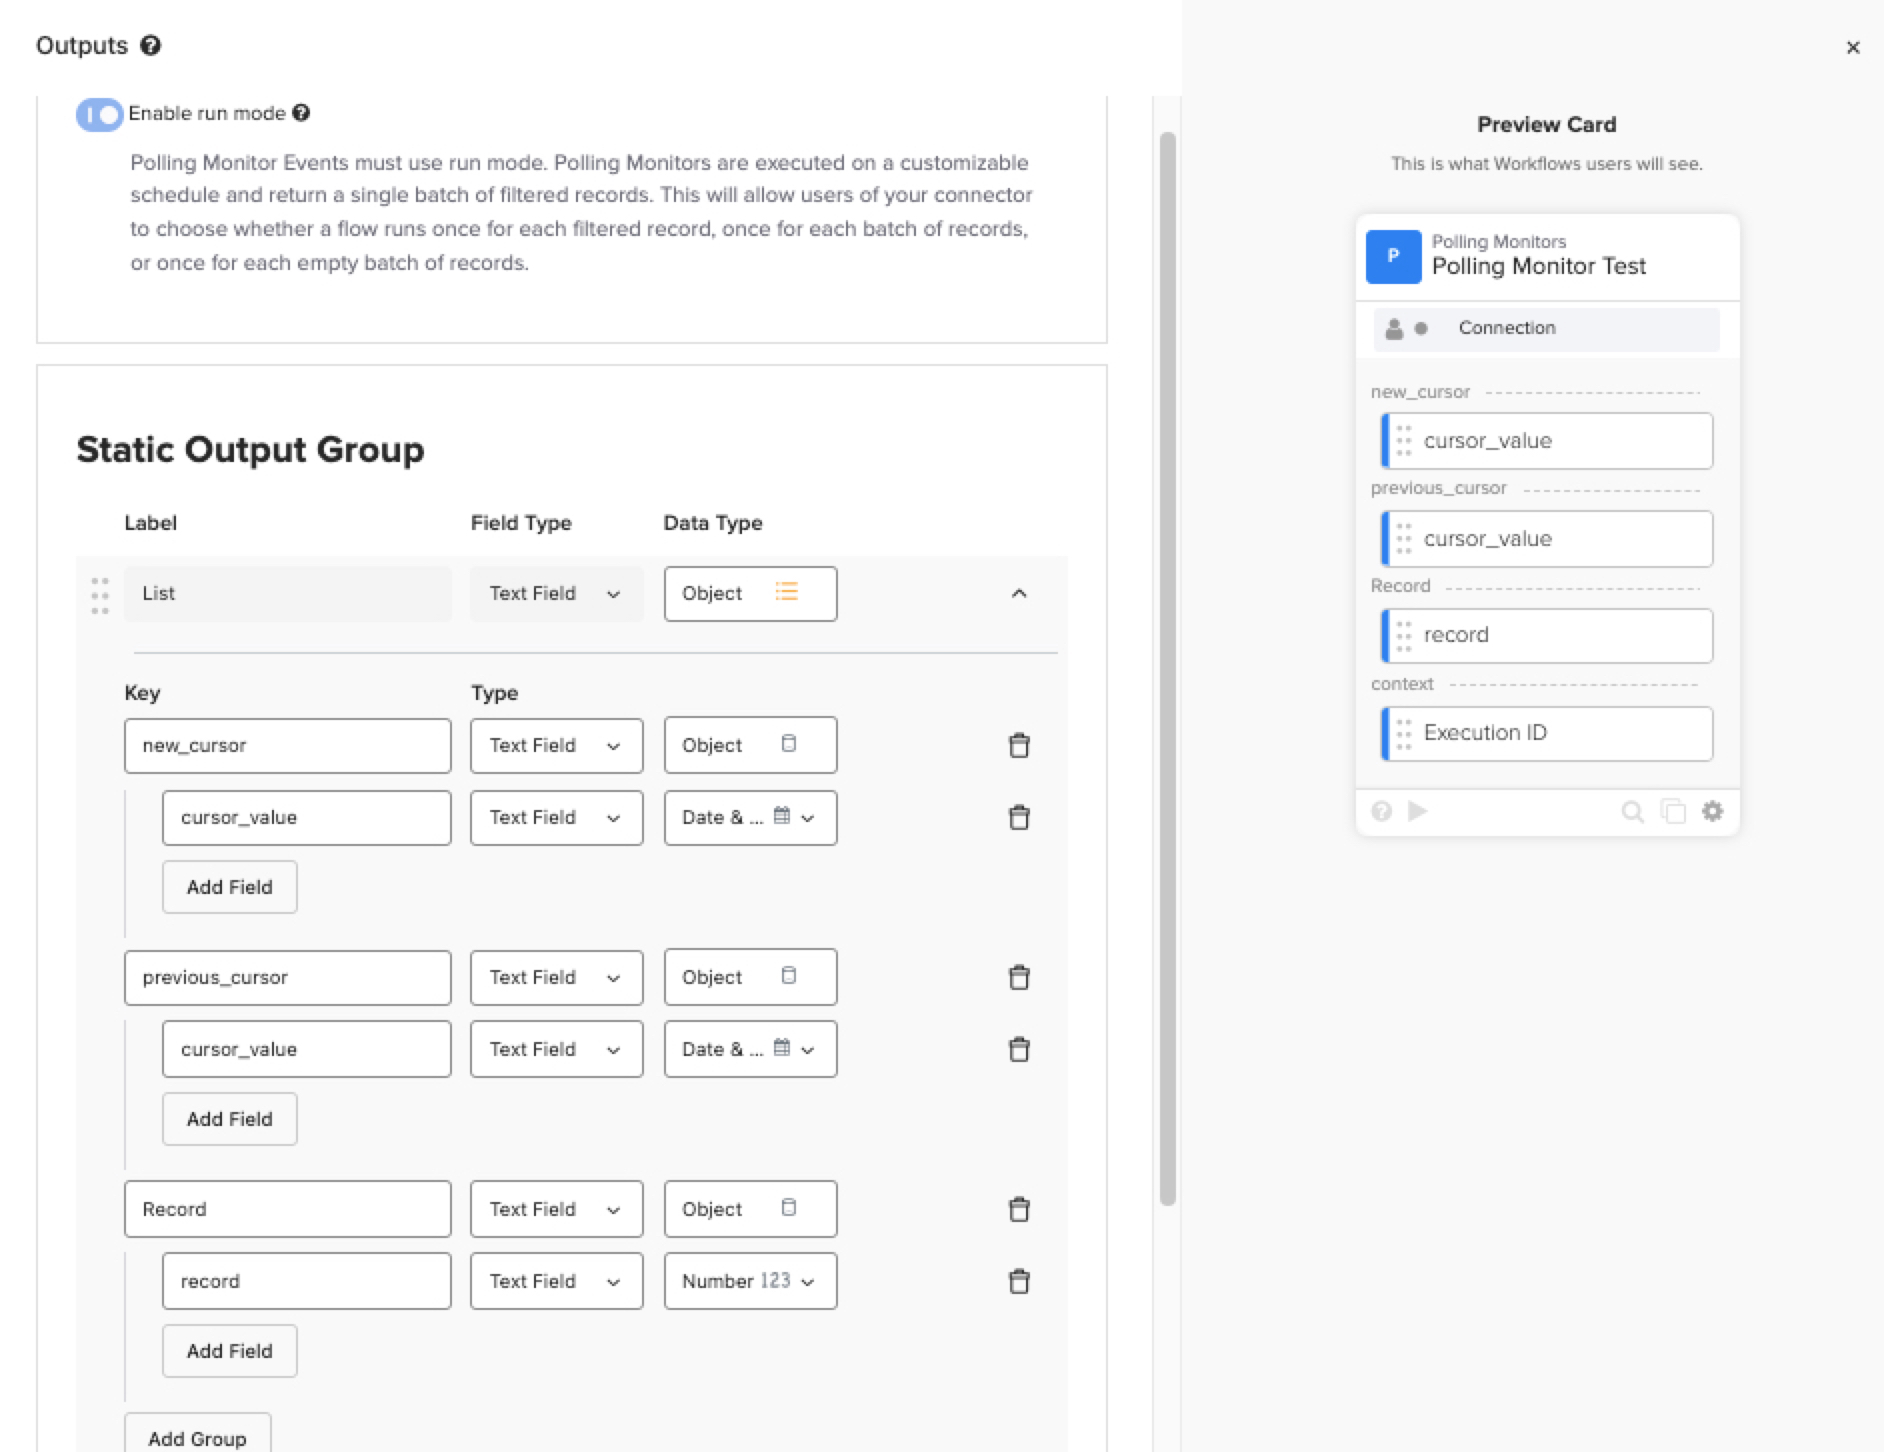
Click Add Outputs on the Return Outputs card to configure the output groups and fields returned by the polling monitor event flow.
-
Polling monitor events always have an active run mode, so the Enable run mode toggle is automatically enabled and can't be changed. See Enable run mode for polling monitors.
-
In the Outputs dialog, you can specify the output values you want the polling monitor to return. Click Add group to create an output group and Add Field to add each field in the group. If the intended returned output is an object, the groups form the top-level key value pairs in the object and the fields form the second-level key value pairs.
-
Click Apply to save the changes to your Return Outputs card.
-
-
Build out your polling monitor flow:
-
Add a Date & Time Now function card to generate a new value for your
endAtfield. This assumes that you're using time stamps as the filters for your API query. -
Construct a query filter for your HTTP call with
startAtandendAtquery filters. Drag the Cursor output of the Polling Monitor event card as the input for thestartAtdate.If your cursor is an object, rather than a time stamp, use an Object Get card to retrieve the time stamp from your cursor object.
-
Add a Call Flow card to run your connection's existing httpHelper flow and call the API of the remote service.
-
Drag your constructed query filter as input for the Call Flow card's query field.
-
Use the connection defined on the Auth field of the Polling Monitor event card.
-
-
Use the Cursor card's properties input to save the new Now value as the cursor for the next scheduled execution. This overwrites the original Cursor value.
-
If your cursor is an object rather than a time stamp, use an Object Construct card to update the time stamp inside your cursor object.
-
After connector deployment, each active external flow that uses this Polling Monitor event card retains a unique cursor value.
-
-
Format the payload response from your API call into a list of objects. Each object contains the top-level keys for your groups, and the second-level keys for your group fields.
-
Map the formatted API response into the List field of the Return Outputs card.
-
-
Click Save and name the flow.
Example
This example of a polling monitor flow uses a cursor object to store a time stamp and record information about new users added to a remote service.
This is the initial view when you create a Polling Monitor event card. It contains the Polling Monitor event card, along with the Flow Control Cursor and Return Outputs cards.
The following breaks down how to construct this polling monitor event flow:
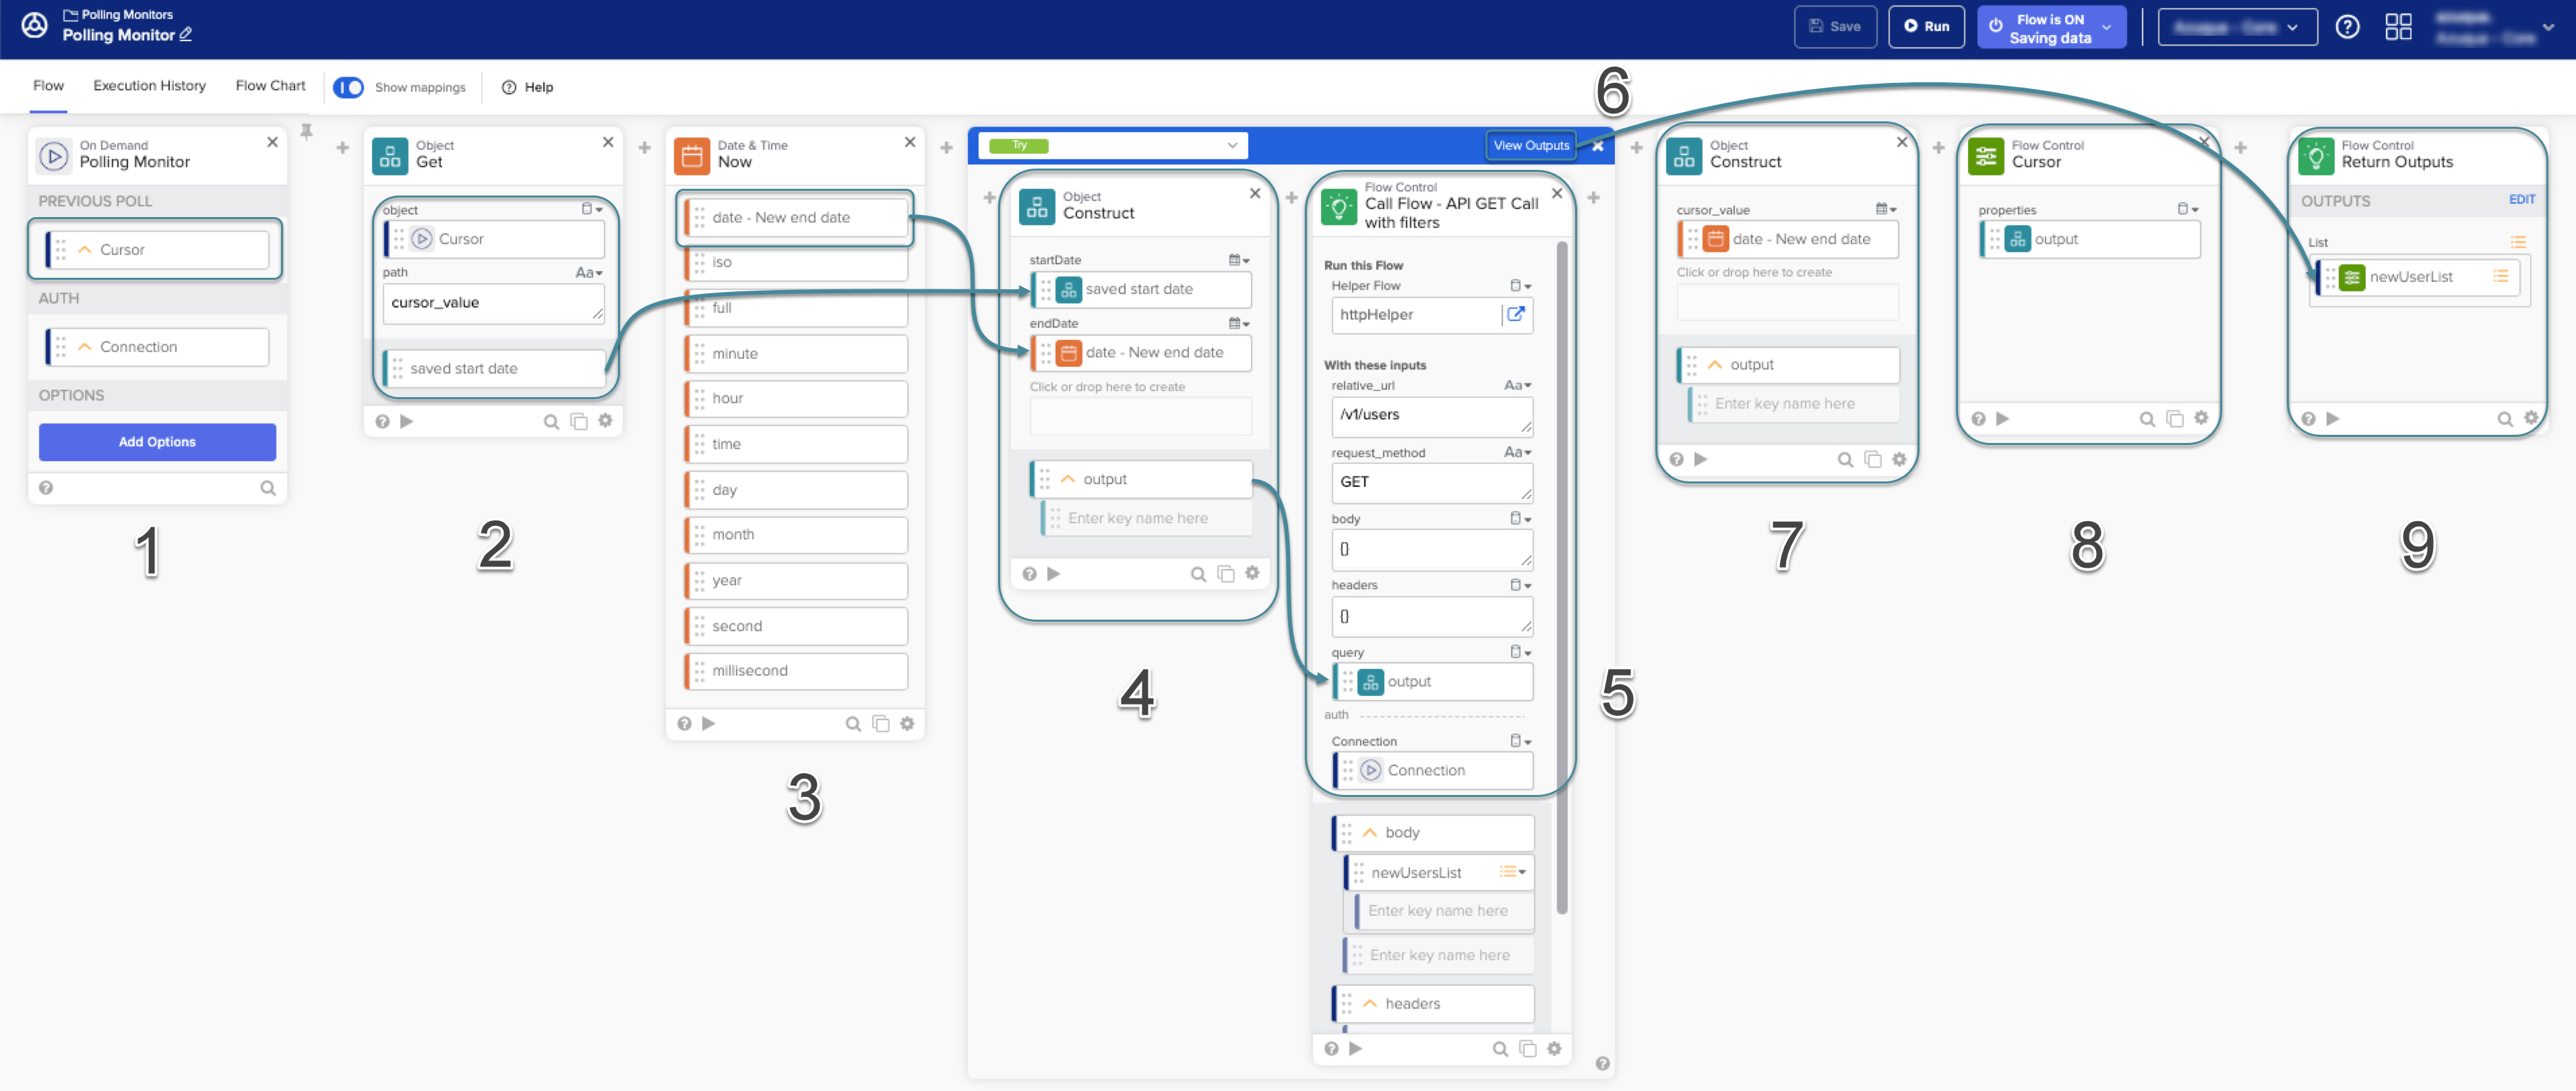
-
On the Polling Monitor event card, the Cursor field type is an
Object, because the cursor contains record information in addition to the time stamp. -
An Object Get function card retrieves the time stamp from the cursor object, which is stored in a key called
cursor_value.In this example, the card output is a Date & Time type field called
saved start date. -
A Date & Time Now card generates a new time stamp for this execution of the polling monitor. For convenience, the field name is edited to read
date - New end date. -
The
saved start dateanddate - New end datefields combine in an Object Construct card to create a query object calledoutput. -
The Flow Control Call Flow card makes a call to the external API. It uses the
httpHelperflow for your connector, with aGETcall to the/v1/usersendpoint.Construct your API query filter to select records with a time window. For example, here's a query object that checks for user creation events in a one month time period:
{
  "createdBefore": 2025-02-01T00:00:00.000Z,
  "createdAfter": 2025-01-01T00:00:00.000Z
}
The Flow Control Call Flow card uses the Connection provided on the Polling Monitor card for the connection authorization.
In the example, this card returns a list of objects called
newUsersList. -
The cards mentioned in steps 4 and 5 are enclosed in a Try block of a Branching If Error card.
If the API call is successful, the output of the Try card is a list of new users. This list of objects is sent to the Return Outputs card.
The If Error block of this function isn't shown. However, it specifies a process to handle any errors encountered setting the cursor object or making the API call.
-
The Object Construct card updates the cursor object. It replaces the previous time stamp value stored in the
cursor_valuekey with thedate - New end datevalue. This represents the latest time stamp, and the next iteration of the polling monitor uses that value for thesaved start datefield. -
The Flow Control Cursor card updates the Properties value for this particular user's polling monitor flow cursor.
-
The Return Outputs card sends the list of new users back to the flow that called the polling monitor and completes this particular execution.
Test a polling monitor event
To test your polling monitor event in Connector Builder, you can set the Cursor value in the Run dialog.
Enter a value from a previous iteration of the polling monitor execution to simulate the cursor value.
You can also leave the cursor as a null value, to simulate the first execution of the polling monitor.
Next steps