Delegated SCEP for macOS with Microsoft Intune
Configuring a Certificate Authority (CA) allows you to issue client certificates to your targeted devices through your Mobile Device Management (MDM) software. These certificates grant access to specific API endpoints that Okta Verify uses to establish device identity.
|
Purpose |
Okta Device Access certificate |
|
Platform |
macOS |
|
MDM |
Microsoft Intune |
|
SCEP URL |
Delegated |
Before you begin
Make sure that you have access to the following:
-
Certificates that are deployed for digital signature, but not for other purposes (for example, encryption)
-
Okta Admin Console
-
Microsoft Intune admin center
Start this task
Register the Azure Active Directory app credentials for Okta
-
In Microsoft Azure, click App registrations.
-
Click + New registration.
-
On the Register an application page, enter the following:
-
Name: Enter a meaningful name for the app.
-
Supported account types: Select the appropriate supported account type.
The following procedure uses Accounts in this organizational directory only ([Your_Tenant_Name] only - Single tenant).
-
Redirect URI (optional): Either leave this field blank, or select Web and then enter a redirect URI.
-
Click Register.
-
-
On the app page under Essentials, copy the Application (client) ID.
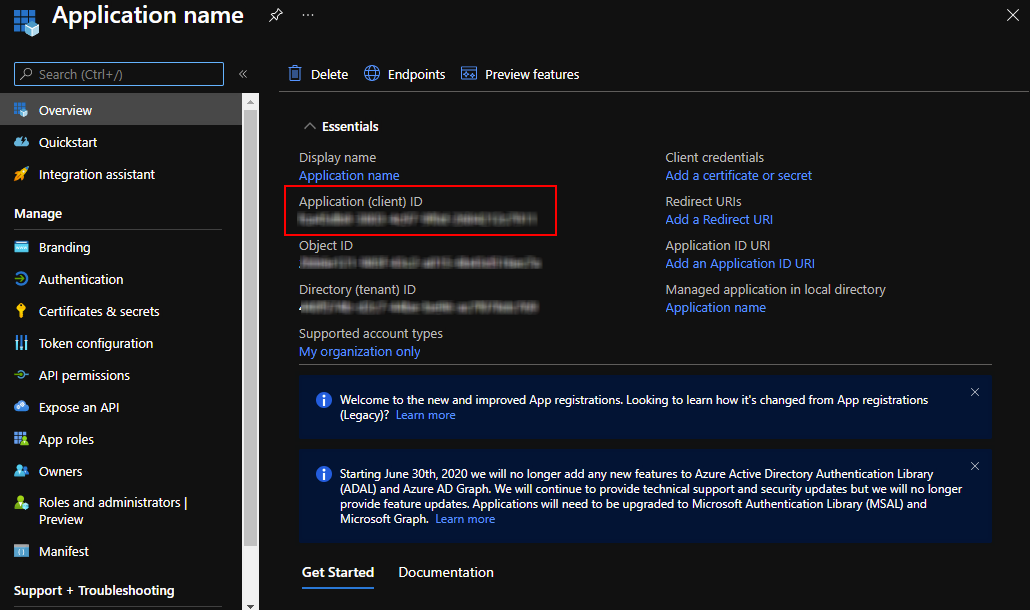
This value is required in the Okta Admin Console in the following task.
-
Add a client secret:
-
In the left pane, click Certificates & secrets.
-
Under Client secrets, click + New client secret.
-
In the Add a client secret section, enter the following:
-
Description: Optional. Enter a description for the client secret.
-
Expires: Select an expiration time period.
-
-
Click Add.
The secret appears under Client secrets.
-
In the Client secrets tab, copy the Value.
-
-
Set the scep_challenge_provider permissions:
-
In the left pane, click API permissions.
-
Click + Add a permission.
-
On the Request API permissions page, scroll down and click Intune.
-
Under What type of permissions does your application require?, click Application permissions.
-
In the Select permissions search field, enter
scep. Select the scep_challenge_provider checkbox.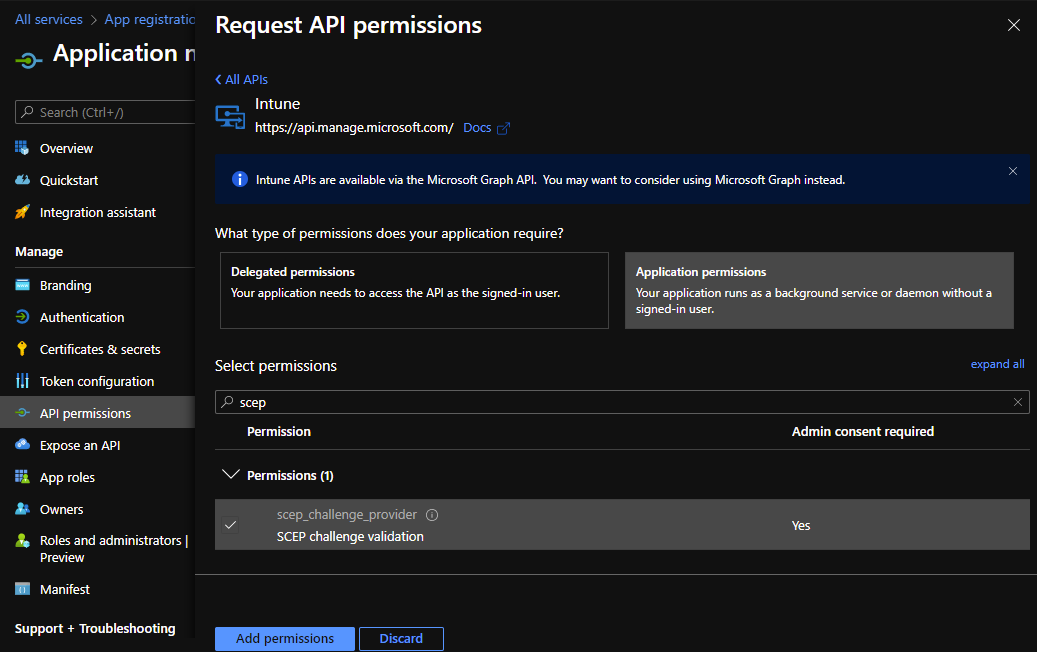
-
Click Add permissions.
-
In the Configured permissions section, click Grant admin consent for [Your_Tenant_Name].
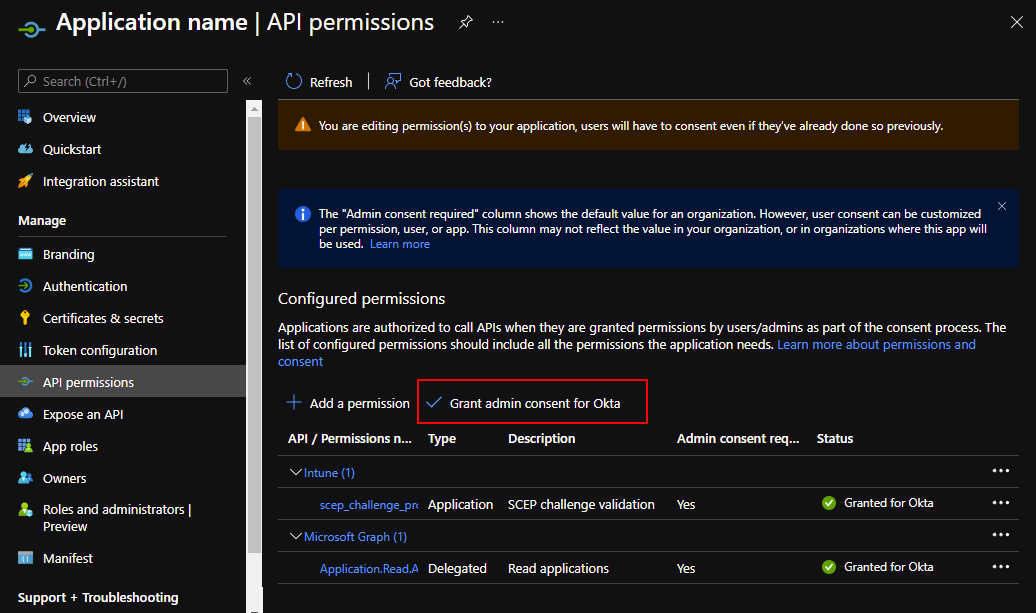
-
Click Yes in the message that appears.
-
-
Set the Microsoft Graph permissions:
-
Click + Add a permission.
-
In the Request API permissions section, click Microsoft Graph.
-
Under What type of permissions does your application require? click Application permissions.
-
In the Select permissions search field, enter
application. Expand the Application list and select Application.Read.All. -
Click Add permissions.
-
In the Configured permissions section, click Grant admin consent for [Your_Tenant_Name].

-
Click Yes in the message that appears.
-
Generate a SCEP URL in Okta
-
In the Admin Console, go to .
-
Select the Device Access tab.
-
Click Add SCEP configuration.
-
Select the following option:
SCEP URL challenge type: Select Dynamic SCEP URL, and then select Microsoft Intune (delegated SCEP).
-
Enter the AAD client ID, AAD tenant, and AAD secret values that you copied from the previous step.
-
Click Generate.
-
Copy and save the SCEP URL.
This URL is needed when you Create a SCEP profile in Microsoft Intune .
Download the x509 certificate from Okta
-
In the Admin Console, go to .
-
Click the Certificate authority tab.
-
In the Actions column for your Okta CA, click the Download x509 certificate icon.
-
Rename the downloaded file so that it includes a
.cerextension.You need the certificate (CER) file when you create a trusted certificate profile in Microsoft Intune.
Create a trusted certificate profile in Microsoft Intune
-
In the Microsoft Intune admin center, go to Devices.
-
Click Configuration profiles.
-
Click + Create profile.
-
On the Create a profile page:
-
Platform: Select macOS .
-
Profile type: Select Templates.
-
In the Template name section, click Trusted certificate.
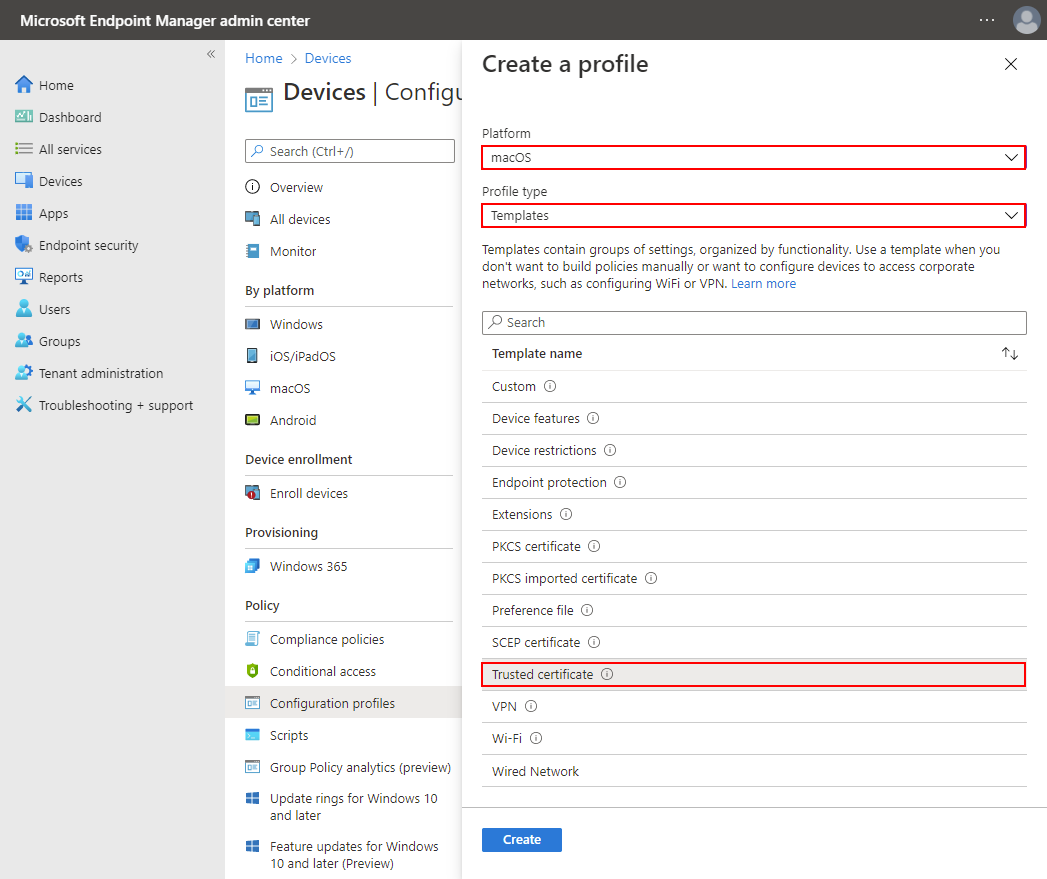
-
Click Create.
-
-
On the Basics tab of the Trusted certificate page, complete the following fields:
-
Name: Enter a name for the certificate.
-
Description: Optional. Enter a description for the certificate.
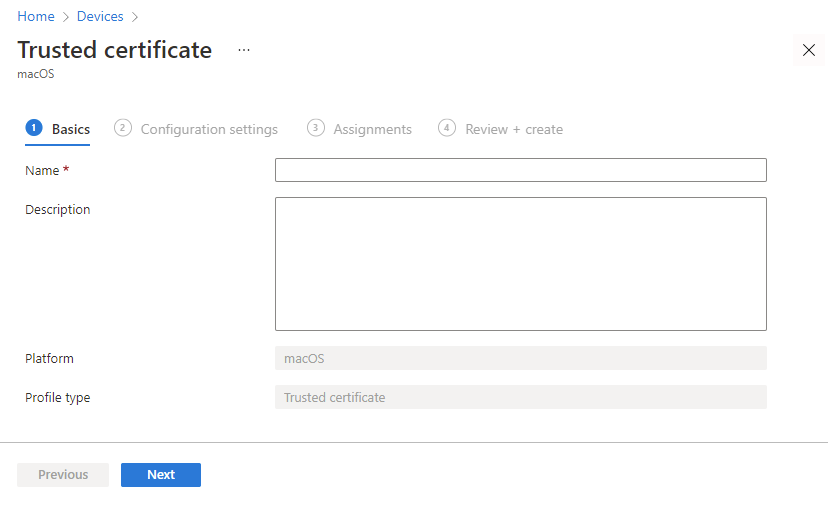
-
Click Next.
-
-
On the Configuration settings tab of the Trusted certificate page, select the following:
-
Certificate file: Select the x509 certificate (CER) file that you downloaded from Okta.
-
Destination store: Select Computer certificate store - Intermediate.
-
Click Next.
-
-
On the Assignments tab of the Trusted certificate page, select the following:
-
Included groups: Assign the trusted certificate profile to one or more user groups. The user groups must be the same as the groups where you're going to assign the SCEP profile.
Note:Make sure the user groups specified in both profiles are the same.
-
Click Next.
-
-
On the Applicability rules tab of the Trusted certificate page, configure any required rules and click Next.
-
On the Review + create tab of the Trusted certificate page, review the configuration and then click Create.
Create a SCEP profile in Microsoft Intune
-
In the Microsoft Intune admin center, go to Devices.
-
Click Configuration profiles.
-
Click + Create profile.
-
On the Create a profile page:
-
Platform: Select macOS .
-
Profile type: Select Templates.
-
Under the Template name section, click SCEP certificate.
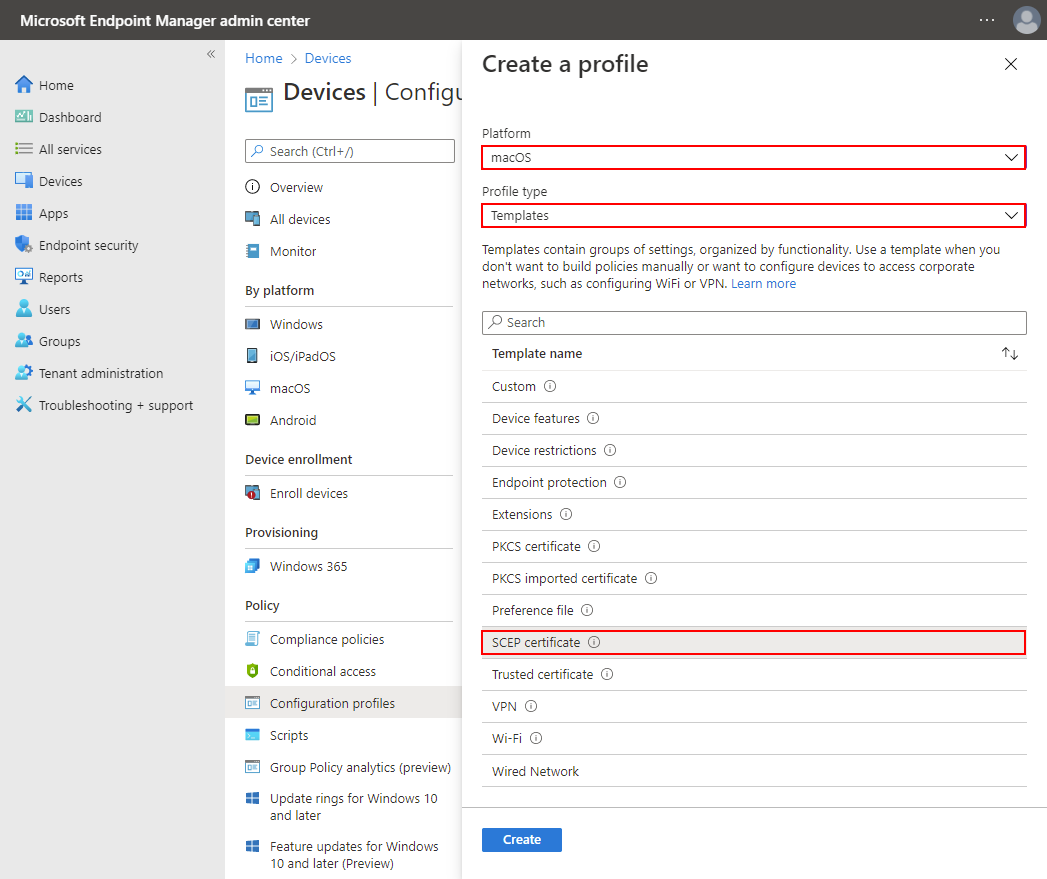
-
Click Create.
-
-
On the Basics tab of the SCEP certificate page, complete the following fields:
-
Name: Enter a name for the certificate.
-
Description: Optional. Enter a description for the certificate.
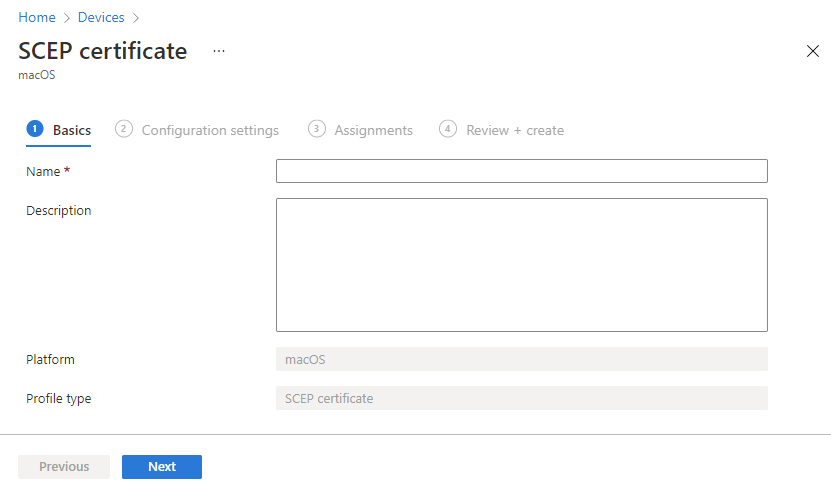
-
Click Next.
-
-
On the Configuration settings tab of the SCEP certificate page, complete the following fields:
-
Deployment Channel: Select how you want to deploy the profile. This setting also determines the keychain where the linked certificates are stored.
-
User Channel: Select this channel when setting up a SCEP certificate for endpoint management.
-
Device Channel: Select this channel when setting up a SCEP certificate for Device Access.
-
-
Certificate type: Select a certificate type, depending on how you plan to use the profile.
-
User: Select User when setting up a SCEP certificate for endpoint management.
-
Device: Use Device when setting up a SCEP certificate for Device Access.
-
-
Subject name format: Enter a subject name for the certificate. For example,
CN={{UserPrincipalName}},G={{GivenName}},SN={{SurName}}.Note:Okta has no specific format requirements for this field. You can use this field to indicate the certificate's purpose as a device management signal for Okta or use profile variables provided by Microsoft Intune.
For a list of supported variables, see Use SCEP certificate profiles with Microsoft Intune.
-
Certificate validity period: Select Years in the list, and then enter
1in the next field. -
Key usage: Select Digital signature.
-
Key size (bits): Select 2048.
-
Click + Root Certificate.
-
On the Root Certificate page, select the trusted certificate that you created in the previous task.
-
Click OK.
-
Under Extended key usage, set Predefined values to Client Authentication.
-
SCEP Server URLs: Enter the SCEP URL that you generated in Okta.
-
Allow all apps access to private key: Select Enable.

-
Click Next.
-
-
On the Assignments tab of the SCEP certificate page, assign the certificate to the same user groups to which you assigned the trusted certificate profile. Click Next.
Note:Make sure the user groups specified in both profiles are the same.
-
On the Review + create tab of the SCEP certificate page, review the configuration and then click Create.
Verify the certificate installation on your macOS devices
-
On a macOS device managed by Microsoft Intune, open one of the following keychain entries:
-
To verify an endpoint management certificate, open .
-
To verify a Device Access certificate, open .
-
-
Verify that a client certificate and the associated private key exist.
-
Make sure that the private key is accessible to all apps:
-
Double-click the private key.
-
Click the Access Control tab.
-
Select Allow all applications to access this item.
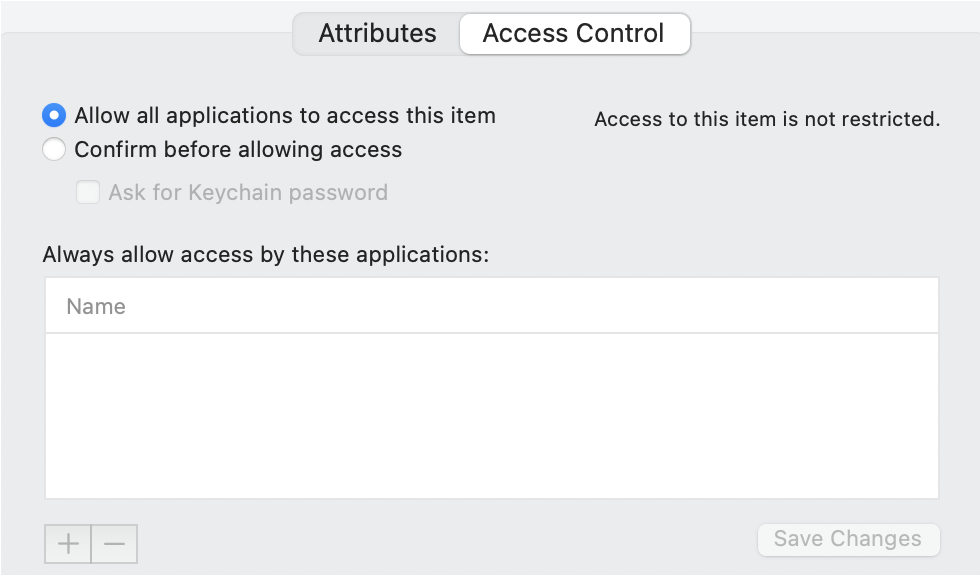
-
Click Save Changes.
-