Configure device configuration profiles for PSSO using Microsoft Intune
Desktop Password Sync for macOS uses Apple's Platform Single Sign-on (Platform SSO) feature to sync a user's local macOS account password with their Okta password.
This guide details how to configure and deploy Desktop Password Sync for macOS devices managed by Microsoft Intune.
Before you begin
-
Confirm that you have configured and deployed Device Access certificates to your macOS devices.
-
User devices must be running macOS 14 Sonoma or later.
-
Download the Okta Verify PKG file from the Okta Admin Console. See Download Okta Verify for macOS .
-
You must have access to a licensed Microsoft Intune environment.
Start this task
To set up the device configuration profiles for Platform Single Sign-on (Platform SSO) using Microsoft Intune, perform the following tasks in order:
Configure the Single Sign-On (SSO) profile
-
In your Microsoft Intune admin center, select Devices from the main navigation bar.
-
Go to .
-
Click Create, then select New Policy.
-
On the Create a profile pane, select the following options:
-
Platform:
macOS -
Profile type:
Settings catalog
-
-
Click Create.
-
Give the profile a name, for example,
Okta SSO Extension and Domains. Click Next. -
Click Add settings.
-
Enter
SSOin the Settings field and click Search. -
Select .
-
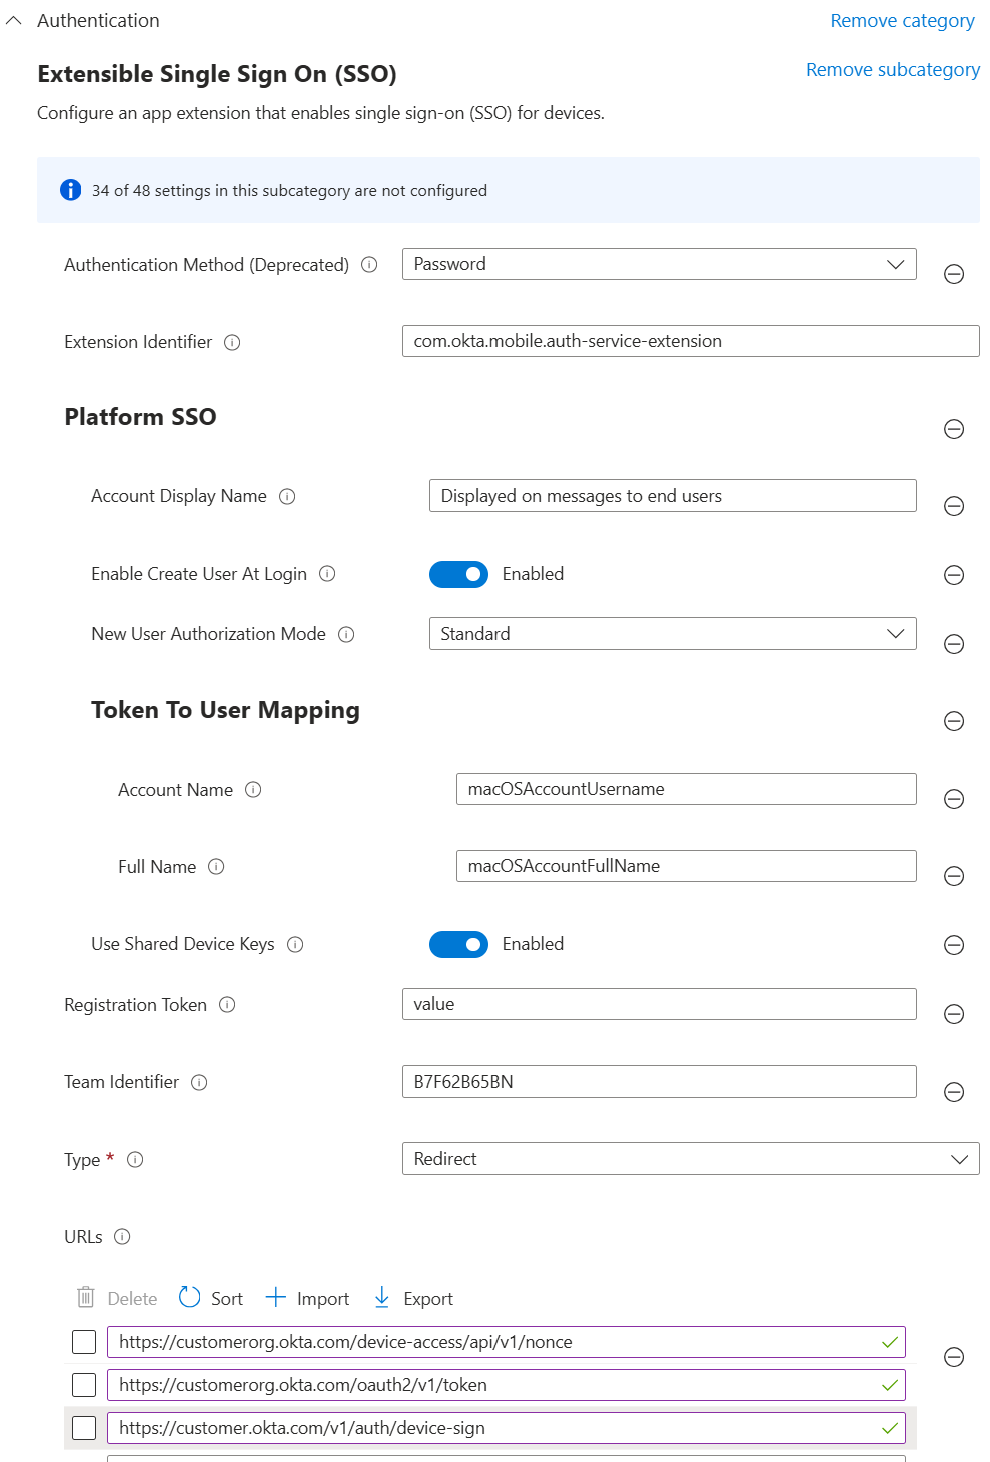
Configure the following options:
Setting
Value
Authentication Method
Password
Extension Identifier
com.okta.mobile.auth-service-extensionAccount Display Name
A display name for your Okta instance.
This value is used in notifications and authentication requests for the account.
This is set at a system level and not at a user-specific level.
Enable Create User At Login
Set this to Enabled.
This option is only needed for Just-In-Time Local Account Creation.
New User Authorization Mode
Select either Standard or Admin.
This option is only needed for Just-In-Time Local Account Creation.
Token To User Mapping: Account Name
macOSAccountUsernameThis option is only needed for Just-In-Time Local Account Creation.
Token To User Mapping: Full Name
macOSAccountFullNameThis option is only needed for Just-In-Time Local Account Creation.
Use Shared Device Keys
Enabled
Registration Token
This setting must be present, but you can enter any value in the field, as the created SCEP profile overrides this value.
Team Identifier
B7F62B65BNType
Redirect
URLs
Add the URLs for your Okta org, including the paths:
-
/device-access/api/v1/nonce -
/oauth2/v1/token -
/v1/auth/device-sign
For example:
-
https://customerorg.okta.com/device-access/api/v1/nonce -
https://customerorg.okta.com/oauth2/v1/token -
https://customerorg.okta.com/v1/auth/device-sign
-
Configure associated domains
-
Click Add settings to add another item to the profile you created in the previous step.
-
Enter
Associated Domainsin the Settings field and click Search. -
Select .
-
In the , click Edit instance.
-
Enter the following for the instance:
-
Application Identifier:
B7F62B65BN.com.okta.mobile.auth-service-extension -
Associated Domain: Enter
authsrv:followed by the URL of your Okta org. For example,authsrv:customerorg.okta.com -
Click Save.
-
-
Repeat for the other associated domain:
-
Application Identifier:
B7F62B65BN.com.okta.mobile -
Associated Domain: Enter
authsrv:followed by the URL of your Okta org. For example,authsrv:customerorg.okta.com -
Click Save.
-
-
Click Next.
-
Assign Scope tags if required and click Next.
-
Assign the proper users or groups and click Next.
-
Confirm all your settings on the Review + Create tab, and click Create.
Configure custom preference files
For Platform SSO to function, you need to create and deploy a preference file for each of the following preference domains:
-
com.okta.mobile -
com.okta.mobile.auth-service-extension -
com.okta.deviceaccess.servicedaemon: Optional. Only required for Device-Bound SSO. -
com.apple.preference.security: Optional. Only required to block password reset.
com.okta.mobile
Create and save a text file named com.okta.mobile with the following contents.
<key>OktaVerify.OrgUrl</key>
<string>https://customerorg.okta.com</string>
<key>OktaVerify.UserPrincipalName</key>
<string>{{mail}}</string>
Replace the following items with your specific org configuration:
-
https://customerorg.okta.comis the URL for your Okta org. -
{{mail}}is an optional value that's populated with the Okta username when the user registers for PSSO. If you don't specify a value, users have to enter their username when they sign in.
com.okta.mobile.auth-service-extension
Create and save a text file named com.okta.mobile.auth-service-extension with the following contents:
<key>OktaVerify.OrgUrl</key>
<string>https://customerorg.okta.com</string>
<key>OktaVerify.UserPrincipalName</key>
<string>{{mail}}</string>
<key>OktaVerify.PasswordSyncClientID</key>
<string>add-your-client-ID-here</string>
<key>PlatformSSO.ProtocolVersion</key>
<string>2.0</string>
Replace the following items with your specific org configuration:
-
https://customerorg.okta.comis the URL for your Okta org. -
{{mail}}is an optional value that's populated with the Okta username when the user registers for PSSO. If you don't specify a value, users have to enter their username when they sign in. -
add-your-client-ID-hereis the Client ID that you copied during the Platform SSO app creation.You can retrieve this value from the Authentication tab of the configured Platform Single Sign-on app for macOS .
com.okta.deviceaccess.servicedaemon
Create and save a text file named com.okta.deviceaccess.servicedaemon with the following contents.
<key>OktaJoinEnabled</key>
<true/>
This profile file is optional and is used for Device-Bound SSO. See Deploy Device-Bound SSO to user devices.
com.apple.preference.security
Create and save a text file named com.apple.preference.security with the following contents.
<key>dontAllowPasswordResetUI</key>
<true/>
This profile disables the ability to change the local account password.
As the password is synced with Okta, users shouldn't change their password locally. To change a password, users should change their Okta password and then sync it at the lock screen of the computer.
Create the custom preference profiles
-
In your Microsoft Intune admin center, select Devices from the main navigation bar.
-
Go to .
-
Click Create, then select New Policy.
-
On the Create a profile pane, select the following options:
-
Platform:
macOS -
Profile type:
Templates
-
-
In the lower pane, select Preference file and click Create.
-
Give the profile a name, for example,
com.okta.mobile. Click Next. -
For each preference domain that you want to configure, enter the name of the preference domain, for example
com.okta.mobile. -
Click the Browse folder icon and select the text file that matches that preference domain. Click Next.
-
Assign the proper users or groups and click Next.
-
Confirm all your settings on the Review + Create tab, and click Create.
Repeat the policy creation process for each of your preference domains.
Verify profile deployment
-
On the macOS device, open the System Settings app.
-
Go to .
-
Confirm that you see device management profiles for each of your preference domains.
Deploy Okta Verify
Finally, deploy the Okta Verify app to your enrolled macOS devices.
-
In the Admin Console, go to .
-
Scroll to the Okta Verify for macOS and click Download Latest.
-
Sign in to the Microsoft Intune admin center, and select Apps on the main navigation bar.
-
In the Overview tab, select macOS apps from the Manage apps by platform section.
-
Click Create.
-
In the Select app type pane, under Other app types, select macOS app (PKG).
-
Click Select.
-
In the Add app pane, click Select app package file.
-
In the App package file pane:
-
Click the Browse button and locate the macOS PKG that you downloaded from the Okta Admin Console. Click OK.
-
On the App information page, add the details for your app. Depending on the app that you chose, some of the values in this pane may be filled in automatically.
-
Update the details in this table for your deployment and click Next to continue.
-
You can optionally configure a pre-installation script and a post-install script to customize the app install. Click Next to continue.
-
Choose the minimum operating system required to install this app, for example, macOS 15 Sequoia.
-
You can use detection rules to choose how an app installation is detected on a managed macOS device. Click Next to continue.
-
Select your users and groups for this app installation. Click Next to continue.
-
Confirm all your settings on the Review + Create tab, and click Create.
-
Next step